 Nginx进程结构与核心模块初探
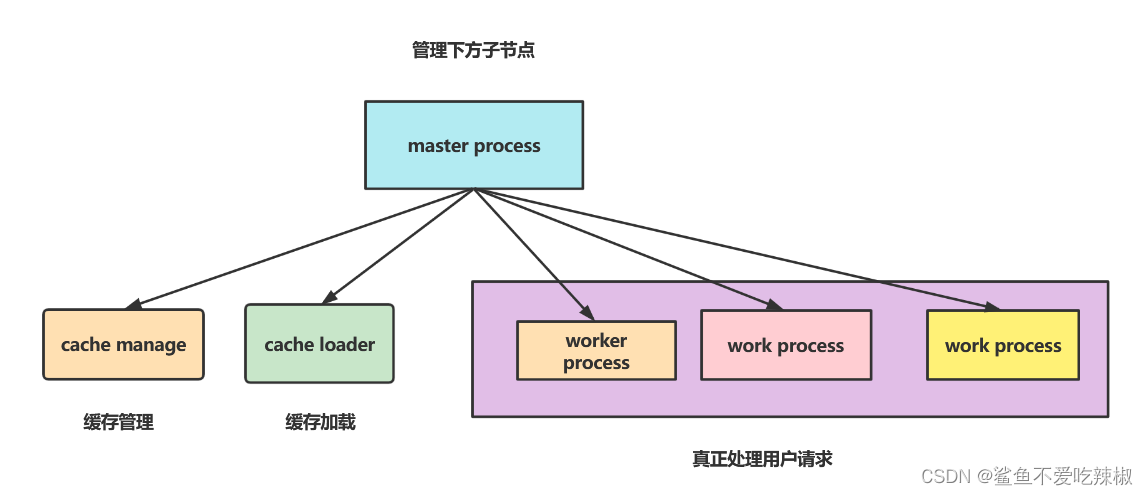
# nginx进程结构
nginx是多进程结构,并不是多线程结构,之所以这样设计的原因是因为多线程内存空间是共享的,一旦一个线程崩溃可能导致整个进程崩溃,所以nginx的设计者就将nginx设计为多进程结构。
# nginx与Linux进程管理
# Linux进程管理命令与参数
杀死进程的命令如下所示:
kill -数字或者字母(参考下表) pid
注意:kill后面需要跟一个参数,对应参数的数字含义如下,以笔者日常使用为例,基本使用-9。
1) SIGHUP 本信号在用户终端连接(正常或非正常)结束时发出, 通常是在终端的控制进程结束时, 通知同一session内的各个作业, 这时它们与控制终端不再关联.

2) SIGINT 程序终止(interrupt)信号, 在用户键入INTR字符(通常是Ctrl+C)时发出

3) SIGQUIT 和 SIGINT类似, 但由QUIT字符(通常是Ctrl+\)来控制. 进程在因收到 SIGQUIT 退出时会产生core文件, 在这个意义上类似于一个程序错误信号.

4) SIGILL 执行了非法指令. 通常是因为可执行文件本身出现错误, 或者试图执行数据段. 堆栈溢出时也有可能产生这个信号.

5) SIGTRAP 由断点指令或其它trap指令产生. 由debugger使用.

6) SIGABRT 程序自己发现错误并调用abort时产生.

6) SIGIOT 在PDP-11上由iot指令产生, 在其它机器上和SIGABRT一样.

7) SIGBUS 非法地址, 包括内存地址对齐(alignment)出错. eg: 访问一个四个字长的整数, 但其地址不是4的倍数.

8) SIGFPE 在发生致命的算术运算错误时发出. 不仅包括浮点运算错误, 还包括溢出及除数为0等其它所有的算术的错误.

9) SIGKILL 用来立即结束程序的运行. 本信号不能被阻塞, 处理和忽略.

10) SIGUSR1 留给用户使用

11) SIGSEGV 试图访问未分配给自己的内存, 或试图往没有写权限的内存地址写数据.

12) SIGUSR2 留给用户使用

13) SIGPIPE Broken pipe

14) SIGALRM 时钟定时信号, 计算的是实际的时间或时钟时间. alarm函数使用该信号.

15) SIGTERM 程序结束(terminate)信号, 与SIGKILL不同的是该信号可以被阻塞和处理. 通常用来要求程序自己正常退出. shell命令kill缺省产生这个信号.

17) SIGCHLD 子进程结束时, 父进程会收到这个信号.

18) SIGCONT 让一个停止(stopped)的进程继续执行. 本信号不能被阻塞. 可以用一个handler来让程序在由stopped状态变为继续执行时完成特定的工作. 例如, 重新显示提示符

19) SIGSTOP 停止(stopped)进程的执行. 注意它和terminate以及interrupt的区别:该进程还未结束, 只是暂停执行. 本信号不能被阻塞, 处理或忽略.

20) SIGTSTP 停止进程的运行, 但该信号可以被处理和忽略. 用户键入SUSP字符时(通常是Ctrl+Z)发出这个信号

21) SIGTTIN 当后台作业要从用户终端读数据时, 该作业中的所有进程会收到SIGTTIN信号. 缺省时这些进程会停止执行.

22) SIGTTOU 类似于SIGTTIN, 但在写终端(或修改终端模式)时收到.

23) SIGURG 有"紧急"数据或out-of-band数据到达socket时产生.

24) SIGXCPU 超过CPU时间资源限制. 这个限制可以由getrlimit/setrlimit来读取/改变

25) SIGXFSZ 超过文件大小资源限制.

26) SIGVTALRM 虚拟时钟信号. 类似于SIGALRM, 但是计算的是该进程占用的CPU时间.

27) SIGPROF 类似于SIGALRM/SIGVTALRM, 但包括该进程用的CPU时间以及系统调用的时间.

28) SIGWINCH 窗口大小改变时发出.

29) SIGIO 文件描述符准备就绪, 可以开始进行输入/输出操作.

30) SIGPWR Power failure
2
3
4
5
6
7
8
9
10
11
12
13
14
15
16
17
18
19
20
21
22
23
24
25
26
27
28
29
30
31
32
33
34
35
36
37
38
39
40
41
42
43
44
45
46
47
48
49
50
51
52
53
54
55
56
57
58
59
# 实践-修改nginx进程数
# 直接操作worker进程(不推荐,略)
# 用master管理nginx进程
我们的nginx.conf的worker_processes 为1,我们希望修改后通过master让其重新加载配置,首先我们需要键入如下命令确认worker进程数,可以看到当前只有1个worker进程
[root@localhost conf]# ps -ef |grep nginx |grep -v grep
root     27871     1  0 7月16 ?       00:00:00 nginx: master process /usr/local/nginx/sbin/nginx
root     30259 27871  0 13:41 ?        00:00:00 nginx: worker process
2
3
随后我们使用vim修改 worker_processes 1; 改为 worker_processes auto;
[root@localhost conf]# vim nginx.conf
2
利用master将其重启
[root@localhost conf]# kill -1 27871
再次查看nginx进程数就会发现,worker值和CPU核心数一样。
[root@localhost conf]# ps -ef |grep nginx |grep -v grep
root     27871     1  0 7月16 ?       00:00:00 nginx: master process /usr/local/nginx/sbin/nginx
root     30259 27871  0 13:41 ?        00:00:00 nginx: worker process
root     30260 27871  0 13:41 ?        00:00:00 nginx: worker process
root     30261 27871  0 13:41 ?        00:00:00 nginx: worker process
root     30262 27871  0 13:41 ?        00:00:00 nginx: worker process
2
3
4
5
6
# 用命令行管理nginx进程
同样的我们也可以使用命令行来管理nginx进程,这种方式其实更加常用,我们将worker_processes 还原为1,使用nginx -s reload可完成nginx配置重载,起到和signup同样的作用(实际上底层也是通过master完成配置重载)。
可以看到修改前 worker进程数为4。
[root@localhost conf]# ps -ef |grep nginx |grep -v grep
root     27871     1  0 7月16 ?       00:00:00 nginx: master process /usr/local/nginx/sbin/nginx
root     30259 27871  0 13:41 ?        00:00:00 nginx: worker process
root     30260 27871  0 13:41 ?        00:00:00 nginx: worker process
root     30261 27871  0 13:41 ?        00:00:00 nginx: worker process
root     30262 27871  0 13:41 ?        00:00:00 nginx: worker process
2
3
4
5
6
7
8
将worker process改为1,并用nginx命令重载
[root@localhost conf]# vim nginx.conf
[root@localhost conf]# ../sbin/nginx -s reload
2
3
4
再次使用grep查看,可以看到配置生效了。
[root@localhost conf]# ps -ef |grep nginx |grep -v grep
root     27871     1  0 7月16 ?       00:00:00 nginx: master process /usr/local/nginx/sbin/nginx
root     30494 27871  0 13:46 ?        00:00:00 nginx: worker process
2
3
4
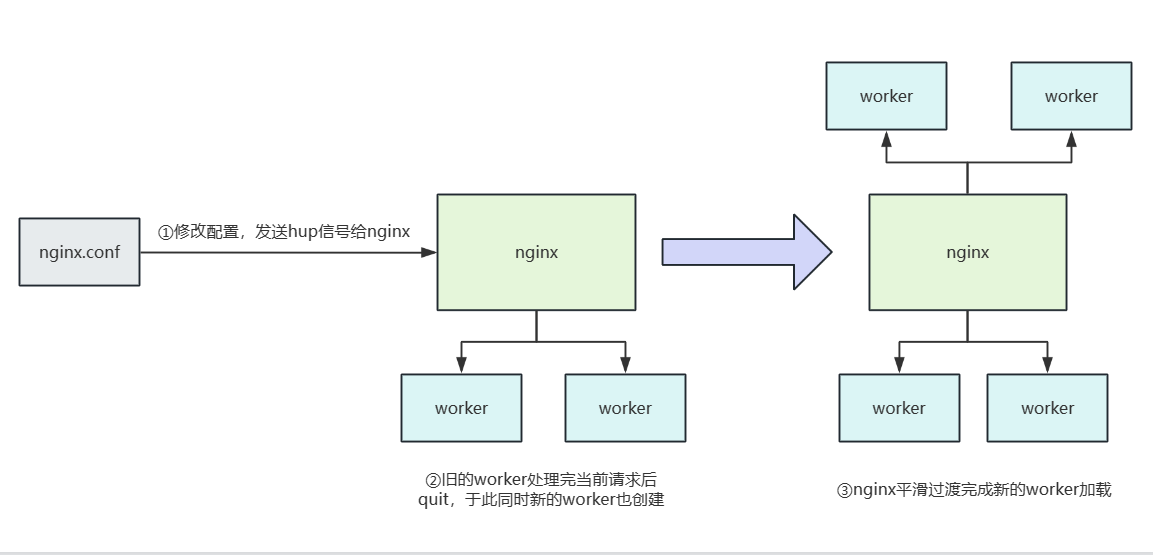
# nginx配置重载
# 配置文件重载的原理
- 修改nginx.conf,向master发送hup或者reload信号,通知配置重载。
- master检查语法配置是否正确。
- master打开监听端口。
- 创建新的worker进程
- 向旧的worker发出QUIT信号
- 旧的worker关闭监听句柄,处理完手头的请求退出,新的worker处理新的请求。
# 演示nginx热部署加载新配置
步骤以及工作过程
- 将旧的nginx换成新的nginx文件
- 将master发送usr2信号
- master修改pid文件,原本的pid文件后缀变为oldbin
- master用新的nginx文件启动nginx进程
- 向旧的master进程发送winch信号,旧的worker进程退出
- 若需要回滚,则向旧的master发送HUP,将新的master杀死
首先备份nginx配置文件。
[root@localhost sbin]# cp nginx nginx.bak
[root@localhost sbin]# ll
总用量 6848
-rwxr-xr-x. 1 root root 3503640 4月  21 11:24 nginx
-rwxr-xr-x. 1 root root 3503640 7月  17 14:00 nginx.bak
2
3
4
5
6
查看nginx进程,确定此时的worker数为1。
[root@localhost sbin]# ps -ef |grep nginx |grep -v grep
root     27871     1  0 7月16 ?       00:00:00 nginx: master process /usr/local/nginx/sbin/nginx
root     30494 27871  0 13:46 ?        00:00:00 nginx: worker process
2
3
使用SIGUSR2 保留旧的nginx进程启动新的nginx进程,如下所示,可以看到有启动了几个新的worker,而旧的worker还没有消失。
[root@localhost sbin]# kill -s SIGUSR2 27871
[root@localhost sbin]# ps -ef |grep nginx |grep -v grep
root     27871     1  0 7月16 ?       00:00:00 nginx: master process /usr/local/nginx/sbin/nginx
root     30494 27871  0 13:46 ?        00:00:00 nginx: worker process
root     31350 27871  0 14:03 ?        00:00:00 nginx: master process /usr/local/nginx/sbin/nginx
root     31351 31350  0 14:03 ?        00:00:00 nginx: worker process
2
3
4
5
6
此时查看log目录,可以看到27871这个旧的进程的pid文件后缀变为oldbin,查看这个文件可以定位到旧的worker进程pid。
[root@localhost sbin]# cat ../logs/nginx.pid.oldbin
27871
2
向旧的master进程发送winch信号,旧的worker进程退出
[root@localhost sbin]# kill -s SIGWINCH 27871
[root@localhost sbin]# ps -ef |grep nginx |grep -v grep
root     27871     1  0 7月16 ?       00:00:00 nginx: master process /usr/local/nginx/sbin/nginx
root     31350 27871  0 14:03 ?        00:00:00 nginx: master process /usr/local/nginx/sbin/nginx
root     31351 31350  0 14:03 ?        00:00:00 nginx: worker process
2
3
4
5
6
基于这个值,我们可以杀死旧的master的子进程
[root@localhost sbin]# kill -s SIGQUIT 27871
[root@localhost sbin]# ps -ef |grep nginx |grep -v grep
root     31350     1  0 14:03 ?        00:00:00 nginx: master process /usr/local/nginx/sbin/nginx
root     31351 31350  0 14:03 ?        00:00:00 nginx: worker process
2
3
4
5
# 演示nginx进程回滚
首先我们查看nginx进程,确定worker数量。
[root@localhost sbin]# ps -ef |grep nginx |grep -v grep
root     31350     1  0 14:03 ?        00:00:00 nginx: master process /usr/local/nginx/sbin/nginx
root     31351 31350  0 14:03 ?        00:00:00 nginx: worker process
2
3
4
佳玉下面这段命令演示用户定义信号2加载新配置过程
[root@localhost sbin]# kill -s SIGUSR2 31350
2
可以看到加载了新的worker
[root@localhost sbin]# ps -ef |grep nginx |grep -v grep
root     31350     1  0 14:03 ?        00:00:00 nginx: master process /usr/local/nginx/sbin/nginx
root     31351 31350  0 14:03 ?        00:00:00 nginx: worker process
root     31822 31350  0 14:13 ?        00:00:00 nginx: master process /usr/local/nginx/sbin/nginx
root     31823 31822  0 14:13 ?        00:00:00 nginx: worker process
2
3
4
5
6
此时发现新的进程有问题,我们只需hup旧的worker,退出新的worker进程即可。
[root@localhost sbin]# kill -s SIGHUP 31350
[root@localhost sbin]# kill -s SIGQUIT 31822
2
3
可以看到新的master就被杀死了
[root@localhost sbin]# ps -ef |grep nginx |grep -v grep
root     31350     1  0 14:03 ?        00:00:00 nginx: master process /usr/local/nginx/sbin/nginx
root     31351 31350  0 14:03 ?        00:00:00 nginx: worker process
root     31856 31350  0 14:13 ?        00:00:00 nginx: worker process
2
3
4
5
6
# nginx模块化设计
nginx常见和核心模块和第三方模块如下:
- 核心模块:核心模块是 Nginx 服务器正常运行必不可少的模块,提供错误日志记录、配置文件解析、事件驱动机制、进程管理等核心功能。
- 标准 HTTP 模块:标准 HTTP 模块提供 HTTP 协议解析相关的功能,如:端口配置、网页编码设置、HTTP 响应头设置等。
- 可选 HTTP 模块:可选 HTTP 模块主要用于扩展标准的 HTTP 功能,让 Nginx 能处理一些特殊的服务,如:Flash 多媒体传输、解析 GeoIP 请求、SSL 支持等。
- 邮件服务模块:邮件服务模块主要用于支持 Nginx 的邮件服务,包括对 POP3 协议、IMAP 协议和 SMTP 协议的支持。
- 第三方模块:第三方模块是为了扩展 Nginx 服务器应用,完成开发者自定义功能,如:Json 支持、Lua 支持等。

# nginx编译安装配置参数
# 简介
在正式演示nginx编译配置之前,我们先来了解一下nginx那些常见的编译参数。
--prefix:指定安装的目录。--user:运行nginx的worker子进程的所属主。--group:运行nginx的worker子进程的所属组。--pid-path:存放进程运行pid文件的路径。--conf-path:配置文件nginx.conf的存放路径。--error-log-path:错误日志error.log的存放路径。--http-log-path:访问日志access.log的存放路径。--with-pcre:pcre库的存放路径,正则表达式会用到。--with-zlib:zlib库的存放路径,gzip模块会用到。
# 自定义安装nginx
根据上文参数我们可以自定义这样一条命令:
- 指定安装目录为
/usr/nginx。 - 指令配置文件目录为:
/usr/nginx/conf/nginx.conf。 - 指定用户和group为root。
- 指定pid目录为
/usr/nginx/pid/nginx.pid。 - 错误日志文件目录为
/usr/nginx/error/error.log。 - 导入http_ssl_module 、http_image_filter_module 等模块。
- 指定日志目录为
/usr/nginx/logs/access.log。
./configure --prefix=/usr/nginx --conf-path=/usr/nginx/conf/nginx.conf --user=root --group=root --pid-path=/usr/nginx/pid/nginx.pid --error-log-path=/usr/nginx/error/error.log --with-http_ssl_module --with-http_image_filter_module --http-log-path=/usr/nginx/logs/access.log
2
如果报了下面的问题,我们可以用yum命令手动安装gd和gd-devel解决
./configure: error: the HTTP image filter module requires the GD library.
You can either do not enable the module or install the libraries.

[root@localhost nginx-1.10.2]# yum -y install gd gd-devel
2
3
4
5
6
完成这些步骤后,在使用make进行编译
make
最后再使用make install完成安装
make install
测试,可以看到上文指定user为user,所以启动的时候是以该用户启动的
/usr/nginx/sbin/nginx
[root@localhost nginx-1.10.2]# ps -ef |grep nginx
root      15244      1  0 15:15 ?        00:00:00 nginx: master process /usr/nginx/sbin/nginx
zhangsh+  15245  15244  0 15:15 ?        00:00:00 nginx: worker process
root      15251   3035  0 15:15 pts/1    00:00:00 grep --color=auto nginx
2
3
4
5
6
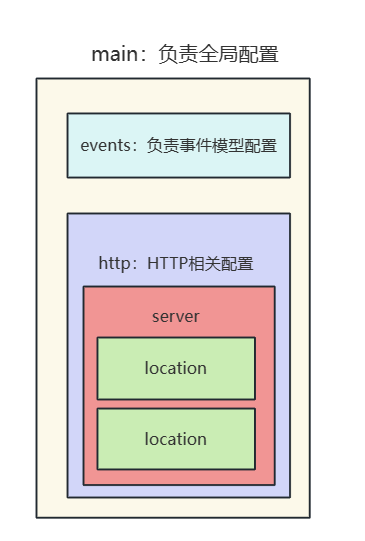
# nginx文件配置结构
nginx文件配置结构生效范围自外向里结构如下图所示,可以看到main负责全局配置,而events负责事件模型的配置,最常用的http模块层次如下。
# 虚拟主机分类
# 分类
- 基于多ip的虚拟主机
- 基于多端口的虚拟主机
- 基于多域名的虚拟主机
# 基于多网卡虚拟主机实现
查看本机所有ip,可以看到ens33和virbr0这两个ip我们就用这个做实验
[root@localhost server2]# ifconfig
ens33: flags=4163<UP,BROADCAST,RUNNING,MULTICAST>  mtu 1500
        inet 192.168.43.99  netmask 255.255.255.0  broadcast 192.168.43.255
		略


virbr0: flags=4099<UP,BROADCAST,MULTICAST>  mtu 1500
        inet 192.168.122.1  netmask 255.255.255.0  broadcast 192.168.122.255
		略
2
3
4
5
6
7
8
9
10
虚拟主机ens33和virbr0配置如下,读者可参考注释自行阅读:
 server {
 	# 对ens33网卡的8081端口作监听
        listen       192.168.43.99:8081;
        server_name  localhost;


        location / {
        # 默认目录地址在nginx的html文件夹下的server1文件夹,所以我们必须创建这样一个文件夹并编写一个index.html
            root   html/server1;
            index  index.html index.htm;
        }


        error_page   500 502 503 504  /50x.html;
        location = /50x.html {
            root   html;
        }


    }

	# 对virbr0网卡的8081端口作监听
         server {
        listen       192.168.122.1:8081;
        server_name  localhost;


        location / {
            root   html/server2;
            index  index.html index.htm;
        }


        error_page   500 502 503 504  /50x.html;
        location = /50x.html {
            root   html;
        }


    }
2
3
4
5
6
7
8
9
10
11
12
13
14
15
16
17
18
19
20
21
22
23
24
25
26
27
28
29
30
31
32
33
34
35
36
37
38
39
40
41
42
43
实验
[root@localhost server2]# curl 192.168.43.99:8081
this is server1

[root@localhost server2]# curl 192.168.122.1:8081
this is server 2
2
3
4
5
6
# 基于端口的虚拟主机实现
配置如下可以看到,这里的listen只配置端口号
server {
		# 监听8001端口响应 html/server1
        listen       8081;
        server_name  localhost;


        location / {
            root   html/server1;
            index  index.html index.htm;
        }


        error_page   500 502 503 504  /50x.html;
        location = /50x.html {
            root   html;
        }


    }


		# 监听8002端口响应 html/server2
         server {
        listen       8082;
        server_name  localhost;


        location / {
            root   html/server2;
            index  index.html index.htm;
        }


        error_page   500 502 503 504  /50x.html;
        location = /50x.html {
            root   html;
        }

}
2
3
4
5
6
7
8
9
10
11
12
13
14
15
16
17
18
19
20
21
22
23
24
25
26
27
28
29
30
31
32
33
34
35
36
37
38
39
40
41
42
实验结果可以看出这样的配置无论使用哪个ip,只要使用配置的端口,就会看到监听端口对应location 的页面
[root@localhost html]# curl 192.168.43.99:8081
this is server1

[root@localhost html]# curl 192.168.43.99:8082
this is server 2

[root@localhost html]# curl 192.168.122.1:8081
this is server1

[root@localhost html]# curl 192.168.122.1:8082
this is server 2
2
3
4
5
6
7
8
9
10
11
12
# 基于域名的虚拟主机实现
为了方便演示我们需要编写一下服务器的hosts文件,保证它可以解析到我们的自定义ip
vim /etc/hosts
增加如下两行数据
127.0.0.1   localhost localhost.localdomain localhost4 localhost4.localdomain4
::1         localhost localhost.localdomain localhost6 localhost6.localdomain6
192.168.43.99 www.test.com
192.168.122.1 www.test2.com
2
3
4
5
nginx.conf配置,可以看到我们针对上面的两端域名分别做出不同的响应网页
 server {
        listen       8081;
        server_name  www.test.com;


        location / {
            root   html/server1;
            index  index.html index.htm;
        }


        error_page   500 502 503 504  /50x.html;
        location = /50x.html {
            root   html;
        }


    }


         server {
        listen       8081;
        server_name  www.test2.com;


        location / {
            root   html/server2;
            index  index.html index.htm;
        }


        error_page   500 502 503 504  /50x.html;
        location = /50x.html {
            root   html;
        }


    }
2
3
4
5
6
7
8
9
10
11
12
13
14
15
16
17
18
19
20
21
22
23
24
25
26
27
28
29
30
31
32
33
34
35
36
37
38
39
40
41
42
43
测试结果可以看出我们不同域名到达对应的网页都是不一样的
[root@localhost html]# curl www.test.com:8081
this is server1

[root@localhost html]# curl www.test2.com:8081
this is server 2
2
3
4
5
6
# 参考文献
Linux下signal信号汇总:https://www.cnblogs.com/frisk/p/11602973.html (opens new window)
Nginx配置文件结构:http://t.csdn.cn/Go7KM (opens new window)
Nginx及其架构设计 :https://www.cnblogs.com/Soy-technology/p/11355597.html#_label1 (opens new window)
