 硬核复刻redis底层双向链表核心实现
# 写在文章开头
之前的几篇文章介绍了笔者复刻redis的基础架构搭建与核心模块实现,从这篇文章开始,笔者就会介绍redis核心数据结构与操作指令的复刻过程,而本文,笔者将介绍一下笔者的开源项目mini-redis中对于链表的复刻思路,希望对你阅读我们的项目源码有所帮助。
Hi,我是 sharkChili ,是个不断在硬核技术上作死的技术人,是 CSDN的博客专家 ,也是开源项目 Java Guide 的维护者之一,熟悉 Java 也会一点 Go ,偶尔也会在 C源码 边缘徘徊。写过很多有意思的技术博客,也还在研究并输出技术的路上,希望我的文章对你有帮助,非常欢迎你关注我的公众号: 写代码的SharkChili 。
因为近期收到很多读者的私信,所以也专门创建了一个交流群,感兴趣的读者可以通过上方的公众号获取笔者的联系方式完成好友添加,点击备注 “加群” 即可和笔者和笔者的朋友们进行深入交流。

# 逐步拆解与复刻redis双向链表
# 构建双向链表基架
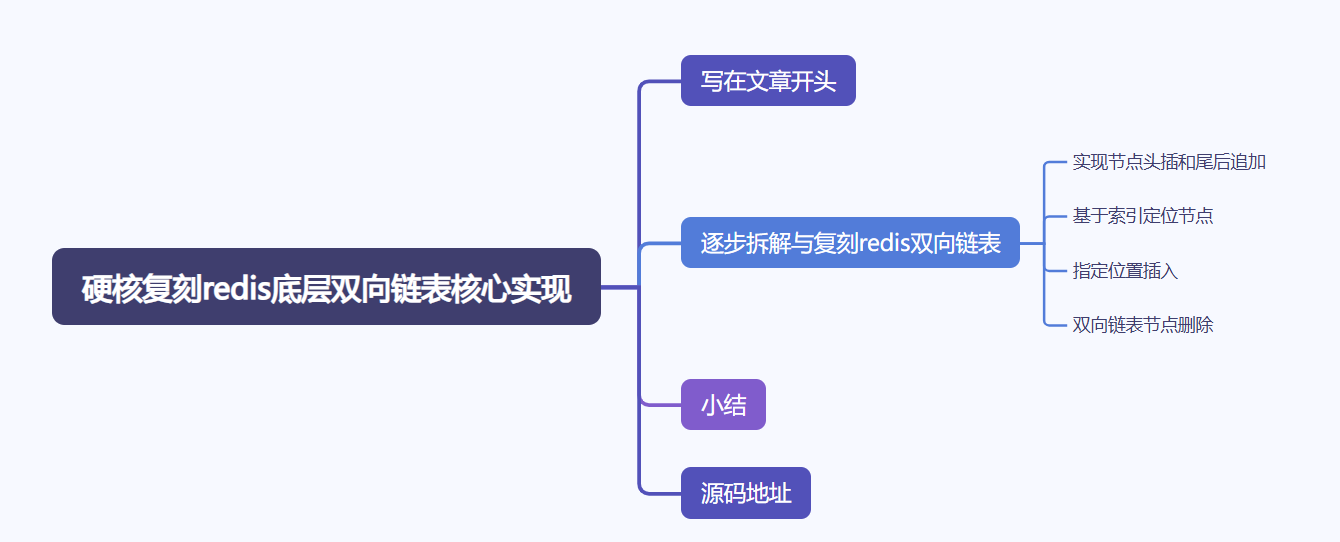
redis中双向链表的节点都是由如下3个元素构成:
- 指向前驱节点的指针
prev。 - 指向后继节点的指针
next。 - 指向当前节点值的指针
value。
所以笔者对于双向链表节点的结构体的定义也按照这套定义复刻:
// Definition of the listNode structure for a doubly linked list
type listNode struct {
	//Node pointing to the previous node of the current node.
	prev *listNode
	//Node pointing to the successor node of the current node.
	next *listNode
	//Record information about the value stored in the current node.
	value *interface{}
}
2
3
4
5
6
7
8
9
10
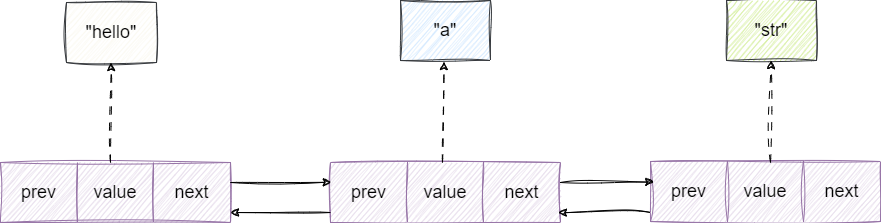
因为是双向链表,这意味着链表可以从前或者从后进行链表操作,所以双向链表就必须具备如下3个构成部分:
- 指向链表第一个节点的
head指针。 - 指向链表最后一个节点的
tail指针。 - 维护链表长度的字段
len。
于是我们基于这个思路,再次给出链表的结构体定义:
type list struct {
	//Points to the first node of the doubly linked list
	head *listNode
	//points to the last node of the linked list.
	tail *listNode
	//Record the current length of the doubly linked list
	len int64
}
2
3
4
5
6
7
8
了解了基础的结构定义,我们就可以编写双向链表初始化的函数listCreate,和redis初始化步骤基本一致,笔者同样是按照:结构体内存空间分配、头尾指针初始化、长度设置为0,然后返回这个双向链表结构体指针的步骤进行操作:
func listCreate() *list {
	//Allocate memory space for the doubly linked list
	var l *list
	l = new(list)

	//Initialize the head and tail pointers.
	l.head = nil
	l.tail = nil

	//Initialize the length to 0, indicating that the current linked list has no nodes
	l.len = 0

	return l
}
2
3
4
5
6
7
8
9
10
11
12
13
14
# 实现节点头插和尾后追加
此时,我们就可以实现mini-redis中双向链表的第一个操作——头插法,该操作就是将新插入的节点作为链表的头节点,该操作的步骤比较明确:
- 新节点指向原有头节点。
- 原有头节点的前驱指针指向新节点。
- 将
head指针指向新节点,完成节点头插。
完成这些操作之后,维护一下链表长度信息:

基于上述思路笔者给出对应的实现,和原生redis的函数和入参基本一致,传入需要操作的链表和value值之后,将value封装为节点,结合上述的思路将其设置为链表头节点:
func listAddNodeHead(l *list, value *interface{}) *list {
	//Allocate memory for a new node and set its value.
	var node *listNode
	node = new(listNode)
	node.value = value
	//If the length is 0, then both the head and tail pointers point to the new node.
	if l.len == 0 {
		l.head = node
		l.tail = node
	} else {
		//Make the original head node the successor node of the new node, node.
		node.prev = nil
		node.next = l.head
		l.head.prev = node
		l.head = node
	}
	//Maintain the information about the length of the linked list.
	l.len++
	return l
}
2
3
4
5
6
7
8
9
10
11
12
13
14
15
16
17
18
19
20
与之同理的还有尾插法,无论入参和操作步骤基本一致,唯一区别就是将节点追加到链表末端作为尾节点,读者可以参考笔者的的实现和注释了解操作细节:
func listAddNodeTail(l *list, value *interface{}) *list {
	//Allocate memory for a new node and set its value.
	var node *listNode
	node = new(listNode)
	node.value = value
	//If the length is 0, then both the head and tail pointers point to the new node.
	if l.len == 0 {
		l.head = node
		l.tail = node
	} else {
		//Append the newly added node after the tail node to become the new tail node.
		node.prev = l.tail
		node.next = nil
		l.tail.next = node
		l.tail = node
	}
	//Maintain the information about the length of the linked list.
	l.len++
	return l

}
2
3
4
5
6
7
8
9
10
11
12
13
14
15
16
17
18
19
20
21
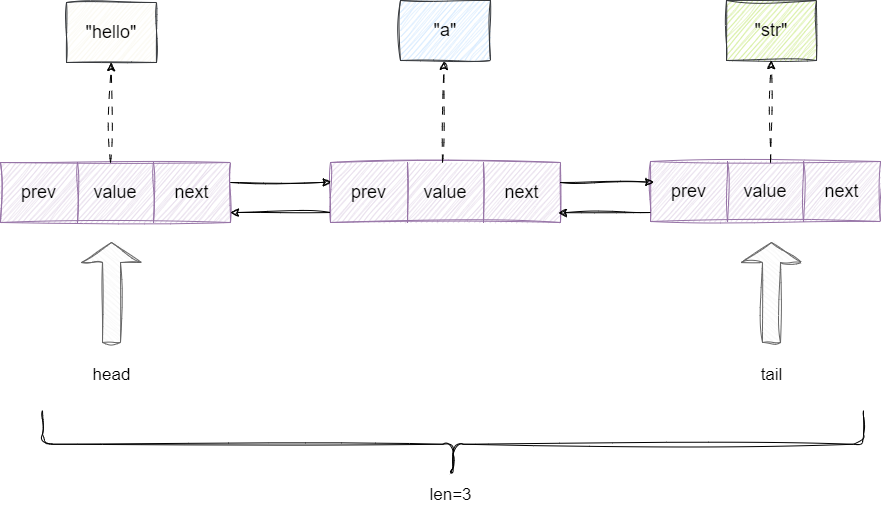
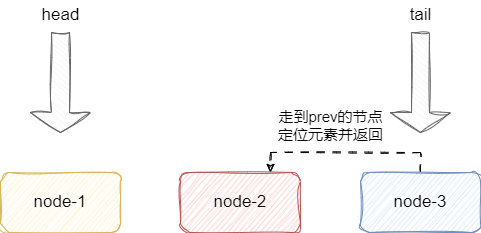
# 基于索引定位节点
双向链表支持基于索引的方式查询,例如我们希望查询索引2节点的值,传入index为2,双向链表就会基于索引2这个值跳越两次来到目标节点并返回:
假如我们传入负数,例如负数2,按照语义就是返回倒数第2个节点,双向链表会按照公式(-index)-1得到值1,然后从尾节点跳1步找到目标节点并返回:
对此我们给出相应的源码实现,整体思路和上述说明一致,读者可参考源码和注释了解细节:
func listIndex(l *list, index int64) *listNode {
	var n *listNode
	//"If less than 0, calculate the index value as a positive number n,
	//then continuously jump to the node pointed to by prev based on this positive number n.
	if index < 0 {
		index = (-index) - 1
		n = l.tail

		for index > 0 && n != nil {
			n = n.prev
			index--
		}
	} else {
		//Conversely, walk n steps from the front and reach the target node via next, then return.
		n = l.head
		for index > 0 && n != nil {
			n = n.next
			index--
		}
	}

	return n
}
2
3
4
5
6
7
8
9
10
11
12
13
14
15
16
17
18
19
20
21
22
23
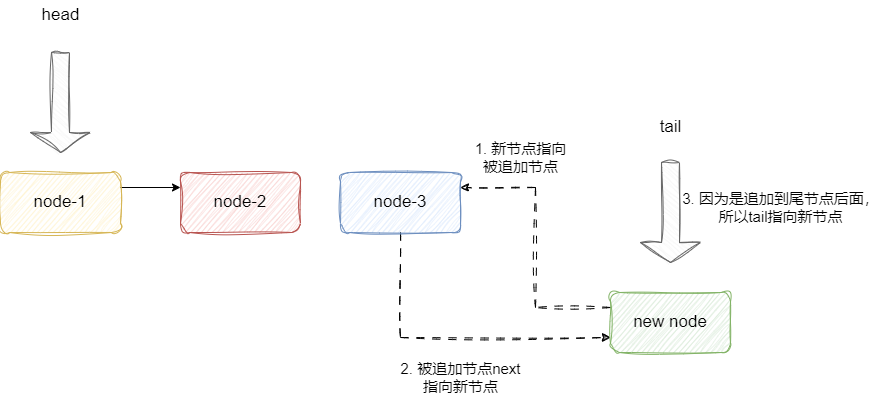
# 指定位置插入
双向链表支持在指定元素的前面或者后面插入元素,我们以元素后插入为例,双向链表会将新节点追加到原有节点后面并维护前驱后继指针的信息,插入到指定节点的前方也是同理:
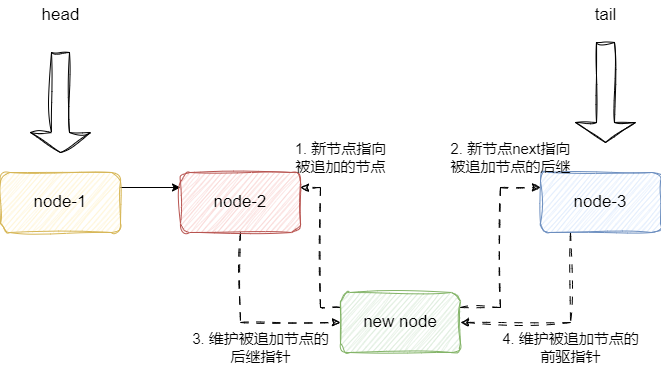
唯一需要注意的就是如果新节点追加到尾节点后面,我们需要将tail指向新节点。追加到头节点同理,我们需要将head指针指向新节点:
对此我们给出listInsertNode的源码实现,读者可参阅思路并结合注释了解实现细节:
func listInsertNode(l *list, old_node *listNode, value *interface{}, after bool) *list {
	//Allocate memory for a new node and set its value.
	var node *listNode
	node = new(listNode)
	node.value = value
	//If after is true, insert the new node after the old node.
	if after {
		node.prev = old_node
		node.next = old_node.next
		//If the old node was originally the tail node, after the modification,
		//make the node the new tail node.
		if l.tail == old_node {
			l.tail = node
		}
	} else {
		//Add the new node before the old node.
		node.next = old_node
		node.prev = old_node.prev
		//If the original node is the head, then set the new node as the head
		if l.head == old_node {
			l.head = node

		}
	}
	//If the node's predecessor node is not empty, then point the predecessor to the node.
	if node.prev != nil {
		node.prev.next = node
	}
	//If the node's successor node is not empty, make this successor point to the node.
	if node.next != nil {
		node.next.prev = node
	}
	//Maintain the information about the length of the linked list.
	l.len++
	return l

}
2
3
4
5
6
7
8
9
10
11
12
13
14
15
16
17
18
19
20
21
22
23
24
25
26
27
28
29
30
31
32
33
34
35
36
37
# 双向链表节点删除
节点删除则比较简单,传入要被删除的节点指针,让被删除节点d的前驱节点指向d的后继节点,同时让d的后继指向d的前驱:
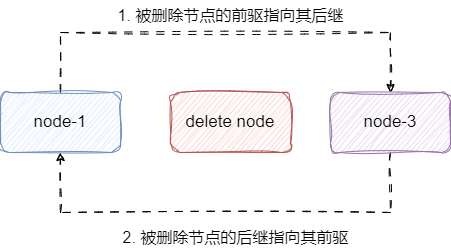
唯一需要注意的就是以下两种情况:
- 删除的是头节点,则让
head指向头节点的后面一个节点。 - 删除的是尾节点,则让
tail指向尾节点的前一个节点。
最后我们断掉被删除节点的前后继指针指向,让go语言垃圾回收自动帮我们完成节点删除即可,这里我们也给出相应的源码实现:
func listDelNode(l *list, node *listNode) {
	//If the predecessor node is not empty,
	//then the predecessor node's next points to the successor node of the node being deleted
	if node.prev != nil {
		node.prev.next = node.next
	} else {
		//If the deleted node is the head node, set the head to point to the next node.
		l.head = node.next
	}

	//If next is not empty, then let next point to the node before the deleted node
	if node.next != nil {
		node.next.prev = node.prev
	} else {
		//If the deleted node is the tail node, make
		//the node before the deleted node the new tail node.
		l.tail = node.prev
	}
	//help gc
	node.prev = nil
	node.next = nil

	l.len--

}
2
3
4
5
6
7
8
9
10
11
12
13
14
15
16
17
18
19
20
21
22
23
24
25
# 小结
自此笔者逐步从结构定义到函数操作一步一步的带读者诠释了笔者复刻redis底层双向链表的步骤,希望对你阅读笔者项目源码有所帮助。
我是 sharkchili ,CSDN Java 领域博客专家,mini-redis的作者,我想写一些有意思的东西,希望对你有帮助,如果你想实时收到我写的硬核的文章也欢迎你关注我的公众号: 写代码的SharkChili 。 因为近期收到很多读者的私信,所以也专门创建了一个交流群,感兴趣的读者可以通过上方的公众号获取笔者的联系方式完成好友添加,点击备注 “加群” 即可和笔者和笔者的朋友们进行深入交流。

# 源码地址
mini-redis:https://github.com/shark-ctrl/mini-redis (opens new window)
