 来聊聊Netty的ByteBuf
# 前言
这篇文章我们来探讨一下Netty的字节操作工具ByteBuf,Netty为我们提供的字节操作工具ByteBuf,相比比原生NIO的字节操作,它有着以下的优势:
- 它的功能可以被用户自定义的缓冲区类型扩展。
- 通过内置的复合缓冲区类型实现了透明的零拷贝。
- 容量可以按需增长(类似于 JDK 的 StringBuilder)。
- 在读和写这两种模式之间切换不需要像JDK的ByteBuffer通过flip()方法进行切换。
- 读和写使用了不同的索引,用户无需过度关注读写索引位置。
- 支持方法的链式调用。
- 支持引用计数,便于管理字节缓冲区的内存。
- 支持池化,通过复用提升操作效率。
# ByteBuf类概述
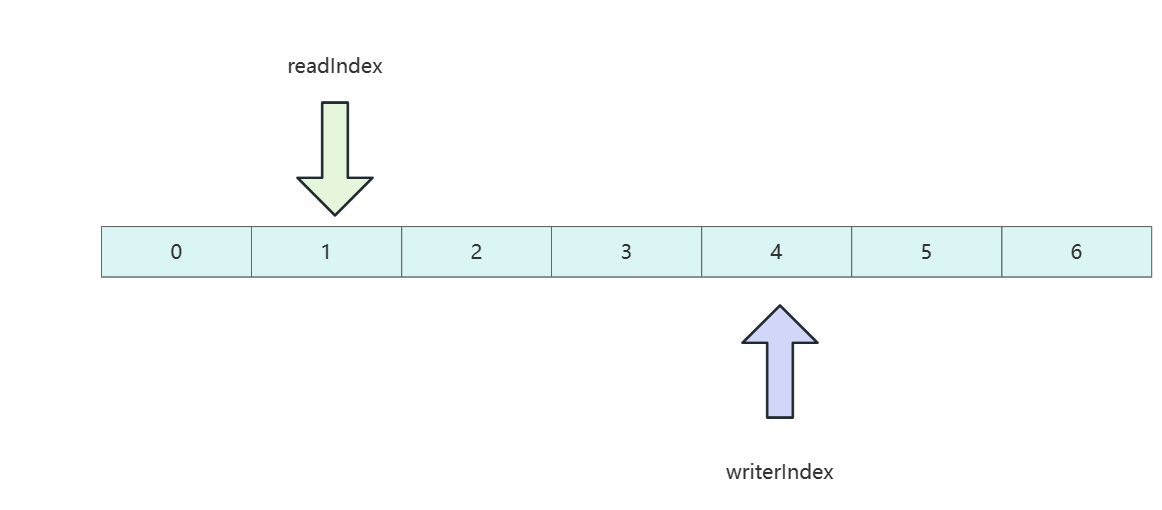
ByteBuf底层维护了个不同的索引,分别是readIndex和writerIndex,用于记录当前字节数组的读写位置。如下图所示,当读索引指向1时,即代表当前已经读取到索引1位置的数据。而写索引到4即代表数据写到索引4位置了,后续两个两个位置可以写。
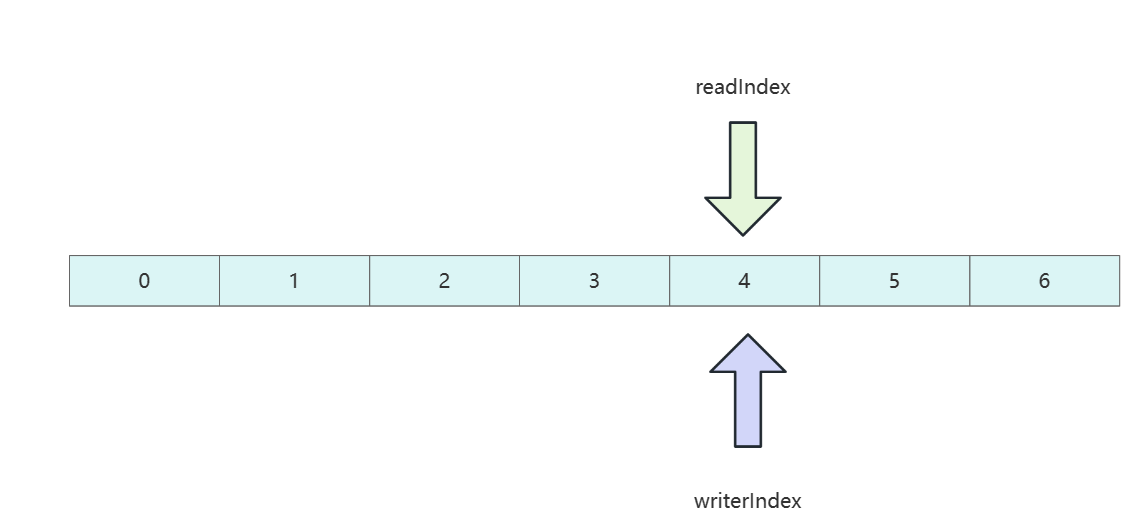
当读和写索引到达同一个位置时,即说明用户将所有写到数组的数据都读完了,如果用户继续将读索引往后挪尝试读取数据,则会抛出越界异常 IndexOutOfBoundsException。
# 几种ByteBuf介绍
# 堆缓冲区
我们最常见的缓冲区操作基本都是堆缓冲区,这种缓存区会将数据都保存在JVM堆空间中,由JVM负责释放回收,操作比较安全,而且读取和释放效率堪比池化的效率,比较适合数据一些临时性或一些遗留的数据处理。
下面给出一段堆缓冲区的使用示例,可以看到只有hasArray返回true时,我们才能操作字节缓冲区的数据。
 static {
        BYTE_BUF_FROM_SOMEWHERE.writeBytes("hello world".getBytes());
    }

public static void heapBuffer() {
        ByteBuf heapBuf = BYTE_BUF_FROM_SOMEWHERE; //get reference form somewhere

        //检查 ByteBuf 是否有一个支撑数组
        if (heapBuf.hasArray()) {
            //如果有,则获取对该数组的引用
            byte[] array = heapBuf.array();
            //计算第一个字节的偏移量
            int offset = heapBuf.arrayOffset() + heapBuf.readerIndex();
            //获得可读字节数
            int length = heapBuf.readableBytes();
            //使用数组、偏移量和长度作为参数调用你的方法
            handleArray(array, offset, length);
        }
    }


private static void handleArray(byte[] array, int offset, int len) {
        System.out.println("str: "+new String(array));
        System.out.println("offset: "+offset);
        System.out.println("len: "+len);
    }
2
3
4
5
6
7
8
9
10
11
12
13
14
15
16
17
18
19
20
21
22
23
24
25
26
调用代码如下所示
 public static void main(String[] args) {
        heapBuffer();
    }
2
3
输出结果如下:
str: hello world
offset: 0
len: 11
2
3
# 直接缓冲区
接下来就是直接缓冲区,相比于堆缓冲区,直接缓冲区数据直接存放在本地内存中,所以在网络传输时,就避免了从JVM复制到内存这一步,效率自然会高出不少。但正如我们所说,它是存在直接内存区中,不受JVM约束,所以我们分配和释放这块内存都是非常昂贵的操作。
如果我们想修改直接缓冲区的数据时,我们也需要将其复制到JVM内存中,否则会报错,操作代码如下所示,可以看到,如果我们想操作直接缓冲区的数据必须通过getBytes方法将其复制到堆内存中才能进行进一步操作。
public static void directBuffer() {
        ByteBuf directBuf = BYTE_BUF_FROM_SOMEWHERE; //get reference form somewhere
        //检查 ByteBuf 是否由数组支撑。如果不是,则这是一个直接缓冲区
        if (!directBuf.hasArray()) {
            //获取可读字节数
            int length = directBuf.readableBytes();
            //分配一个新的数组来保存具有该长度的字节数据
            byte[] array = new byte[length];
            //将字节复制到该数组
            directBuf.getBytes(directBuf.readerIndex(), array);
            //使用数组、偏移量和长度作为参数调用你的方法
            handleArray(array, 0, length);
        }
    }
2
3
4
5
6
7
8
9
10
11
12
13
14
# 常见操作演示
# 随机读写
如下所示,我们可以通过getByte获取缓冲区的数据。
public static void main(String[] args) {
        ByteBuf heapBuf = Unpooled.buffer(1024); //get reference form somewhere
        heapBuf.writeBytes("hello world".getBytes());


        //检查 ByteBuf 是否有一个支撑数组
        if (heapBuf.hasArray()) {
            //如果有,则获取对该数组的引用
            byte[] array = heapBuf.array();
            //计算第一个字节的偏移量
            int offset = heapBuf.arrayOffset() + heapBuf.readerIndex();
            //获得可读字节数
            int length = heapBuf.readableBytes();
            //随机读写索引0位置的数据
            System.out.println((char)heapBuf.getByte(0));
        }
    }
2
3
4
5
6
7
8
9
10
11
12
13
14
15
16
17
# 读取所有可读的字节
如下所示,我们可以通过isReadable判断写索引是否大于读索引以判断是否有可以读取的数据,然后通过readByte将所有数据读取到byte中。
public static void readAllData() {
        ByteBuf buffer = BYTE_BUF_FROM_SOMEWHERE; //get reference form somewhere
        buffer.writeBytes("hello world".getBytes());

        while (buffer.isReadable()) {
            byte b = buffer.readByte();
            System.out.print((char) b);
        }
    }
2
3
4
5
6
7
8
9
输出结果如下:
hello world
# 写数据
基于ByteBuf 写数据方式也简单,如下所示,通过writableBytes判断容量减去索引是否大于4,如果大于4则说明可以写一个整型数据,我们就调用writeInt写一个整型数据。
public static void write() {
        // Fills the writable bytes of a buffer with random integers.
        ByteBuf buffer = BYTE_BUF_FROM_SOMEWHERE; //get reference form somewhere
        while (buffer.writableBytes() >= 4) {
            buffer.writeInt(1);
        }

        //输出我们刚刚写的数据
        System.out.print(buffer.getInt(0));
    }

    public static void main(String[] args) {
        write();
    }
2
3
4
5
6
7
8
9
10
11
12
13
14
# 索引管理
设计者们认为通过clear方式重置相比于discardReadBytes这种强制清空空间相对轻量一些,因为clear工作原理是将索引位置归0,而对应索引位置还是有数据。
buffer.clear();
# 查找操作
byteBuf支持通过forEachByte获取到第一个需要查找字符的索引。
public static void byteProcessor() {
        ByteBuf buffer = BYTE_BUF_FROM_SOMEWHERE; //get reference form somewhere
        buffer.writeBytes("hello \r world \r".getBytes());
        int index = buffer.forEachByte(ByteProcessor.FIND_CR);
        System.out.println(index);
    }

    public static void main(String[] args) {
        byteProcessor();
    }
2
3
4
5
6
7
8
9
10
11
# 派生缓冲区
派生缓冲区其实也有浅拷贝的含义,创建一个新的实例只想源缓冲区的数据,如下所示,我没的copy底层的数组实际上就是buf 的浅拷贝。该浅拷贝会有着自己的读写索引,所以我们可以认为派生缓冲区操作是独立,但是数据是共享的。
 public static void byteBufSlice() {
        Charset utf8 = Charset.forName("UTF-8");
        //创建一个用于保存给定字符串的字节的 ByteBuf
        ByteBuf buf = Unpooled.copiedBuffer("Netty in Action rocks!", utf8);
        //创建该 ByteBuf 从索引 0 开始到索引 15 结束的一个新切片
        ByteBuf sliced = buf.slice(0, 15);
        //将打印“Netty in Action”
        System.out.println(sliced.toString(utf8));
        //更新索引 0 处的字节
        buf.setByte(0, (byte)'J');
        //将会成功,因为数据是共享的,对其中一个所做的更改对另外一个也是可见的
        System.out.println(buf.toString(utf8));
        System.out.println(sliced.toString(utf8));
        assert buf.getByte(0) == sliced.getByte(0);
    }
2
3
4
5
6
7
8
9
10
11
12
13
14
15
用main函数调用上述的方法,可以看到我们修改了派生缓冲区的数据之后,源缓冲区值也变了,由此印证了我们的说法。
Netty in Action
Jetty in Action rocks!
Jetty in Action
2
3
除了slice方法以外,以下
1. duplicate() //返回整个源缓冲区的空间
2. Unpooled.unmodifiableBuffer(…)
3. order(ByteOrder) //返回此缓冲区字节序,例如BIG_ENDIAN,这个方法比较少用
4. readSlice(int) //返回此缓冲区的子区域的一个新切片
2
3
4
# 深拷贝
上面我们了解浅拷贝,这里为了示例完整性也给出深拷贝的例子,使用copy函数就会获得一个全新的缓冲区数据,复制效率相比浅拷贝相对耗时,但是操作和空间都是独立的。
public static void byteBufCopy() {
        Charset utf8 = Charset.forName("UTF-8");
        //创建 ByteBuf 以保存所提供的字符串的字节
        ByteBuf buf = Unpooled.copiedBuffer("Netty in Action rocks!", utf8);
        //创建该 ByteBuf 从索引 0 开始到索引 15 结束的分段的副本
        ByteBuf copy = buf.copy(0, 15);
        //将打印“Netty in Action”
        System.out.println(copy.toString(utf8));
        //更新索引 0 处的字节
        buf.setByte(0, (byte)'J');
        //将会成功,因为数据不是共享的
        assert buf.getByte(0) != copy.getByte(0);
    }
2
3
4
5
6
7
8
9
10
11
12
13
# 读写操作
很多读者会问到既然有了get和set操作,为什么还要有读写操作read和writer呢?原因很简单,get和set读写的操作不会修改读写索引。读者可以参考下面这段代码最后两段输出语句印证。
public static void byteBufSetGet() {
        Charset utf8 = Charset.forName("UTF-8");
        //创建一个新的 ByteBuf以保存给定字符串的字节
        ByteBuf buf = Unpooled.copiedBuffer("Netty in Action rocks!", utf8);
        //打印第一个字符'N'
        System.out.println((char)buf.getByte(0));
        //存储当前的 readerIndex 和 writerIndex
        int readerIndex = buf.readerIndex();
        int writerIndex = buf.writerIndex();
        //将索引 0 处的字 节更新为字符'B'
        buf.setByte(0, (byte)'B');
        //打印第一个字符,现在是'B'
        System.out.println((char)buf.getByte(0));
        //将会成功,因为这些操作并不会修改相应的索引
        System.out.println(readerIndex == buf.readerIndex());//true
        System.out.println(writerIndex == buf.writerIndex());//true
    }
2
3
4
5
6
7
8
9
10
11
12
13
14
15
16
17
而read和writer则不一样,每读或写一次,读写索引都会向前推进。
这一点,我们可以从下面这段代码得以印证
 public static void byteBufWriteRead() {
        Charset utf8 = Charset.forName("UTF-8");
        //创建一个新的 ByteBuf 以保存给定字符串的字节
        ByteBuf buf = Unpooled.copiedBuffer("Netty in Action rocks!", utf8);
        //打印第一个字符'N'
        System.out.println((char)buf.readByte());
        //存储当前的readerIndex
        int readerIndex = buf.readerIndex();
        //存储当前的writerIndex
        int writerIndex = buf.writerIndex();
        //将字符 '?'追加到缓冲区
        buf.writeByte((byte)'?');
        System.out.println(readerIndex == buf.readerIndex());//true
        //将会成功,因为 writeByte()方法移动了 writerIndex
        System.out.println(writerIndex != buf.writerIndex());//true
    }
2
3
4
5
6
7
8
9
10
11
12
13
14
15
16
# 引用计数
# 简介
netty在版本4时,引入计数的概念,ByteBuf和ByteBufHolder通过继承ReferenceCounted接口实现计数功能,当计数功能为0时,该实例就会被释放。
关于计数器的查询操作示例如下所示
public static void referenceCounting(){
        Channel channel = CHANNEL_FROM_SOMEWHERE; //get reference form somewhere
        //从 Channel 获取ByteBufAllocator
        ByteBufAllocator allocator = channel.alloc();
        //...
        //从 ByteBufAllocator分配一个 ByteBuf
        ByteBuf buffer = allocator.directBuffer();
        //检查引用计数是否为预期的 1
        assert  buffer.refCnt()== 1;
        //...
    }
2
3
4
5
6
7
8
9
10
11
释放操作如下所示
public static void releaseReferenceCountedObject(){
        ByteBuf buffer = BYTE_BUF_FROM_SOMEWHERE; //get reference form somewhere
        //减少到该对象的活动引用。当减少到 0 时,该对象被释放,并且该方法返回 true
        boolean released = buffer.release();
        //...
    }
2
3
4
5
6
# 实践
# 基于ByteBuf实现编码和解码
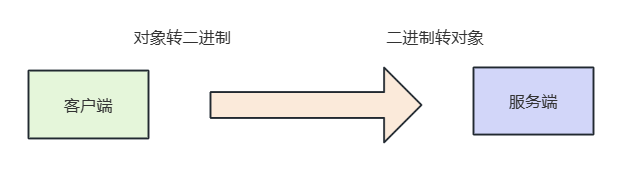
我们现在要完成这样一个需求:
- 和服务端协商好协议格式,并定义对象记录每个字段的类型。
- 传输时将Java对象转为二进制数据。
- 服务端收到数据后,将二进制数据转为Java对象。
- 根据协议包的内容,转交到对应的业务处理器上。
相应的我们给出协议的格式:
- 报文首部是一个魔数,占4个字节,通过对该值的设置,避免报文传输到服务端后,被默认的网络协议解析。
- 版本号:用于记录本次使用的通信协议版本号,由于版本号不太可能发生变化,1个字节足够使用了。
- 序列化算法:记录数据包序列化算法的号码。
- 指令:记录当前数据包的指令类型,可能是登录,心跳检测等。
- 数据长度:记录整个数据包的长度。
- 数据:客户端要发送给服务端的具体数据内容。
自此我们了解的数据包的格式,我们就开始着手编码。

首先我们需要抽象以下指令,因为不同的指令对应的号码是不同,但是指令目前只有一个登录和登录响应两个类型,所以我们先用枚举列出声明出来。
public enum Command {

    /**
     * 登录
     */
    LOGIN_REQUEST(Byte.valueOf("1")),
    LOGIN_RESPONSE(Byte.valueOf("2")),


    private final Byte value;

    Command(Byte value) {
        this.value = value;
    }

    public Byte getValue() {
        return value;
    }
}
2
3
4
5
6
7
8
9
10
11
12
13
14
15
16
17
18
19
20
随后我们通信协议的数据包抽象类可以先将这些字段定义出来,由于不同类型数据包指令类型不同,所以我们将获取指令的方法getCommand设置为抽象方法。
@Data
public abstract class Packet {

    /**
     * 协议版本
     */
    @JSONField(deserialize = false, serialize = false)
    private Byte version = 1;

    /**
     * 序列化器 默认JSON解析
     */
    @JSONField(deserialize = false, serialize = false)
    private Byte serializer = 1;

    /**
     * 获取这个请求的命令
     */
    @JSONField(serialize = false, deserialize = false)
    public abstract Command getCommand();
}
2
3
4
5
6
7
8
9
10
11
12
13
14
15
16
17
18
19
20
21
然后我们就可以封装登录包了,可以看到这个数据包继承了Packet,所以对应通用字段他基本都有了,这里只需将数据的用户id、账号、密码等字段声明一下即可。
@EqualsAndHashCode(callSuper = true)
@Data
public class LoginRequestPacket extends Packet {

    /**
     * 用户ID
     */
    private Integer userId;

    /**
     * 用户名
     */
    private String userName;

    /**
     * 密码
     */
    private String password;

    @Override
    public Command getCommand() {
        return Command.LOGIN_REQUEST;
    }
}
2
3
4
5
6
7
8
9
10
11
12
13
14
15
16
17
18
19
20
21
22
23
24
同样的登录响应包的Java类也封装好了,该协议包内容相对于登录包,仅仅多了登录结果success,以及如果登录则会有失败原因reason。
@EqualsAndHashCode(callSuper = true)
@Data
public class LoginResponsePacket extends Packet {

    private boolean success;

    private String reason;

    private String userId;

    private String userName;

    @Override
    public Command getCommand() {
        return LOGIN_RESPONSE;
    }
}
2
3
4
5
6
7
8
9
10
11
12
13
14
15
16
17
自此我们将协议都封装好了,接下来就是编写序列化和反序列的逻辑了,首先抽象一个序列化器的接口,声明一下序列化工具的行为,它具备将Java对象转字节数组serialize,以及将字节数组转二进制deserialize的能力。
public interface Serializer {


    /**
     * 编码
     * @param object
     * @return
     */
    byte[] serialize(Object object);

    /**
     * 解码
     */
    <T> T deserialize(Class<T> clazz, byte[] bytes);
}
2
3
4
5
6
7
8
9
10
11
12
13
14
15
目前我们的序列化暂时只会用到JSONSerializer,所以我们就编写了第一个序列化工具JSONSerializer 。
public class JSONSerializer implements Serializer {


    @Override
    public byte[] serialize(Object object) {
        return JSON.toJSONBytes(object);
    }

    @Override
    public <T> T deserialize(Class<T> clazz, byte[] bytes) {
        return JSON.parseObject(bytes, clazz);
    }
}
2
3
4
5
6
7
8
9
10
11
12
13
14
序列化器编写完成之后,我们就可以编写包解析工具了,通过该工具,我们只需将数据包传入,包解析工具就会根据数据包的序列化号和指令号找到对应的序列化器和二进制转Java对象时的类类型。
代码如下,可以看到笔者通过静态代码段将对应序列化号和序列化器的映射存到serializerMap中,同样的将指令号和对应数据包Java类型存到packetTypeMap中,这样一来编码和解码都可以工具这些map找到对应的序列化器和转换Java类型。
/**
 * 包解析工具类
 *
 * @author shark-chili
 */
public class PacketCodeC {

    /**
     * 魔数
     */
    public static final int MAGIC_NUMBER = 0x12345678;

    /**
     * 序列化器map,以序列化号为key,序列化器为value
     */
    private static final Map<Byte, Serializer> serializerMap;

    /**
     * 指令集
     */
    private static final Map<Byte, Class<? extends Packet>> packetTypeMap;

    static {

        serializerMap = new HashMap<>();
        serializerMap.put(SerializerAlgorithm.JSON.getValue(), new JSONSerializer());

        packetTypeMap = new HashMap<>();
        // 登录
        packetTypeMap.put(Command.LOGIN_REQUEST.getValue(), LoginRequestPacket.class);
        packetTypeMap.put(Command.LOGIN_RESPONSE.getValue(), LoginResponsePacket.class);
    }

    /**
     * 编码
     */
    public static ByteBuf encode(Packet packet) {
        ByteBuf byteBuf = ByteBufAllocator.DEFAULT.ioBuffer();
        //将包数据转为byteBuf
        writeByteBufInfo(byteBuf, packet);
        return byteBuf;
    }

    /**
     * 编码
     */
    public static void encode(ByteBuf byteBuf, Packet packet) {
        writeByteBufInfo(byteBuf, packet);
    }


    private static void writeByteBufInfo(ByteBuf byteBuf, Packet packet) {
        //写入4字节的魔数
        byteBuf.writeInt(MAGIC_NUMBER);
        //写入1个字节的版本号
        byteBuf.writeByte(packet.getVersion());
        //写入1个字节的序列化算法
        byteBuf.writeByte(packet.getSerializer());
        //写入1个字节的指令
        byteBuf.writeByte(packet.getCommand().getValue());

        Serializer serializer = serializerMap.get(packet.getSerializer());

        if (serializer == null) {
            throw new RuntimeException("当前协议不存在序列化算法");
        }

        byte[] bytes = serializer.serialize(packet);
        //写入4字节的数据长度表示
        byteBuf.writeInt(bytes.length);
        //写入数据
        byteBuf.writeBytes(bytes);


    }


    /**
     * 解码
     *
     * @param byteBuf
     * @return
     */
    public static Packet decode(ByteBuf byteBuf) {
        //跳过魔数
        byteBuf.skipBytes(4);
        //跳过版本号
        byteBuf.skipBytes(1);
        //获取序列化算法
        byte serializerVal = byteBuf.readByte();
        //跳过指令
        byte commandVal=byteBuf.readByte();
        //获取数据长度
        int length = byteBuf.readInt();

        //根据长度将数据写到byte数组中
        byte[] bytes = new byte[length];
        byteBuf.readBytes(bytes);

        Serializer serializer = serializerMap.get(serializerVal);
        if (serializer == null) {
            throw new RuntimeException("当前协议不存在序列化器");
        }

        Class<? extends Packet> type = packetTypeMap.get(commandVal);
        if (type == null) {
            throw new RuntimeException("当前协议不存在转换对象");
        }

        //转为对象
        return serializer.deserialize(type, bytes);
    }
}
2
3
4
5
6
7
8
9
10
11
12
13
14
15
16
17
18
19
20
21
22
23
24
25
26
27
28
29
30
31
32
33
34
35
36
37
38
39
40
41
42
43
44
45
46
47
48
49
50
51
52
53
54
55
56
57
58
59
60
61
62
63
64
65
66
67
68
69
70
71
72
73
74
75
76
77
78
79
80
81
82
83
84
85
86
87
88
89
90
91
92
93
94
95
96
97
98
99
100
101
102
103
104
105
106
107
108
109
110
111
112
113
114
最后我们给出测试类,可以看到笔者的自测逻辑,只需将LoginRequestPacket 先编码再解码再编码,再和原Java对象的编码进行比对是否一致,若一致则说明测试通过。
public class SerializerTest {

    /**
     * 通过编码后在解码和原对象解码比对确认是否一致
     */
    @Test
    public void testSerializer() {
        LoginRequestPacket packet = new LoginRequestPacket();
        packet.setVersion(((byte) 1));
        packet.setSerializer((byte) 1);
        packet.setUserId(12345);
        packet.setUserName("zhangsan");
        packet.setPassword("12345");
        //将包先编码再解码
        JSONSerializer serializer = new JSONSerializer();
        byte[] bytes = serializer.serialize(packet);
        LoginRequestPacket result = serializer.deserialize(LoginRequestPacket.class, bytes);


        Assert.assertArrayEquals(serializer.serialize(packet), serializer.serialize(result));

    }
}
2
3
4
5
6
7
8
9
10
11
12
13
14
15
16
17
18
19
20
21
22
23
# 基于ByteBuf实现客户端通信
基于上面的例子,我们继续完成一个客户端通信的例子,整体流程如下:
- 客户端向服务端发起连接。
- 客户端封装一个LoginRequestPacket的请求包。
- 通过序列化工具将请求包转成byteBuf发送出去。
- 服务端收到请求包,通过序列化器解析,并校验。
- 服务端将校验结果通过LoginResponsePacket包回复给客户端。
- 客户端收到响应打印结果。

为了例子的完整性服务端的配置代码和业务处理器示例代码一并给出,先来看看服务端业务处理器代码,可以看到服务端继承SimpleChannelInboundHandler 并实现channelRead0,确保收到客户端登录包时进行数据解析和校验。
public class ServerHandler extends SimpleChannelInboundHandler {

    @Override
    protected void channelRead0(ChannelHandlerContext ctx, Object msg) throws Exception {
        ByteBuf byteBuf = (ByteBuf) msg;
        Packet packet = PacketCodeC.decode(byteBuf);

        //如果是登录包则进入逻辑处理
        if (packet instanceof LoginRequestPacket) {
            LoginRequestPacket req = (LoginRequestPacket) packet;
            LoginResponsePacket resp = new LoginResponsePacket();
            //判断账户密码是否正确
            if ("zhangsan".equals(req.getUserName()) && "123456".equals(req.getPassword())) {
                //校验成功将发送组装校验成功的消息并发送
                resp.setSuccess(true);
                ctx.channel().writeAndFlush(PacketCodeC.encode(resp));
                return;
            }
            //校验失败则将失败消息编码并发送
            resp.setSuccess(false);
            resp.setReason("校验失败,用户名:" + req.getUserName());
            ctx.channel().writeAndFlush(PacketCodeC.encode(resp));


        }


    }
}
2
3
4
5
6
7
8
9
10
11
12
13
14
15
16
17
18
19
20
21
22
23
24
25
26
27
28
29
对应的引导类配置代码如下,在逻辑链上添加上文的ServerHandler。
/**
 * Netty 服务端
 *
 * @author shark-chili
 */
public class NettyServer {
    public static void main(String[] args) {
        // 启动一个netty服务端需要指定 线程模型 IO模型 业务处理逻辑

        // 引导类负责引导服务端启动工作
        ServerBootstrap serverBootstrap = new ServerBootstrap();


        // 负责监听端口,接受新的连接
        NioEventLoopGroup bossGroup = new NioEventLoopGroup();
        // 负责处理每一个连接读写的线程组
        NioEventLoopGroup workerGroup = new NioEventLoopGroup();

        // 配置线程组并指定NIO模型
        serverBootstrap.group(bossGroup, workerGroup)
                //设置IO模型,这里为NioServerSocketChannel,建议Linux服务器使用 EpollServerSocketChannel
                .channel(NioServerSocketChannel.class)
                // 定义后续每个连接的数据读写,对于业务处理逻辑
                .childHandler(new ChannelInitializer<NioSocketChannel>() {
                    @Override
                    protected void initChannel(NioSocketChannel nioSocketChannel) throws Exception {
                        nioSocketChannel.pipeline().addLast(new ServerHandler());
                    }
                });


        bind(serverBootstrap, 9000);
    }

    /**
     * 以端口号递增的形式尝试绑定端口号
     */
    private static void bind(ServerBootstrap serverBootstrap, int port) {
        // bind 方法是异步的,为其添加监听器,如果绑定成功则结束,反之端口号+1进行绑定
        serverBootstrap.bind(port).addListener(future -> {
            if (future.isSuccess()) {
                System.out.println("端口[" + port + "]绑定成功!");
            } else {
                System.err.println("端口[" + port + "]绑定失败!");
                bind(serverBootstrap, port + 1);
            }
        });
    }
}
2
3
4
5
6
7
8
9
10
11
12
13
14
15
16
17
18
19
20
21
22
23
24
25
26
27
28
29
30
31
32
33
34
35
36
37
38
39
40
41
42
43
44
45
46
47
48
49
50
客户端的业务处理器如下,可以看到它继承了ChannelInboundHandlerAdapter ,客户端会在建立连接时调用channelActive,我们就在此时发送登录包,并用channelRead接受服务端响应包。
public class ClientHandler extends ChannelInboundHandlerAdapter {

    /**
     * 连接建立的时候向服务端发送消息
     *
     * @param ctx
     * @throws Exception
     */
    @Override
    public void channelActive(ChannelHandlerContext ctx) throws Exception {
        System.out.println("和服务端建立连接,尝试登录");
        //组装登录包
        LoginRequestPacket packet = new LoginRequestPacket();
        packet.setUserId(123);
        packet.setUserName("zhangsan");
        packet.setPassword("123456");

        //转成字节并发送
        ByteBuf byteBuf = PacketCodeC.encode(packet);
        ctx.channel().writeAndFlush(byteBuf);
    }


    @Override
    public void channelRead(ChannelHandlerContext ctx, Object msg) throws Exception {
        Packet packet = PacketCodeC.decode((ByteBuf) msg);
        if (packet instanceof LoginResponsePacket) {
            LoginResponsePacket loginResponsePacket = (LoginResponsePacket) packet;
            if (loginResponsePacket.isSuccess()) {
                System.out.println("客户端登录成功");
            } else {
                System.out.println("登录失败,失败原因:" + loginResponsePacket.getReason());
            }
        }
    }
}
2
3
4
5
6
7
8
9
10
11
12
13
14
15
16
17
18
19
20
21
22
23
24
25
26
27
28
29
30
31
32
33
34
35
36
随后,我们将客户端和服务端启动,对应服务端输出结果:
端口[9000]绑定成功!
客户端输出结果:
连接成功!
和服务端建立连接,尝试登录
客户端登录成功
2
3
# 进阶-基于两个示例深入了解ByteBuf
# Netty内存池泄漏问题
# 问题代码
现在我们有这么一个功能,客户端和Netty服务端建立连接之后发送消息,然后服务端就会收取消息并将消息内容原封不动的转发回去,服务端代码如下所示,该功能业务测试时并没有问题,但是到压测环境后不久,就发生的内存泄漏问题。
我们先贴出服务端代码,可以看到这就是典型的服务端启动代码,绑定9999端口监听用户请求,收到消息之后就会将消息内容交予ServerHandler处理。
public class Server3 {
	public static void main(String[] args) throws Exception {
		EventLoopGroup bossGroup = new NioEventLoopGroup(1);
		EventLoopGroup workerGroup = new NioEventLoopGroup(1);
		ServerBootstrap b = new ServerBootstrap();
		b.group(bossGroup, workerGroup)
				.channel(NioServerSocketChannel.class)
				.option(ChannelOption.SO_BACKLOG, 100)
				.childHandler(new ChannelInitializer<SocketChannel>() {
					@Override
					public void initChannel(SocketChannel ch) throws Exception {
						ChannelPipeline p = ch.pipeline();
						//流水线添加对应的处理器
						p.addLast(new ServerHandler());

					}
				});

		ChannelFuture f = b.bind(9999).sync();

		f.channel().closeFuture().addListener(new ChannelFutureListener() {
			@Override
			public void operationComplete(ChannelFuture future) throws Exception {
				System.out.println(">>>>>>>>>>>>>链路关闭");
				bossGroup.shutdownGracefully();
				workerGroup.shutdownGracefully();
			}
		});
	}
}
2
3
4
5
6
7
8
9
10
11
12
13
14
15
16
17
18
19
20
21
22
23
24
25
26
27
28
29
30
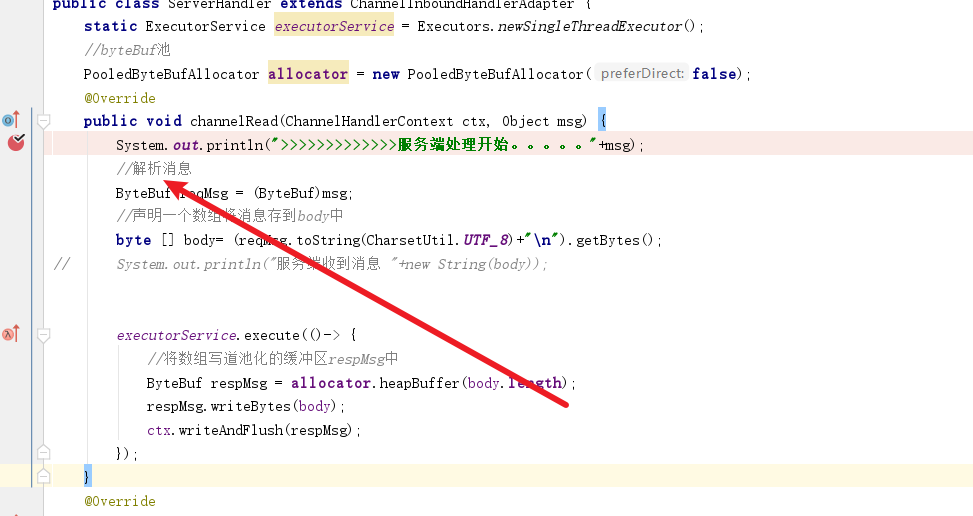
上文的ServerHandler 代码如下,逻辑也很简单,无非就是将客户端发送的数据原原本本转发回去。
public class ServerHandler extends ChannelInboundHandlerAdapter {
static ExecutorService executorService = Executors.newSingleThreadExecutor();
//byteBuf池
PooledByteBufAllocator allocator = new PooledByteBufAllocator(false);
@Override
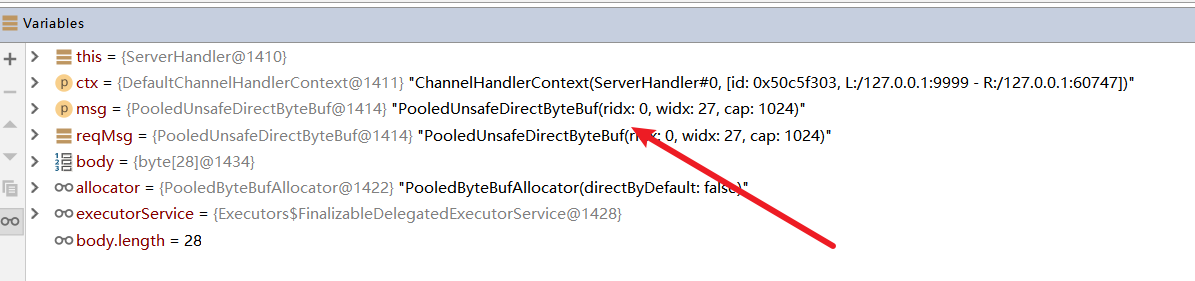
public void channelRead(ChannelHandlerContext ctx, Object msg) {
System.out.println(">>>>>>>>>>>>>服务端处理开始。。。。。"+msg);
//解析消息
ByteBuf reqMsg = (ByteBuf)msg;
//声明一个数组将消息存到body中
byte [] body= (reqMsg.toString(CharsetUtil.UTF_8)+"\n").getBytes();
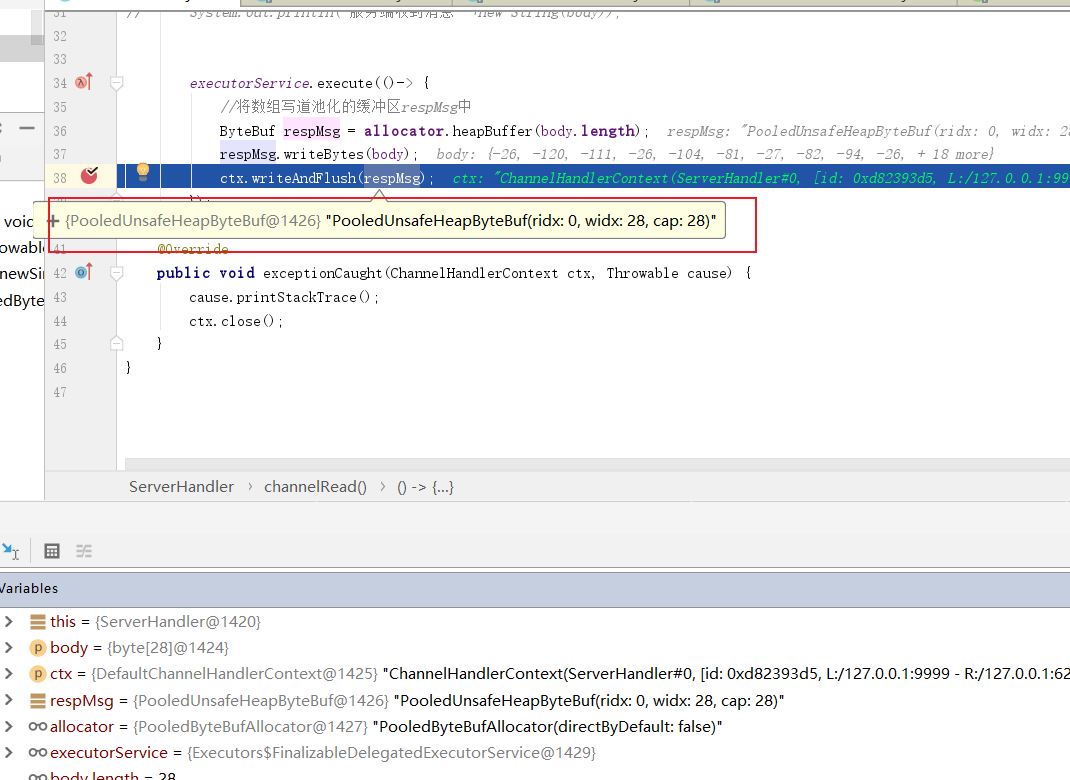
executorService.execute(()-> {
//将数组写道池化的缓冲区respMsg中
ByteBuf respMsg = allocator.heapBuffer(body.length);
respMsg.writeBytes(body);
ctx.writeAndFlush(respMsg);
});
}
@Override
public void exceptionCaught(ChannelHandlerContext ctx, Throwable cause) {
cause.printStackTrace();
ctx.close();
}
}
2
3
4
5
6
7
8
9
10
11
12
13
14
15
16
17
18
19
20
21
22
23
24
25
26
客户端启动代码如下,逻辑就是和服务端建立连接然后发送消息
public class Client3 {

	public static void main(String[] args) throws Exception {
		EventLoopGroup group = new NioEventLoopGroup();

		Bootstrap b = new Bootstrap();
		b.group(group)
				.channel(NioSocketChannel.class)
				.option(ChannelOption.TCP_NODELAY, true)
				.handler(new ChannelInitializer<SocketChannel>() {
					@Override
					public void initChannel(SocketChannel ch) throws Exception {
						ChannelPipeline p = ch.pipeline();
						p.addLast(new ClientHandler());
					}
				});

		ChannelFuture f = b.connect("127.0.0.1", 9999).sync();


		f.channel().writeAndFlush(Unpooled.copiedBuffer("我是客户端。。。。", CharsetUtil.UTF_8));
		//f.channel().writeAndFlush(Unpooled.copiedBuffer("我是客户端。。。。", CharsetUtil.UTF_8));

		f.channel().closeFuture().addListener(new ChannelFutureListener() {
			@Override
			public void operationComplete(ChannelFuture future) throws Exception {
				group.shutdownGracefully();
			}
		});
	}
}
2
3
4
5
6
7
8
9
10
11
12
13
14
15
16
17
18
19
20
21
22
23
24
25
26
27
28
29
30
31
对应处理器代码如下,也就是传输数据,传输结束后控制台告知用户发送成功了而已。
public class ClientHandler extends ChannelInboundHandlerAdapter {

	private final ByteBuf message;

	public ClientHandler() {
		message = Unpooled.buffer(1024);
		for (int i = 0; i < message.capacity(); i++) {
			message.writeByte((byte) i);
		}
	}

	@Override
	public void channelActive(ChannelHandlerContext ctx) {
		// ctx.writeAndFlush(message);
	}

	@Override
	public void channelRead(ChannelHandlerContext ctx, Object msg) {
		System.out.println(">>>>>>>>>开始读:" + msg.toString());
		ctx.write(msg);
	}

	@Override
	public void channelReadComplete(ChannelHandlerContext ctx) {
		System.out.println(">>>>>>>>>读完成了");
		ctx.flush();
	}

	@Override
	public void exceptionCaught(ChannelHandlerContext ctx, Throwable cause) {
		cause.printStackTrace();
		ctx.close();
	}
}
2
3
4
5
6
7
8
9
10
11
12
13
14
15
16
17
18
19
20
21
22
23
24
25
26
27
28
29
30
31
32
33
34
# 问题复现
完成编码工作之后,为了更快的演示上述问题,我们调整一下服务端的JVM参数,然后启动服务端和客户端。
-Xmn128m -Xmx128m
随着时间的推移,服务端出现了内存泄漏异常,可以看到异常都指向buffer相关的源代码,我们到处以下内存信息查看详情。
io.netty.util.internal.OutOfDirectMemoryError: failed to allocate 16777216 byte(s) of direct memory (used: 117440512, max: 117964800)
	at io.netty.util.internal.PlatformDependent.incrementMemoryCounter(PlatformDependent.java:640)
	at io.netty.util.internal.PlatformDependent.allocateDirectNoCleaner(PlatformDependent.java:594)
	at io.netty.buffer.PoolArena$DirectArena.allocateDirect(PoolArena.java:764)
	at io.netty.buffer.PoolArena$DirectArena.newChunk(PoolArena.java:740)
	at io.netty.buffer.PoolArena.allocateNormal(PoolArena.java:244)
	at io.netty.buffer.PoolArena.allocate(PoolArena.java:226)
	at io.netty.buffer.PoolArena.allocate(PoolArena.java:146)
	at io.netty.buffer.PooledByteBufAllocator.newDirectBuffer(PooledByteBufAllocator.java:324)
	at io.netty.buffer.AbstractByteBufAllocator.directBuffer(AbstractByteBufAllocator.java:185)
	at io.netty.buffer.AbstractByteBufAllocator.directBuffer(AbstractByteBufAllocator.java:176)
	at io.netty.buffer.AbstractByteBufAllocator.ioBuffer(AbstractByteBufAllocator.java:137)
2
3
4
5
6
7
8
9
10
11
12
我们首先通过jps定位到进程号,可以看到进程号码为23472
C:\Users\shark-chili>jps
14192 Launcher
23472 Server3
3144 RemoteMavenServer
5112 Jps
22956
2
3
4
5
6
然后我们键入如下命令导出内存日志
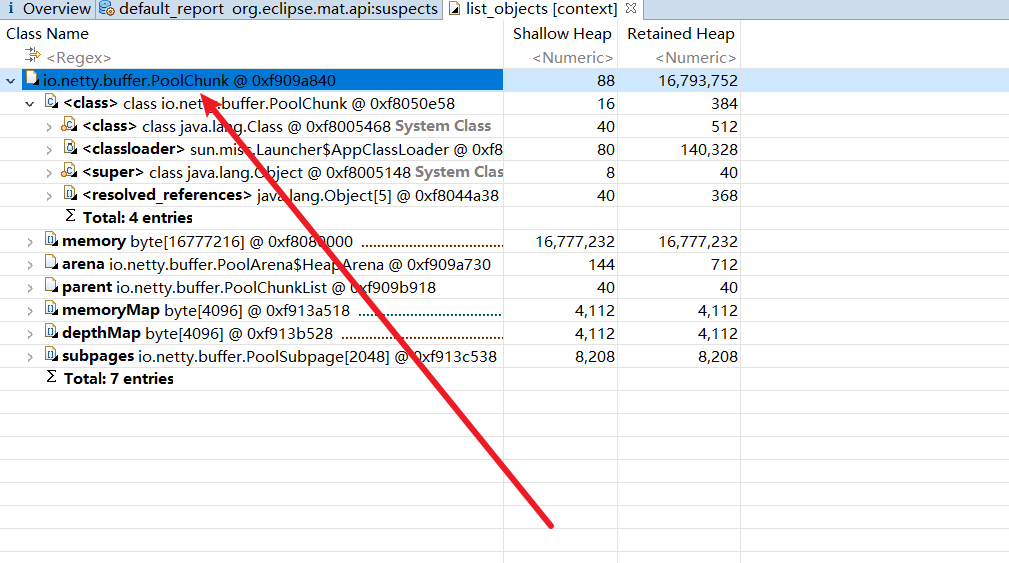
jmap -dump:format=b,file=e:/oom.hprof 23472
使用mat打开,可以看到大量的内存都被一个缓冲区相关的pollChunk占有,所以我们必须从服务端关于字节的读写地方入手排查问题,看看是不是那个地方使用不当导致缓冲区内存未能被正确释放。
# 排查思路1——从写缓冲区代码排查问题
为了更好的排查问题,我们不让客户端进行多次发送消息,所以将下面这些代码注释掉,确保一次消息发送不能立刻完成,以便我们调试服务端代码
由上可知问题大概率出在池化的缓冲区,那么问题要么出现在写未能释放内存或者读未能释放内存,所以我们不妨先排查一下写的代码有没有问题,所以我们在这里插入一个断点。然后将客户端代码启动。
这里笔者断点已开,可以看到当前缓冲区的地址,我们这里先记一下。
断点调试开始,代码来到writeAndFlush,可以看到这段逻辑主要是在write方法,即将消息写入,我们不妨步入看看逻辑
public ChannelFuture writeAndFlush(Object msg, ChannelPromise promise) {
        if (msg == null) {
            throw new NullPointerException("msg");
        }

       ......

        write(msg, true, promise);

        return promise;
    }
2
3
4
5
6
7
8
9
10
11
步入之后,代码会将消息封装成任务,我们不妨看看这个任务是什么样子。
 private void write(Object msg, boolean flush, ChannelPromise promise) {
       .....
        if (executor.inEventLoop()) {
           ........
        } else {
            AbstractWriteTask task;
            if (flush) {
            	//将消息写入封装成一个任务
                task = WriteAndFlushTask.newInstance(next, m, promise);
            }  else {
                .....
            }
            //将写入这个消息提交到NioEventLoop中去异步执行
            safeExecute(executor, task, promise, m);
        }
    }
2
3
4
5
6
7
8
9
10
11
12
13
14
15
16
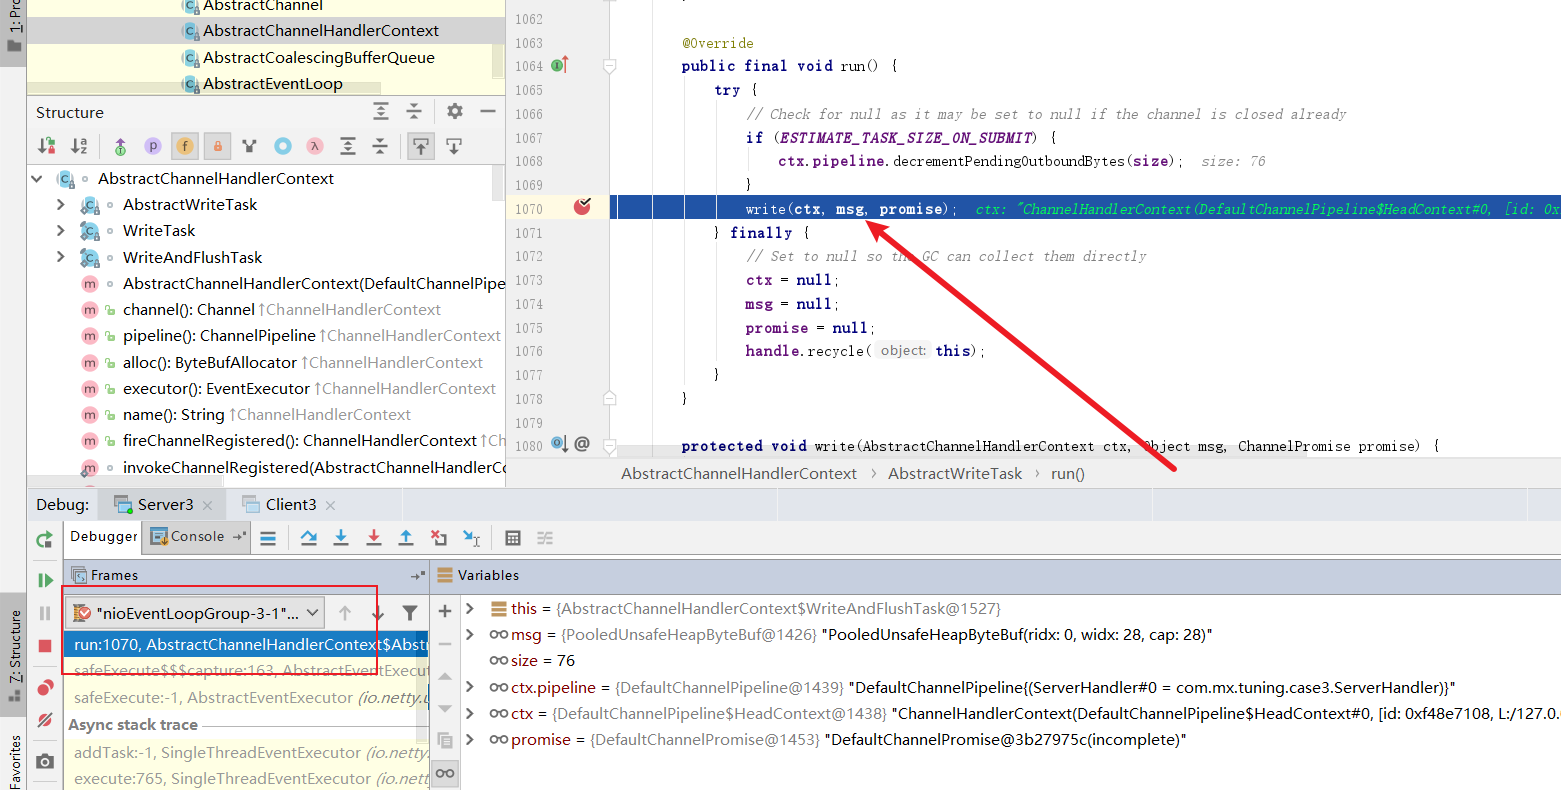
步入代码后,我们看看WriteAndFlushTask继承了AbstractWriteTask,因为上文中代码会将task提交到线程池,所以笔者推测这个类大概率有run方法,结果查看WriteAndFlushTask没有,所以我们去父类AbstractWriteTask看看。
 static final class WriteAndFlushTask extends AbstractWriteTask{
 }
2
果然看到了run方法,所以为了调试后续的写逻辑,我们不妨在这个后续会被提交的线程任务中差个断点。
@Override
        public final void run() {
            try {
                // Check for null as it may be set to null if the channel is closed already
                if (ESTIMATE_TASK_SIZE_ON_SUBMIT) {
                    ctx.pipeline.decrementPendingOutboundBytes(size);
                }
                write(ctx, msg, promise);
            } finally {
                // Set to null so the GC can collect them directly
                ctx = null;
                msg = null;
                promise = null;
                handle.recycle(this);
            }
        }
2
3
4
5
6
7
8
9
10
11
12
13
14
15
16
放行上述代码,最终代码走到了上面的run方法,由此印证笔者的猜测。可以看到NioEventLoop轮询到这个任务,操作了msg地址也很我们上述一开始打到的一模一样,我们不妨看看writer做了什么。
步入代码我们看到这两个方法,我先看看write做了什么
 @Override
        public void write(AbstractChannelHandlerContext ctx, Object msg, ChannelPromise promise) {
            super.write(ctx, msg, promise);
            ctx.invokeFlush();
        }
2
3
4
5
这里笔者看到一个奇怪的方法,名为filterOutboundMessage可以看到它会对msg重新赋值,可能会有对缓冲区的操作,我们不妨看看它做了些什么。
 @Override
        public final void write(Object msg, ChannelPromise promise) {
          ..........

            int size;
            try {
            //过滤msg
                msg = filterOutboundMessage(msg);
                size = pipeline.estimatorHandle().size(msg);
                if (size < 0) {
                    size = 0;
                }
            } catch (Throwable t) {
              ......
            }

         .....
        }
2
3
4
5
6
7
8
9
10
11
12
13
14
15
16
17
18
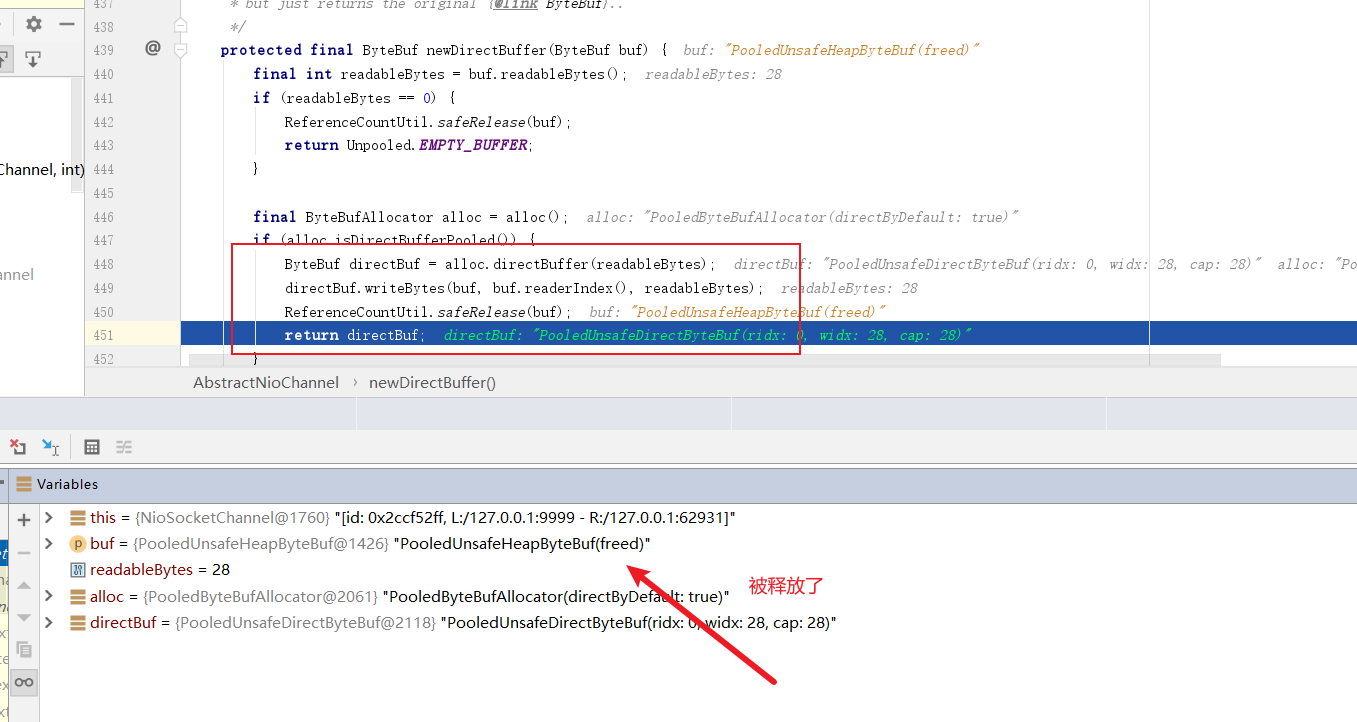
步入代码我们看到一个创建直接缓冲区的操作,我们看看它做了什么。
 @Override
    protected final Object filterOutboundMessage(Object msg) {
        if (msg instanceof ByteBuf) {
            ByteBuf buf = (ByteBuf) msg;
            if (buf.isDirect()) {
                return msg;
            }
			//拿着缓冲区的数据直接生成缓冲区
            return newDirectBuffer(buf);
        }

        if (msg instanceof FileRegion) {
            return msg;
        }

     .......
    }
2
3
4
5
6
7
8
9
10
11
12
13
14
15
16
17
步入代码我们可以看到,这里面有段操作会将缓冲区的值拷贝到直接缓冲区的操作,而且完成会将原缓冲区释放,可以看到栈区1426的缓冲区内存变为freed,由此可知内存泄漏和写无关,我们不妨看看读的源码有没有问题。
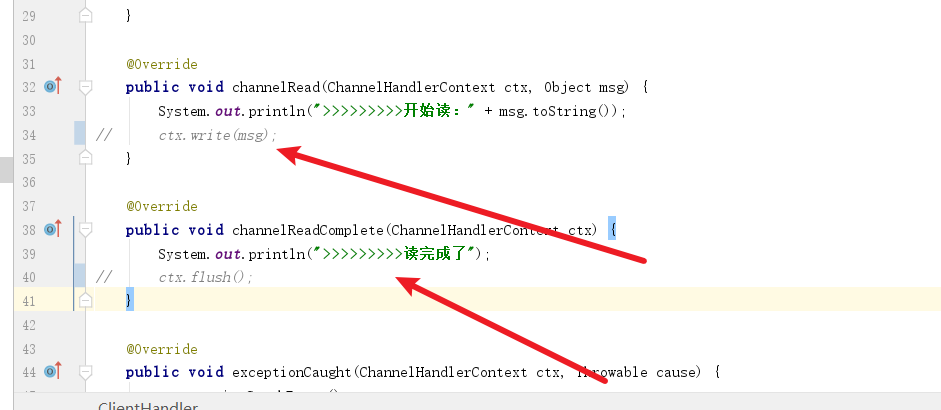
# 排查思路2——从读缓冲区代码排查问题
我们从读取处插个断点
可以看到至少在当前方法结束时,缓冲区内存还是没有后被释放。
read结束之后,会执行后续的方法,并没有释放的操作,由此可知读出现直接内存泄漏。
private void invokeChannelRead(Object msg) {
        if (invokeHandler()) {
            try {
            //我们重写的read方法
                ((ChannelInboundHandler) handler()).channelRead(this, msg);
            } catch (Throwable t) {
                notifyHandlerException(t);
            }
        } else {
            fireChannelRead(msg);
        }
    }
2
3
4
5
6
7
8
9
10
11
12
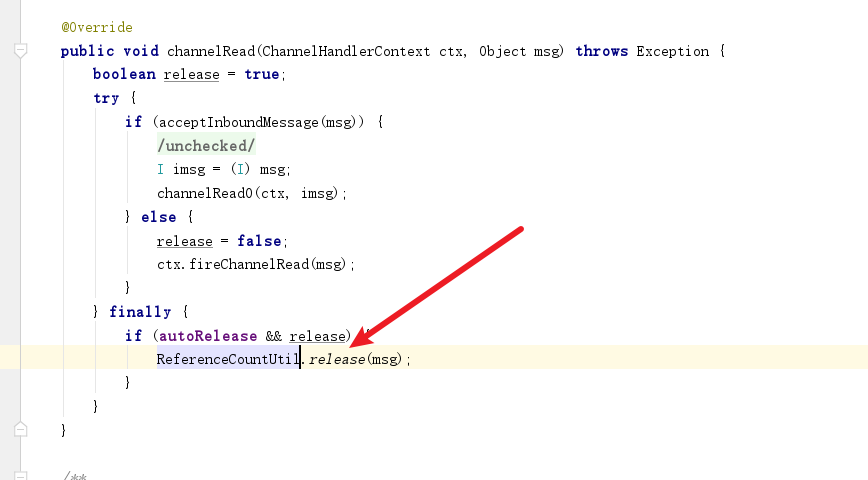
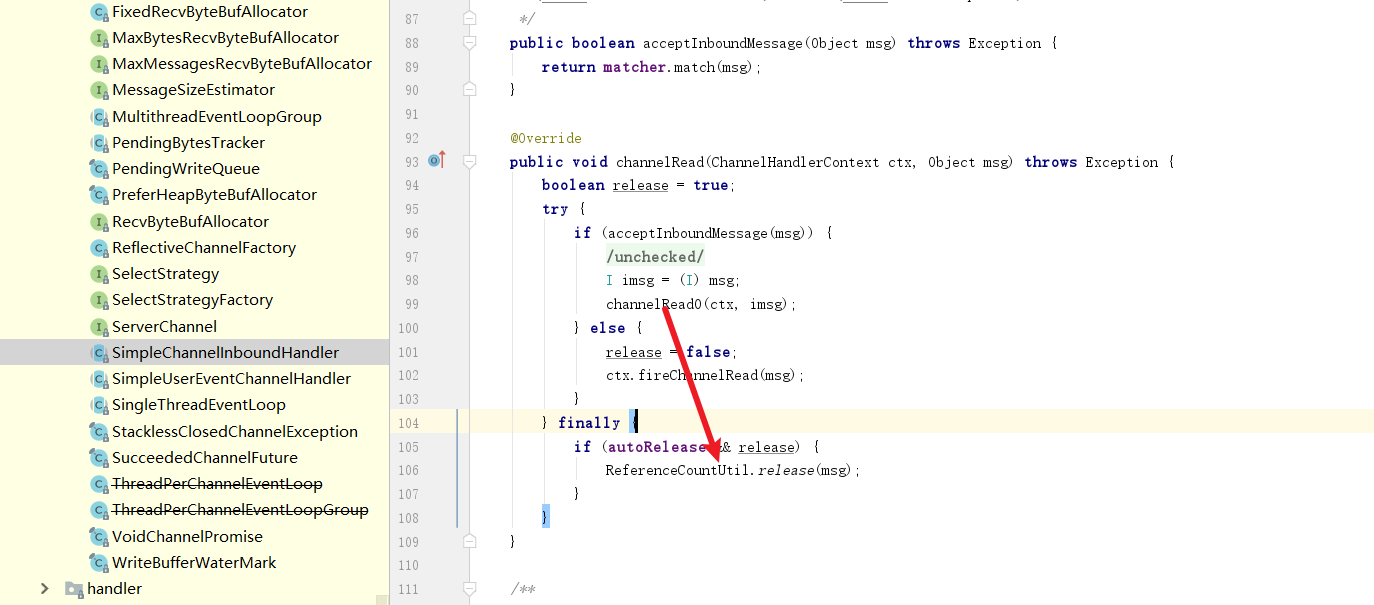
解决方式也很简单,修改ServerHandlerV2 继承SimpleChannelInboundHandler,重写read0进行读取。
public class ServerHandlerV2 extends SimpleChannelInboundHandler<ByteBuf> {
	static ExecutorService executorService = Executors.newSingleThreadExecutor();
	PooledByteBufAllocator allocator = new PooledByteBufAllocator(false);;

	@Override
	public void channelRead0(ChannelHandlerContext ctx, ByteBuf msg) {
		System.out.println(">>>>>>>>>>>>>服务端处理开始2。。。。。");
		byte[] body = new byte[msg.readableBytes()];
		executorService.execute(() ->
		{
			ByteBuf respMsg = allocator.heapBuffer(body.length);
			respMsg.writeBytes(body);
			ctx.writeAndFlush(respMsg);
		});
	}

	@Override
	public void exceptionCaught(ChannelHandlerContext ctx, Throwable cause) {
		cause.printStackTrace();
		ctx.close();
	}
}
2
3
4
5
6
7
8
9
10
11
12
13
14
15
16
17
18
19
20
21
22
原因很简单,从read0调用处即可知道,当前直接内存用完后框架会帮助我们手动释放。
# 引用计数引发的一个bug
笔者近期做一个功能需要通过netty获取udp报文,并将报文提交到线程池中交由其他线程处理,于是写了下面这段代码
@Component
public class NettyUdpHandler extends SimpleChannelInboundHandler<DatagramPacket> {

    private static final Logger LOG = LoggerFactory.getLogger(NettyUdpHandler.class);

    @Override
    protected void channelRead0(ChannelHandlerContext ctx, DatagramPacket dp) {
        try {
            ByteBuf content = dp.content();
            String str = content.toString(CharsetUtil.UTF_8);


			//提交到线程池
            UdpProcess udpProcess = AppContext.getBean(UdpProcess.class);
            udpProcess.receive(dp);

        } catch (Exception e) {
            LOG.error("报文处理失败,失败原因:{}", e.getMessage(), e);
        }
    }
}
2
3
4
5
6
7
8
9
10
11
12
13
14
15
16
17
18
19
20
21
22
结果运行时报错Netty io.netty.util.IllegalReferenceCountException: refCnt: 0 ,由上文可知我们的byteBuf计数器被归0,然后实例被释放了。
查看源码后发现,原来在我们将报文提交到线程池中的线程时,这个线程走到了finally于是将实例空间释放掉了。
解决方式也很简单,我们手动将报文加计数器+1
dp.retain();
然后工作线程使用完该报文后手动释放即可
 if (null != dp) {
                dp.release();
                LOG.info("工作线程报文处理结束,处理时长:{}ms", (System.currentTimeMillis() - begin));
            }
2
3
4
# 错误使用直接内存引发的错误
这个案例发生在一个HTTP请求中,我们不妨看看下面这个例子。
先来看看服务端代码,声明的模板很固定,绑定好自定业务处理器即可。
public class Server4 {

	private void bind(int port) throws Exception {
		EventLoopGroup bossGroup = new NioEventLoopGroup(1);

		EventLoopGroup workerGroup = new NioEventLoopGroup(1);

		ServerBootstrap b = new ServerBootstrap();

		b.group(bossGroup, workerGroup).channel(NioServerSocketChannel.class)
				.childHandler(new ChannelInitializer<SocketChannel>() {
					@Override
					public void initChannel(SocketChannel ch) throws Exception {
						ch.pipeline().addLast(new HttpServerCodec());
						ch.pipeline().addLast(new HttpObjectAggregator(Short.MAX_VALUE));
						//添加自定义业务处理器
						ch.pipeline().addLast(new HttpServerHandler());
					}
				}).option(ChannelOption.SO_BACKLOG, 128);
		ChannelFuture f = b.bind("127.0.0.1", port).sync();
		f.channel().closeFuture().sync();
		f.channel().closeFuture().addListener(new ChannelFutureListener() {
			@Override
			public void operationComplete(ChannelFuture future) throws Exception {
				workerGroup.shutdownGracefully();
				bossGroup.shutdownGracefully();
			}
		});
	}


}
2
3
4
5
6
7
8
9
10
11
12
13
14
15
16
17
18
19
20
21
22
23
24
25
26
27
28
29
30
31
32
我们再来看看逻辑处理器的代码,可以看到逻辑也很简单,拿着用户的请求的参数响应回去即可。
public class HttpServerHandler extends SimpleChannelInboundHandler<FullHttpRequest> {

    @Override
    protected void channelRead0(ChannelHandlerContext ctx,
                                FullHttpRequest request) throws Exception {
        //错误处理
        if (!request.decoderResult().isSuccess()) {
            sendError(ctx, BAD_REQUEST);
            return;
        }
        //输出用户发送的请求消息详情写回给用户
        System.out.println("Http Server receive the request : " + request);
        ByteBuf body = request.content().copy();
        FullHttpResponse response = new DefaultFullHttpResponse(
                HTTP_1_1, HttpResponseStatus.OK, body);
        response.headers().set(HttpHeaderNames.CONTENT_LENGTH, body.readableBytes());
        ctx.writeAndFlush(response).sync();
        System.out.println("Http Server send response succeed : " + response);
    }

    @Override
    public void exceptionCaught(ChannelHandlerContext ctx, Throwable cause) throws Exception {
        cause.printStackTrace();
        ctx.close();
    }

    private static void sendError(ChannelHandlerContext ctx, HttpResponseStatus status) {
        FullHttpResponse response = new DefaultFullHttpResponse(
                HTTP_1_1, status, Unpooled.copiedBuffer("Failure: " + status.toString() + "\r\n", CharsetUtil.UTF_8));
        response.headers().set(CONTENT_TYPE, "text/plain; charset=UTF-8");
        System.out.println(response);
        ctx.writeAndFlush(response).addListener(ChannelFutureListener.CLOSE);
    }
}
2
3
4
5
6
7
8
9
10
11
12
13
14
15
16
17
18
19
20
21
22
23
24
25
26
27
28
29
30
31
32
33
34
完成上述编码之后我们将代码启动。
public static void main(String[] args) throws Exception {
		Server4 server = new Server4();
		int port = 9999;
		System.out.println("HTTP server listening on " + port);
		server.bind(port);
	}
2
3
4
5
6
然后我们再来看看客户端的启动类,套路也是一样,编写好配置模板和业务处理器之后HttpClientHandler。
public class Client4 {
private Channel channel;
HttpClientHandler handler = new HttpClientHandler();
private void connect(String host, int port) throws Exception {
EventLoopGroup workerGroup = new NioEventLoopGroup(1);
Bootstrap b = new Bootstrap();
b.group(workerGroup);
b.channel(NioSocketChannel.class);
b.handler(new ChannelInitializer<SocketChannel>() {
@Override
public void initChannel(SocketChannel ch) throws Exception {
ch.pipeline().addLast(new HttpClientCodec());
ch.pipeline().addLast(new HttpObjectAggregator(Short.MAX_VALUE));
//自定义业务逻辑处理器
ch.pipeline().addLast(handler);
}
});
ChannelFuture f = b.connect(host, port).sync();
channel = f.channel();
}
/**
* 模拟http请求阻塞发送
*
* @param request
* @return
* @throws InterruptedException
* @throws ExecutionException
*/
private HttpResponse blockSend(FullHttpRequest request) throws InterruptedException, ExecutionException {
request.headers().set(HttpHeaderNames.CONTENT_LENGTH, request.content().readableBytes());
DefaultPromise<HttpResponse> respPromise = new DefaultPromise<HttpResponse>(channel.eventLoop());
handler.setRespPromise(respPromise);
channel.writeAndFlush(request);
//阻塞调用方线程,线程夯住,等待服务端的结果
HttpResponse response = respPromise.get();
if (response != null)
//通过自定义的HttpResponse解析缓冲区的结果
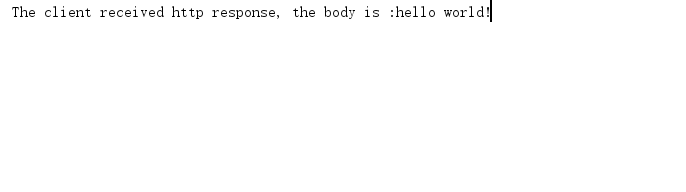
System.out.print("The client received http response, the body is :" + new String(response.body()));
return response;
}
}
2
3
4
5
6
7
8
9
10
11
12
13
14
15
16
17
18
19
20
21
22
23
24
25
26
27
28
29
30
31
32
33
34
35
36
37
38
39
40
41
42
43
44
45
46
47
我们不妨看看HttpClientHandler,它引入了一个DefaultPromise,泛型为HttpResponse,由DefaultPromise负责将收到数据进行处理。
public class HttpClientHandler extends SimpleChannelInboundHandler<FullHttpResponse> {

	/**
	 * 声明一个DefaultPromise处理接受的消息
	 */
	DefaultPromise<HttpResponse> respPromise;

	@Override
	protected void channelRead0(ChannelHandlerContext ctx,
								FullHttpResponse msg) throws Exception {
		if (msg.decoderResult().isFailure())
			throw new Exception("Decode HttpResponse error : " + msg.decoderResult().cause());
		HttpResponse response = new HttpResponse(msg);
		respPromise.setSuccess(response);//唤醒业务线程
	}

	@Override
	public void exceptionCaught(
			ChannelHandlerContext ctx, Throwable cause) throws Exception {
		cause.printStackTrace();
		ctx.close();
	}

	public DefaultPromise<HttpResponse> getRespPromise() {
		return respPromise;
	}

	public void setRespPromise(DefaultPromise<HttpResponse> respPromise) {
		this.respPromise = respPromise;
	}

}
2
3
4
5
6
7
8
9
10
11
12
13
14
15
16
17
18
19
20
21
22
23
24
25
26
27
28
29
30
31
32
而真正的缓冲区处理类代码如下,可以看到它做的操作就是将收到缓冲区的数据写道byte数组中。
public class HttpResponse {

    private HttpHeaders header;

    private FullHttpResponse response;

    private byte[] body;


    public HttpResponse(FullHttpResponse response) {
        this.header = response.headers();
        this.response = response;
    }


    public byte[] body() {
        return body = response.content() != null ?
                response.content().array() : null;
    }


}
2
3
4
5
6
7
8
9
10
11
12
13
14
15
16
17
18
19
20
21
22
23
24
25
26
自此我们也将客户端编码完成了,这里我们也将客户端启动,启动代码如下
public static void main(String[] args) throws Exception {
        Client4 client = new Client4();
        //连接服务端
        client.connect("127.0.0.1", 9999);
        //组装参数
        ByteBuf body = Unpooled.wrappedBuffer("hello world!".getBytes("UTF-8"));
        //调用并发送
        DefaultFullHttpRequest request = new DefaultFullHttpRequest(HttpVersion.HTTP_1_1, HttpMethod.GET,
                "http://127.0.0.1/user?id=10&addr=shanghai", body);
        //阻塞等待结果
        HttpResponse response = client.blockSend(request);
    }
2
3
4
5
6
7
8
9
10
11
12
结果客户端报错了,我们不妨debug看看客户端处理消息哪一环哪里出错了。
Exception in thread "main" java.lang.UnsupportedOperationException: direct buffer
at io.netty.buffer.PooledUnsafeDirectByteBuf.array(PooledUnsafeDirectByteBuf.java:343)
at io.netty.buffer.AbstractUnpooledSlicedByteBuf.array(AbstractUnpooledSlicedByteBuf.java:99)
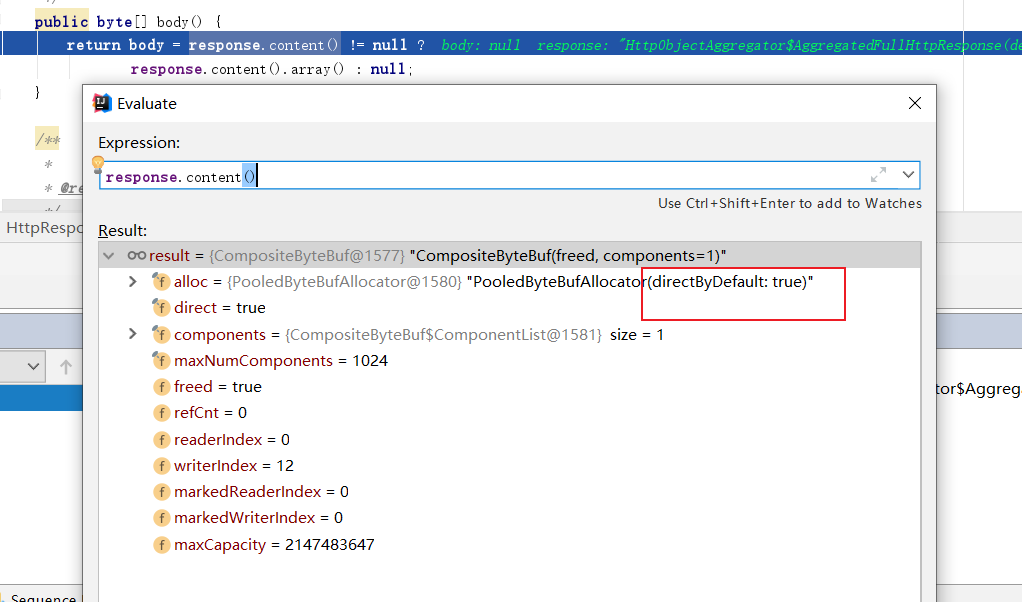
at io.netty.buffer.CompositeByteBuf.array(CompositeByteBuf.java:596)
at com.mx.tuning.case4.HttpResponse.body(HttpResponse.java:66)
at com.mx.tuning.case4.Client4.blockSend(Client4.java:62)
at com.mx.tuning.case4.Client4.main(Client4.java:72)
2
3
4
5
6
7
8
结合堆栈以及断点,笔者调试一番后发现,处理器收到的缓冲区下发给我我们的HttpResponse的数据是来自直接缓冲区,直接缓冲区是基于零拷贝技术实现,基于零拷贝技术,可以避免没必要的数据在用户态和内核之间的来回拷贝的步骤,从而提升传输效率。
所以Java应用程序是无法直接操作直接缓冲区的,这也就是为什么我们使用array企图操作数组数据时会抛出异常。
而解决方式也很简单,修改channelRead0方法调用的HttpResponse方法,收到的response数据时,直接将缓冲区数据原原本本复制一份到body数组中,这样一来后续的操作就不会报错了。
 public HttpResponse(FullHttpResponse response) {
        this.header = response.headers();
        this.response = response;
        if (response.content() != null) {
            body = new byte[response.content().readableBytes()];
            response.content().getBytes(0, body);
        }
    }


    public byte[] body() {
        return body;
    }
2
3
4
5
6
7
8
9
10
11
12
13
14
这样一来客户端的响应就不会报错了。
# 优化-浅谈池化技术
有时候我们希望可以创建的创建byteBuf,实际上netty也为我们提供的良好的池化API,使用方式也很简单,我们自然首先需要创建一个池。
PooledByteBufAllocator allocator = new PooledByteBufAllocator(false);
使用时,按照如下获取指定大小即可
buf = allocator.heapBuffer(10 * 1024);
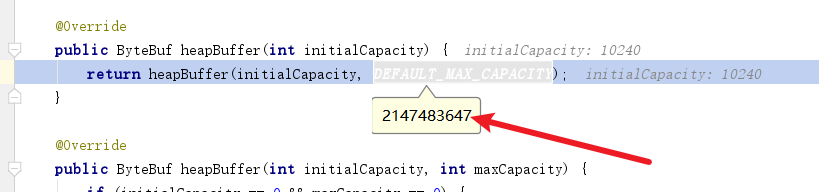
默认情况下缓冲区池的容量为255M左右可以提供复用这一点读者可以阅读源码印证。
以下笔者编写的池化性能压测代码,通过1e次循环判断池化和非池化的性能差距。
public class ByteBufPerformance {

    public static void main(String[] args) {
//        unPoolTest();
        poolTest();
    }

    static void unPoolTest() {
        //非内存池模式
        long beginTime = System.currentTimeMillis();
        ByteBuf buf = null;
        int maxTimes = 1_0000_0000;
        for (int i = 0; i < maxTimes; i++) {
            buf = Unpooled.buffer(10 * 1024);
            buf.release();
        }
        System.out.println("Execute unPoolTest" + maxTimes + " times cost time : "
                + (System.currentTimeMillis() - beginTime));
    }

    static void poolTest() {
        //内存池模式
        PooledByteBufAllocator allocator = new PooledByteBufAllocator(false);
        long beginTime = System.currentTimeMillis();
        ByteBuf buf = null;
        int maxTimes = 1_0000_0000;
        for (int i = 0; i < maxTimes; i++) {
            buf = allocator.heapBuffer(10 * 1024);
            buf.release();
        }
        System.out.println("Execute poolTest" + maxTimes + " times cost time : "
                + (System.currentTimeMillis() - beginTime));
    }
}
2
3
4
5
6
7
8
9
10
11
12
13
14
15
16
17
18
19
20
21
22
23
24
25
26
27
28
29
30
31
32
33
34
输出结果如下,可以看到池化的效率相比非池化效率高了将近10倍。
Execute unPoolTest100000000 times cost time : 80928
Execute poolTest100000000 times cost time : 8365
2
# 参考文献
Netty io.netty.util.IllegalReferenceCountException: refCnt: 0 问题解决:https://blog.csdn.net/pange1991/article/details/86532648 (opens new window)
Netty实战:https://book.douban.com/subject/27038538/ (opens new window)
Java性能调优 6步实现项目性能升级:https://coding.imooc.com/class/442.html (opens new window)
跟闪电侠学 Netty:Netty 即时聊天实战与底层原理:https://book.douban.com/subject/35752082/ (opens new window)
