 Redis持久化技术AOF要点与详细解答
# 基本配units
redis默认单位的度量为byte,而不是bit,这点我们需要注意一下- 计量单位对大小写不敏感
如下注释所示,要指定gb就把gb的解注释就好了
# Note on units: when memory size is needed, it is possible to specify
# it in the usual form of 1k 5GB 4M and so forth:
#
# 1k => 1000 bytes
# 1kb => 1024 bytes
# 1m => 1000000 bytes
# 1mb => 1024*1024 bytes
# 1g => 1000000000 bytes
# 1gb => 1024*1024*1024 bytes
#
# units are case insensitive so 1GB 1Gb 1gB are all the same.
2
3
4
5
6
7
8
9
10
11
12
13
# include引入其他配置文件
该配置可以将其他配置全部提取到该配置文件中以便统一管理。
# include /path/to/local.conf
# include /path/to/other.conf
2
3
4
5
# 网络相关配置
# bind
- 默认绑定
127.0.0.1 - 若
protected-mode yes,且没有设置bind ip、没有设置密码的情况下,只有本机可以访问redis。
bind 127.0.0.1 -::1


protected-mode yes
2
3
4
5
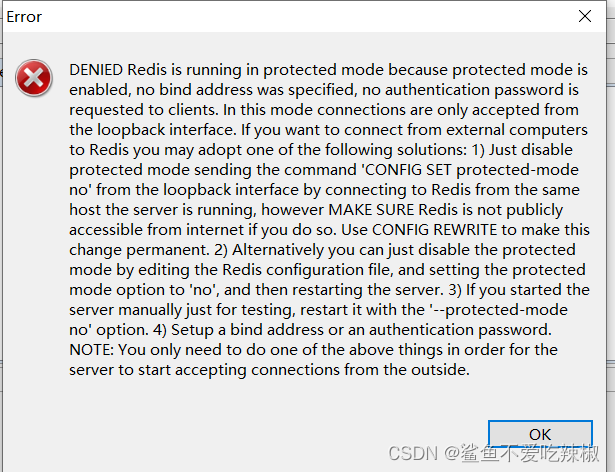
如下我们将bind注释,保护模式开启,使用远程连接工具时发现,redis-server拒绝访问了
#bind 127.0.0.1 -::1
protected-mode yes
2
# protected-mode
设置redis的保护模式,若设置为no,则其他服务器的redis客户端可以随便访问你的redis服务端。
# 设置为yes 开启保护模式,其他ip的客户端连不了
protected-mode yes
2
3
# port
指定redis服务端启用的端口号。
# 指定端口号为6380
port 6380
2
3
# tcp-backlog
该参数决定已经建立3次握手请求队列+未完成三次握手的请求队列的总数。
注: 当你设置这个值的时候必须考虑到Linux内核的这两个参数:
net.core.somaxconn参数决定了端口监听队列的最大长度,存放的是已经处于ESTABLISHED而没有被用户程序(例如nginx)接管的TCP连接,默认是128,对于高并发的,或者瞬发大量连接,必须调高该值,否则会直接丢弃连接net.ipv4.tcp_max_syn_backlog参数决定已经收到syn包,但是还没有来得及确认的连接队列,这是传输层的队列,在高并发的情况下,必须调整该值,提高承载能力。
tcp-backlog 511
2
而上述Linux内核参数,可使用vim命令修改下面配置文件生效
vim /etc/sysctl.conf
2
示例内容
vm.swappiness = 0
kernel.sysrq = 1

net.ipv4.neigh.default.gc_stale_time = 120

# see details in https://help.aliyun.com/knowledge_detail/39428.html
net.ipv4.conf.all.rp_filter = 0
net.ipv4.conf.default.rp_filter = 0
net.ipv4.conf.default.arp_announce = 2
net.ipv4.conf.lo.arp_announce = 2
net.ipv4.conf.all.arp_announce = 2

# see details in https://help.aliyun.com/knowledge_detail/41334.html
net.ipv4.tcp_max_tw_buckets = 262144
net.ipv4.tcp_syncookies = 1

# tcp_max_syn_backlog will only take effect when net.ipv4.tcp_syncookies == 0
# net.ipv4.tcp_max_syn_backlog = 65536
net.ipv4.tcp_synack_retries = 2
net.ipv4.tcp_slow_start_after_idle = 0
2
3
4
5
6
7
8
9
10
11
12
13
14
15
16
17
18
19
20
21
22
# timeout
表示一个空闲的redis客户端维持多久后关闭,若设置为0,表示永不关闭。
# Close the connection after a client is idle for N seconds (0 to disable)
timeout 0
2
3
# tcp-keepalive
该值表示对redis客户端心跳时长检测间隔,默认300s,建议设置成60
# A reasonable value for this option is 300 seconds, which is the new
# Redis default starting with Redis 3.2.1.
tcp-keepalive 300
2
3
4
5
# 通用设置
# daemonize
若设置为yes,则redis服务端会被设置为守护进程,会默认在后台启动
# 设置为yes,后台运行
daemonize yes
2
# pidfile
指定redis的pid文件的存放位置
# 设置redis pid文件存放在redis_6379.pid
pidfile /var/run/redis_6379.pid
2
3
# loglevel
指定日志记录的级别,总共有debug、verbose、notice、warning四个级别,在生产环境,我们建议使用notice、warning
设置日志级别为notice
loglevel notice
2
3
# logfile
设置redis服务器的日志名称
# Specify the log file name. Also the empty string can be used to force
# Redis to log on the standard output. Note that if you use standard
# output for logging but daemonize, logs will be sent to /dev/null
logfile ""
2
3
4
5
# databases
redis设置数据库的数量,默认为16
databases 16
2
3
redis客户端可以用如下命令指定操作的redis数据库
SELECT <dbid>
示例
127.0.0.1:6379> SELECT 1
OK
2
3
# 安全相关参数
# requirepass
解开注释配置这个参数之后,redis客户端连接需要使用密码
# requirepass foobared
2
3
示例
# 设置认证密钥为123
 requirepass 123
2
可以看到设置完requirepass之后,操作redis服务端就需要使用auth进行认证了
127.0.0.1:6379> ping
(error) NOAUTH Authentication required.
127.0.0.1:6379> auth 123
OK
127.0.0.1:6379> ping
PONG
127.0.0.1:6379>
2
3
4
5
6
7
8
9
# redis内存调优相关
# maxclients
redis允许接入的最大客户端连接数,默认为1000
# IMPORTANT: When Redis Cluster is used, the max number of connections is also
# shared with the cluster bus: every node in the cluster will use two
# connections, one incoming and another outgoing. It is important to size the
# limit accordingly in case of very large clusters.
#
# maxclients 10000
2
3
4
5
6
笔者尝试将这个值改为1之后,开始第2个客户端尝试连接报出了ERR max number of clients reached的错误
[root@iZ8vb7bhe4b8nhhhpavhwpZ ~]# cd /usr/sbin/
[root@iZ8vb7bhe4b8nhhhpavhwpZ sbin]# redis-cli
127.0.0.1:6379> ping
Error: Broken pipe
127.0.0.1:6379> auth 123
(error) ERR max number of clients reached
127.0.0.1:6379>
2
3
4
5
6
7
8
# maxmemory(重点)
设置内存的使用上限,一旦redis使用上限达到配置值时,就会根据内存maxmemory-policy配置的策略进行缓存置换。
当然若未设置该策略或者无法根据规则移除key的话,你只能对redis进行读操作,写操作一律报错。
之前面试有问过,redis内存满了怎么办,实际上如果服务器性能还行的话,我们是建议清理空间之后调大maxmemory的值。
# 设置内存容量为1G
 maxmemory 1G
2
3
# maxmemory-policy(重点)
这个参数决定内存满了之后的内存回收方式:
- volatile-lru:针对那些有设置过期时间的集合中,使用
LRU算法移除近期不怎么用到的key; - allkeys-lru:在所有集合
key中,使用LRU算法移除key。 - volatile-random:在过期集合中移除随机的
key,只对设置了过期时间的键 - allkeys-random:在所有集合key中,移除随机的key
- volatile-ttl:移除那些
TTL值最小的key,即那些最近要过期的key - noeviction:不进行移除。针对写操作,只是返回错误信息(redis的默认配置)
# 设置为allkeys-lru缓存置换算法
 maxmemory-policy allkeys-lru
2
3
4
# maxmemory-samples
在使用LRU或者TTL算法进行内存置换时都无法进行精确计算,所以我们可以设置一定量的样本确保估算值的准确性。
此时我们就可以使用maxmemory-samples达到目的,建议设置在3-7范围以内,这个值越大估算的值越准确,但是性能消耗也会随之变高。
配置如下所示,redis默认配置为5
设置样本数为5
 maxmemory-samples 5
2
3
# 面试题:redis内存满了怎么办?这类问题你是怎么解决的?
答: 肯定是需要对redis中用不到的元素进行移除,所以我们首先需要对redis.conf动手,大抵分为以下三步骤:
- 如果服务器内存还行,我们就调大redis可用最大内存:使用
maxmemory进行设置。 - 设置回收算法,就我个人而言:
maxmemory-policy allkeys-lru。 - 最后一个为了保证内存置换的数据更加准确,我们建议设置
maxmemory-samples调整样本决定估值更加准确。 - 日常注意,对于短期用到的热点数据设置时效。
