 解读 Spring Boot 核心知识点
# 写在文章开头
在当今的软件开发领域,Spring Boot 犹如一颗璀璨的明星,散发着耀眼的光芒。它以其强大的功能和便捷的特性,成为了众多开发者的首选框架。当我们深入探究 Spring Boot 的世界,会发现其中蕴含着丰富而关键的核心知识点,这些知识点犹如构建大厦的基石,支撑着整个应用的高效运行。
Hi,我是 sharkChili ,是个不断在硬核技术上作死的技术人,是 CSDN的博客专家 ,也是开源项目 Java Guide 的维护者之一,熟悉 Java 也会一点 Go ,偶尔也会在 C源码 边缘徘徊。写过很多有意思的技术博客,也还在研究并输出技术的路上,希望我的文章对你有帮助,非常欢迎你关注我的公众号: 写代码的SharkChili 。
同时也非常欢迎你star我的开源项目mini-redis:https://github.com/shark-ctrl/mini-redis (opens new window)
因为近期收到很多读者的私信,所以也专门创建了一个交流群,感兴趣的读者可以通过上方的公众号获取笔者的联系方式完成好友添加,点击备注 “加群” 即可和笔者和笔者的朋友们进行深入交流。
# 详解Spring Boot基础知识点
# 为什么需要Spring boot
Spring框架是轻量级Java框架,他完全可以基于配置+一些POJO(简单的Java对象,不是JavaBean, EntityBean 或者 SessionBean,无需担任任何的角色)即可完成一套web服务器开发。
尽管是轻量级,但是还是需要配置大量的xml,而Spring boot则将繁琐的配置全部封装起来,使得我们可以开箱即用。

相较于原生的Spring他有着如下优点:
- 可以非常方便的开发出
Spring应用容器。 - 基于
Spring boot开发应用的时间比Spring要少很多,生产力明显提高了。 - 可以非常方便集成其他
Spring组件,例如Spring JDBC、Spring ORM等。 Spring boot内嵌了web容器,例如tomcat服务器,也可以改为jetty。Spring boot内部提供的CLI命令行工具,例如java或者Groovy。- 无需编写大量的
xml配置文件。 Spring Boot遵循“固执己见的默认配置”,以减少开发工作(默认配置可以修改)。Spring boot内部也提供了许多的插件,例如Maven或Gradle,使得我们的可以快速的开发或者测试Spring应用。
# 什么是Spring Boot Starters
原本我们开发web应用需要手动引入mvc、jackson等各种依赖,有了Starters之后,我们只需引入一个Starters依赖即可完成所有Spring web应用的配置,非常方便。
<dependency>
    <groupId>org.springframework.boot</groupId>
    <artifactId>spring-boot-starter-web</artifactId>
</dependency>
2
3
4
SpringBoot应用Starters基本的一共有44种,具体如下:
1)spring-boot-starter 这是Spring Boot的核心启动器,包含了自动配置、日志和YAML。
2)spring-boot-starter-actuator 帮助监控和管理应用。
3)spring-boot-starter-amqp 通过spring-rabbit来支持AMQP协议(Advanced Message Queuing Protocol)。
4)spring-boot-starter-aop 支持面向方面的编程即AOP,包括spring-aop和AspectJ。
5)spring-boot-starter-artemis 通过Apache Artemis支持JMS的API(Java Message Service API)。
6)spring-boot-starter-batch 支持Spring Batch,包括HSQLDB数据库。
7)spring-boot-starter-cache 支持Spring的Cache抽象。
8)spring-boot-starter-cloud-connectors 支持Spring Cloud Connectors,简化了在像Cloud Foundry或Heroku这样的云平台上连接服务。
9)spring-boot-starter-data-elasticsearch 支持ElasticSearch搜索和分析引擎,包括spring-data-elasticsearch。
10)spring-boot-starter-data-gemfire 支持GemFire分布式数据存储,包括spring-data-gemfire。
11)spring-boot-starter-data-jpa 支持JPA(Java Persistence API),包括spring-data-jpa、spring-orm、hibernate。
12)spring-boot-starter-data-MongoDB 支持MongoDB数据,包括spring-data-mongodb。
13)spring-boot-starter-data-rest 通过spring-data-rest-webmvc,支持通过REST暴露Spring Data数据仓库。
14)spring-boot-starter-data-solr 支持Apache Solr搜索平台,包括spring-data-solr。
15)spring-boot-starter-freemarker 支持FreeMarker模板引擎。
16)spring-boot-starter-groovy-templates 支持Groovy模板引擎。
17)spring-boot-starter-hateoas 通过spring-hateoas支持基于HATEOAS的RESTful Web服务。
18)spring-boot-starter-hornetq 通过HornetQ支持JMS。
19)spring-boot-starter-integration 支持通用的spring-integration模块。
20)spring-boot-starter-jdbc 支持JDBC数据库。
21)spring-boot-starter-jersey 支持Jersey RESTful Web服务框架。
22)spring-boot-starter-jta-atomikos 通过Atomikos支持JTA分布式事务处理。
23)spring-boot-starter-jta-bitronix 通过Bitronix支持JTA分布式事务处理。
24)spring-boot-starter-mail 支持javax.mail模块。
25)spring-boot-starter-mobile 支持spring-mobile。
26)spring-boot-starter-mustache 支持Mustache模板引擎。
27)spring-boot-starter-Redis 支持Redis键值存储数据库,包括spring-redis。
28)spring-boot-starter-security 支持spring-security。
29)spring-boot-starter-social-facebook 支持spring-social-facebook
30)spring-boot-starter-social-linkedin 支持pring-social-linkedin
31)spring-boot-starter-social-twitter 支持pring-social-twitter
32)spring-boot-starter-test 支持常规的测试依赖,包括JUnit、Hamcrest、Mockito以及spring-test模块。
33)spring-boot-starter-thymeleaf 支持Thymeleaf模板引擎,包括与Spring的集成。
34)spring-boot-starter-velocity 支持Velocity模板引擎。
35)spring-boot-starter-web S支持全栈式Web开发,包括Tomcat和spring-webmvc。
36)spring-boot-starter-websocket 支持WebSocket开发。
37)spring-boot-starter-ws 支持Spring Web Services。
Spring Boot应用启动器面向生产环境的还有2种,具体如下:
38)spring-boot-starter-actuator 增加了面向产品上线相关的功能,比如测量和监控。
39)spring-boot-starter-remote-shell 增加了远程ssh shell的支持。
最后,Spring Boot应用启动器还有一些替换技术的启动器,具体如下:
40)spring-boot-starter-jetty 引入了Jetty HTTP引擎(用于替换Tomcat)。
41)spring-boot-starter-log4j 支持Log4J日志框架。
42)spring-boot-starter-logging 引入了Spring Boot默认的日志框架Logback。
43)spring-boot-starter-tomcat 引入了Spring Boot默认的HTTP引擎Tomcat。
44)spring-boot-starter-undertow 引入了Undertow HTTP引擎(用于替换Tomcat)。
# Spring Boot 支持哪些内嵌 Servlet
Spring支持的内嵌Servlet有3种:
Tomcat(这个是默认的容器)JettyUndertow

正是因为Spring boot内嵌了web容器,使得我们启动web程序就像启动普通Java程序的一样方便,由于Spring boot默认使用的web容器是Tomcat ,如果我们想修改可以使用下面这种方式排除tomcat容器,再引入其他容器
<!--从Web启动器依赖中排除Tomcat-->
<dependency>
    <groupId>org.springframework.boot</groupId>
    <artifactId>spring-boot-starter-web</artifactId>
    <exclusions>
        <exclusion>
            <groupId>org.springframework.boot</groupId>
            <artifactId>spring-boot-starter-tomcat</artifactId>
        </exclusion>
    </exclusions>
</dependency>
<!--添加Jetty依赖-->
<dependency>
    <groupId>org.springframework.boot</groupId>
    <artifactId>spring-boot-starter-jetty</artifactId>
</dependency>
2
3
4
5
6
7
8
9
10
11
12
13
14
15
16
# 详解@SpringBootApplication 这个注解
这个注解我们完全可以通过源码就知道它大概做的实际,如下所示,可以看到SpringBootApplication 主要是由SpringBootConfiguration、EnableAutoConfiguration、ComponentScan构成。这三个注解分别是意思是:
SpringBootConfiguration内部有一个Configuration注解,所以它的意思是允许在上下文开启额外bean或者其他配置类。EnableAutoConfiguration启用Spring boot自动配置机制。ComponentScan自动扫描当前类的包下的所有被@Component (@Service,@Controller)注解的类。
@Target({ElementType.TYPE})
@Retention(RetentionPolicy.RUNTIME)
@Documented
@Inherited
@SpringBootConfiguration
@EnableAutoConfiguration
@ComponentScan(
    excludeFilters = {@Filter(
    type = FilterType.CUSTOM,
    classes = {TypeExcludeFilter.class}
), @Filter(
    type = FilterType.CUSTOM,
    classes = {AutoConfigurationExcludeFilter.class}
)}
)
public @interface SpringBootApplication {
.....
}
2
3
4
5
6
7
8
9
10
11
12
13
14
15
16
17
18
# Spring是如何启动的(重点)
总结一下大概有9个步骤:
- 创建监听,并准备监听。
- 容器环境预配置。
- 打印banner。
- 创建应用上下文即
applicationContextFactory。 - 容器刷新前置处理:进行应用上下文各种配置初始化,拿到我们的启动类元信息生成
BeanDefinition存入beanDefinitionMap中。 - 容器刷新,即走到
Spring的IOC逻辑,手机配置、注解中的bean信息存入beanDefinitionMap,然后进行bean的创建和注入。 - 容器刷新后置处理,默认为空。
- 发出容器刷新结束事件
ApplicationReadyEvent通知。 - 调用
callRunners获取所有容器中的ApplicationRunner和CommandLineRunner的run方法并执行。
对应的我们给出源码即SpringApplication下的run方法,读者可参考上述流程阅读一下下面这段源码:
public ConfigurableApplicationContext run(String... args) {
		//......
		// 1. 获取并启动监听
		SpringApplicationRunListeners listeners = getRunListeners(args);
		listeners.starting(bootstrapContext, this.mainApplicationClass);
		try {
			ApplicationArguments applicationArguments = new DefaultApplicationArguments(args);
			//2. 项目环境environment 预配置
			ConfigurableEnvironment environment = prepareEnvironment(listeners, bootstrapContext, applicationArguments);
			configureIgnoreBeanInfo(environment);
			//打印banner,此时控制台会输出一个banner
			Banner printedBanner = printBanner(environment);
			//3. 创建Sring容器
			context = createApplicationContext();
			context.setApplicationStartup(this.applicationStartup);
			//4. 容器刷新前置处理,进行应用上下文各种配置信息初始化,并将当前启动类存入beanDefinitionMap中
			prepareContext(bootstrapContext, context, environment, listeners, applicationArguments, printedBanner);
			//5.刷新容器,这里会进行IOC相关操作
			refreshContext(context);
			//6. 容器刷新后置操作,默认空实现
			afterRefresh(context, applicationArguments);
			Duration timeTakenToStartup = Duration.ofNanos(System.nanoTime() - startTime);
			if (this.logStartupInfo) {
				new StartupInfoLogger(this.mainApplicationClass).logStarted(getApplicationLog(), timeTakenToStartup);
			}
			// 7. 发出执行结束的ApplicationReadyEvent事件通知
			listeners.started(context, timeTakenToStartup);
			//8. 调用runner,完成启动后的特定命令
			callRunners(context, applicationArguments);
		}
		catch (Throwable ex) {
			//......
		}

		//9. 返回上下文
		return context;
	}
2
3
4
5
6
7
8
9
10
11
12
13
14
15
16
17
18
19
20
21
22
23
24
25
26
27
28
29
30
31
32
33
34
35
36
37
# Spring Boot 的自动装配是如何实现的
关于spring自动装配的原理和使用,建议阅读笔者这篇文章,里面有详尽的分析和实践:
Spring Boot自动装配原理以及实践:https://mp.weixin.qq.com/s/GYlMV53Uak1gQ-OkA9lR8g (opens new window)
# 为什么会有yml格式的文件,和properties区别是什么
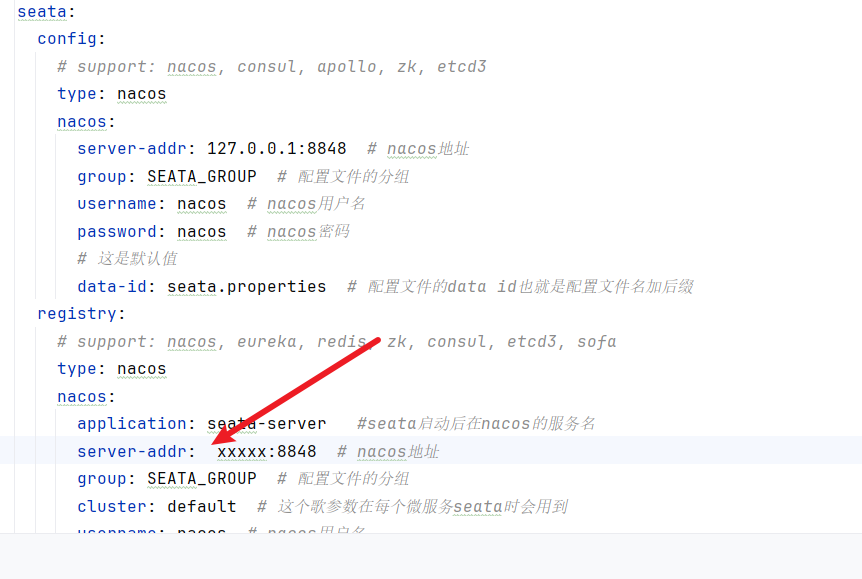
相比于properties,yml格式的文件结构更加清晰,更易于阅读和理解,但是缺点也很明显,因为格式的严格要求,很可能因为格式原因导致配置无法读取,以笔者为例,线上配置seata配置时明明注册地址,但是服务始终读取不到配置,导致启动失败,这种问题是肉眼无法观察的:
而且yml还有一个缺点即@PropertySource 这个注解无法读取yml格式的配置数据。
# Spring Boot 常用的读取配置文件的方法
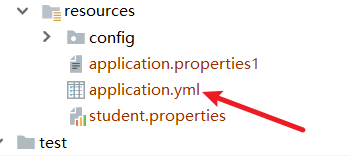
- 通过 @value 读取简单直观的配置:为了演示这种读取方式,我们可以在resource目录下建立一个
application.yml文件
配置文件内容为
myConfig: 这个是helloworld配置的具体内容哦
后续如果我们希望获取到myConfig这个值的话,只需按照下面这种方式引入即可,注意value注解获取配置值的方式,Spring并不推荐使用。
	@Value("${myConfig}")
	private String value;
2
3
- 通过@ConfigurationProperties读取并与 bean 绑定:这种方式相较于上面那种更加强大,可以与
bean绑定,例如我们yml的配置文件内容如下(注意配置名称必须全小写,否则会报一些奇怪的错误)
myobj:
  name: out-side-config
  email: out-side-config@qq.com
2
3
那么我们就可以编写一个类,代码如下所示,使用ConfigurationProperties引入前缀为myobj的配置内容即可,该配置就会将myobj前缀下的所有配置和我们的类绑定
/**
 * 注意 yml配置文件不能有大写字母
 */
@ConfigurationProperties(prefix = "myobj")
public class MyObj {

    private String name;

    private String email;


    //......get、set
}
2
3
4
5
6
7
8
9
10
11
12
13
@PropertySource读取指定的properties文件
有时候我们希望指定配置文件和类进行绑定,那么我们就可以使用PropertySource注解,例如我们在resource目录下有个student.properties文件,内容为
name:xiaoming
no:18
2
我们只需使用PropertySource执行路径以及配置文件名,再配合value即可完成属性绑定。
@Component
@PropertySource("classpath:student.properties")
public class Student {

    @Value("${name}")
    private String name;
    @Value("${no}")
    private String no;


     //......get、set
}
2
3
4
5
6
7
8
9
10
11
12
13
# Spring Boot 加载配置文件的优先级
大体来说优先考虑外部、properties或者yml指明profile的文件:
- 命令行参数。所有的配置都可以在命令行上进行指定。
- 操作系统环境变量 。
- jar包外部的
application-{profile}.properties或带spring.profile的application.yml配置文件 - jar包内部的
application-{profile}.properties或带spring.profile的application.yml配置文件,再来加载不带profile。 jar包外部的application.properties或不带spring.profile的application.yml配置文件jar包内部的application.properties或不带spring.profile的application.yml配置文件
# 常用的 Bean 映射工具有哪些
常见的是:MapStruct、ModelMapper、Dozer、Orika、JMapper 这几种吧。
最常用的还是MapStruct,它的工作原理也很简单,我们声明一个转换接口后,它会在编译期为了我们生成转换实现类的字节码文件。
对此我们不妨距离一下它的使用方式,首先引入版本号、依赖、插件
版本号
 <properties>
        <java.version>1.8</java.version>
        <org.mapstruct.version>1.5.3.Final</org.mapstruct.version>
    </properties>
2
3
4
依赖
<!--mapstruct依赖-->
        <dependency>
            <groupId>org.mapstruct</groupId>
            <artifactId>mapstruct</artifactId>
            <version>${org.mapstruct.version}</version>
        </dependency>
        <dependency>
            <groupId>org.projectlombok</groupId>
            <artifactId>lombok</artifactId>
            <version>1.18.12</version>
        </dependency>
2
3
4
5
6
7
8
9
10
11
插件
            <plugin>
                <groupId>org.apache.maven.plugins</groupId>
                <artifactId>maven-compiler-plugin</artifactId>
                <version>3.8.1</version>
                <configuration>
                    <source>1.8</source>
                    <target>1.8</target>
                    <annotationProcessorPaths>
                        <path>
                            <groupId>org.mapstruct</groupId>
                            <artifactId>mapstruct-processor</artifactId>
                            <version>${org.mapstruct.version}</version>
                        </path>
                    </annotationProcessorPaths>
                </configuration>
            </plugin>
2
3
4
5
6
7
8
9
10
11
12
13
14
15
16
17
例如我们现在有个Doctor 希望转为DoctorDTO类,代码如下所示
public class Doctor {
    private Integer id;

    private String name;

    private String srcAddr;


    //......get、set
    }
}
2
3
4
5
6
7
8
9
10
11
DoctorDTO 类,可以看出地址的字段名为dstAddr,和上面的srcAddr有区别
public class DoctorDTO {

    private Integer id;

    private String name;

    private String dstAddr;


    //......get、set
}
2
3
4
5
6
7
8
9
10
11
所以我们编写一个接口,如下所示,对于字段名不一样的,我们使用Mapping手动配置映射关系
import org.mapstruct.Mapper;
import org.mapstruct.Mapping;
import org.mapstruct.factory.Mappers;
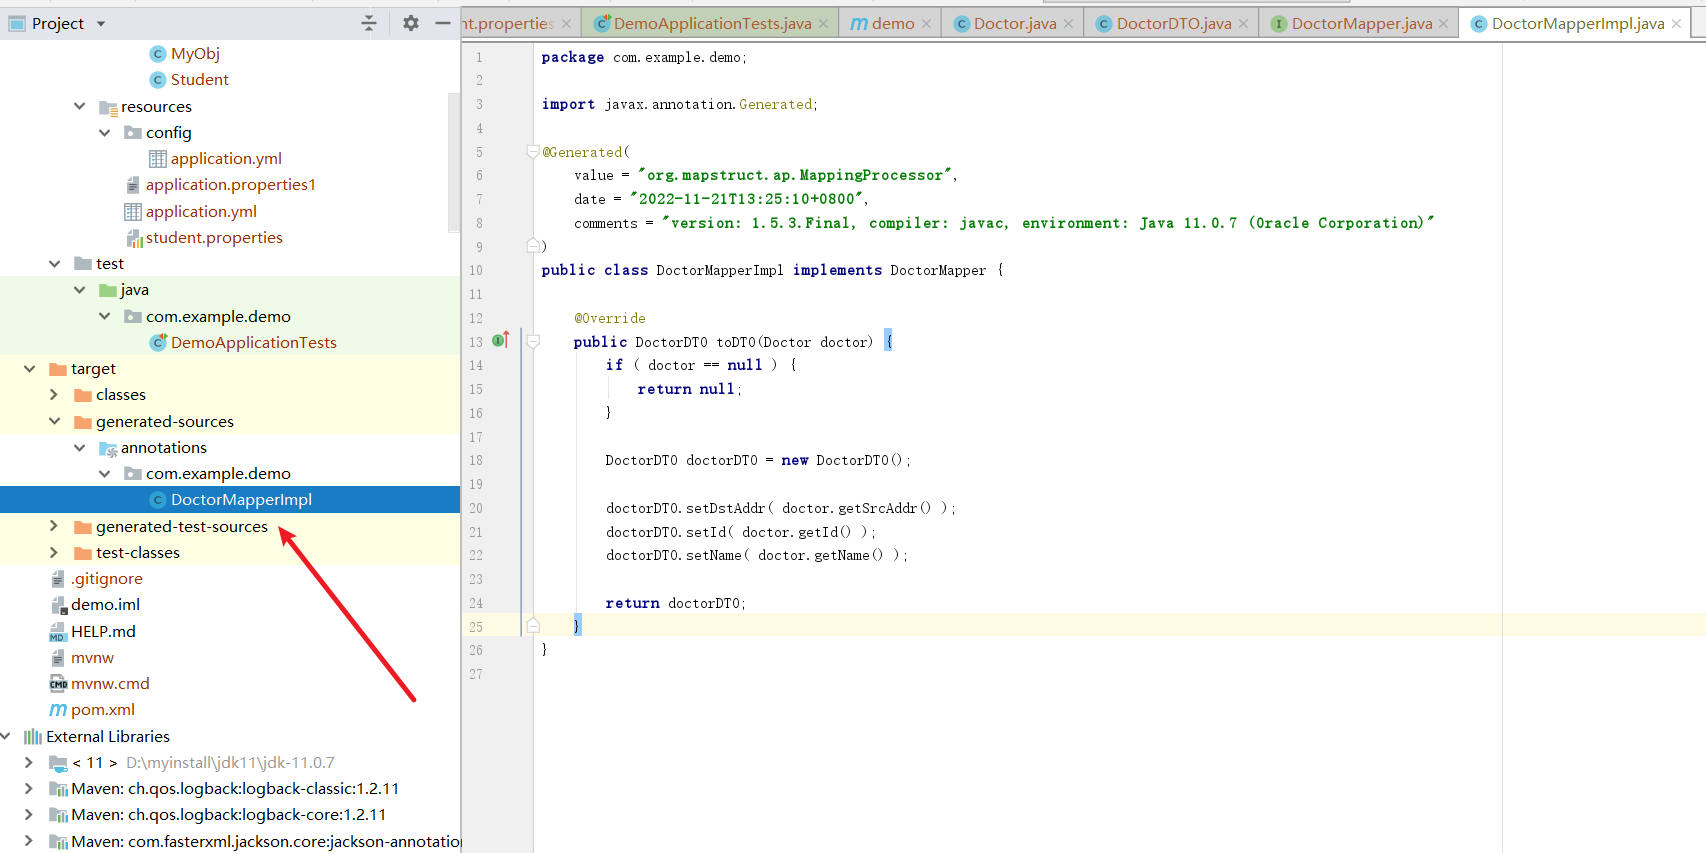
@Mapper
public interface DoctorMapper {
DoctorMapper INSTANCE = Mappers.getMapper(DoctorMapper.class);
/**
* 会在编译期生成
* @param doctor
* @return
*/
@Mapping(source = "srcAddr", target = "dstAddr")
DoctorDTO toDTO(Doctor doctor);
}
2
3
4
5
6
7
8
9
10
11
12
13
14
15
16
17
18
测试代码,可以看到bean转换完成
@Test
	public void testToDTO() {
		Integer doctorId = 15;
		String doctorName = "xiaoming";

		Doctor doctor = new Doctor();
		doctor.setId(doctorId);
		doctor.setName(doctorName);
		doctor.setSrcAddr("中国北京");

		DoctorDTO doctorDTO = DoctorMapper.INSTANCE.toDTO(doctor);

		// 输出结果 DoctorDTO{id=15, name='xiaoming', dstAddr='中国北京'}
        System.out.println(doctorDTO);
		assertEquals(doctorId, doctorDTO.getId());
		assertEquals(doctorName, doctorDTO.getName());
	}
2
3
4
5
6
7
8
9
10
11
12
13
14
15
16
17
通过源码我们可以看到这个接口的实现类会在编译器生成
# Spring Boot 如何监控系统实际运行状况
引入spring-boot-starter-actuator的依赖
<dependency>
    <groupId>org.springframework.boot</groupId>
    <artifactId>spring-boot-starter-actuator</artifactId>
</dependency>
2
3
4
然后键入下面的地址即可查看对应端点的信息
http://localhost:8080/actuator
具体可以参考下面这篇文章
集成Spring Boot Actuator很简单,难的是运用场景!:https://juejin.cn/post/6983803935328829453 (opens new window)
# Spring Boot 如何做请求参数校验
有两种校验框架,一个是Hibernate Validator,还有一个是JSR(Java Specification Requests)校验,后者比较常用,无需引入特殊的依赖。就例如我们现在有个Person类,希望名字不为空,性别是是数字最大值为2,而email必须为邮箱格式,那么我们就可以基于JSR的注解进行说明。
public class Person {

    @NotNull(message = "姓名不可为空")
    @Size(max = 10, message = "姓名长度不可超过10位")
    private String name;

    @Max(value = 2, message = "性别最大值只能为2")
    private int sex;
    @Email(message = "邮箱格式不正确")
    private String email;

    public String getName() {
        return name;
    }

    public void setName(String name) {
        this.name = name;
    }

    public int getSex() {
        return sex;
    }

    public void setSex(int sex) {
        this.sex = sex;
    }

    public String getEmail() {
        return email;
    }

    public void setEmail(String email) {
        this.email = email;
    }

    @Override
    public String toString() {
        return "Person{" +
                "name='" + name + '\'' +
                ", sex='" + sex + '\'' +
                ", email='" + email + '\'' +
                '}';
    }
}
2
3
4
5
6
7
8
9
10
11
12
13
14
15
16
17
18
19
20
21
22
23
24
25
26
27
28
29
30
31
32
33
34
35
36
37
38
39
40
41
42
43
44
当他作为controller的requestBody的参数时,用法如下所示
 @PostMapping("/test/hello")
    public void hello(@Valid Person person) {
        logger.info("hello {}", person.getName());
    }
2
3
4
假如我们想校验路径参数时,我们只需在Controller上方加一个注解@Validated,然后对于路径参数加入校验注解Valid +校验规则注解即可即可。
@GetMapping("/test/hello2/{id}")
    public void hello2(@Valid @PathVariable("id") @Max(value = 5,message = "最大值为5") Integer  id) {
        logger.info("hello {}", id);
    }
2
3
4
补充一下常见的一些校验注解:
1. @NotEmpty 被注释的字符串的不能为 null 也不能为空
2. @NotBlank 被注释的字符串非 null,并且必须包含一个非空白字符
3. @Null 被注释的元素必须为 null
4. @NotNull 被注释的元素必须不为 null
5. @AssertTrue 被注释的元素必须为 true
6. @AssertFalse 被注释的元素必须为 false
7. @Pattern(regex=,flag=)被注释的元素必须符合指定的正则表达式
8. @Email 被注释的元素必须是 Email 格式。
9. @Min(value)被注释的元素必须是一个数字,其值必须大于等于指定的最小值
10. @Max(value)被注释的元素必须是一个数字,其值必须小于等于指定的最大值
11. @DecimalMin(value)被注释的元素必须是一个数字,其值必须大于等于指定的最小值
12. @DecimalMax(value) 被注释的元素必须是一个数字,其值必须小于等于指定的最大值
13. @Size(max=, min=)被注释的元素的大小必须在指定的范围内
14. @Digits(integer, fraction)被注释的元素必须是一个数字,其值必须在可接受的范围内
15. @Past被注释的元素必须是一个过去的日期
16. @Future 被注释的元素必须是一个将来的日期
2
3
4
5
6
7
8
9
10
11
12
13
14
15
16
17
# 如何使用 Spring Boot 进行全局异常处理
通过@ControllerAdvice将控制器声明为增强器,然后通过ExceptionHandler 对自己自己的异常进行处理。
例如我们想处理所有控制器的BindException,代码如下所示
/**
 * 统一异常处理、数据预处理等
 */
@ControllerAdvice
public class ControllerExceptionHandler {

    private static final Logger LOG = LoggerFactory.getLogger(ControllerExceptionHandler.class);

    /**
     * 校验异常统一处理
     * @param e
     * @return
     */
    @ExceptionHandler(value = BindException.class)
    @ResponseBody
    public CommonResp validExceptionHandler(BindException e) {
        CommonResp commonResp = new CommonResp();
        LOG.warn("参数校验失败:{}", e.getBindingResult().getAllErrors().get(0).getDefaultMessage());
        commonResp.setSuccess(false);
        commonResp.setMessage(e.getBindingResult().getAllErrors().get(0).getDefaultMessage());
        return commonResp;
    }


}
2
3
4
5
6
7
8
9
10
11
12
13
14
15
16
17
18
19
20
21
22
23
24
25
# Spring Boot 中如何实现定时任务
首先在启动类中添加@EnableScheduling注解,然后编写一个定时任务bean,然后在定时任务的方法上添加@Scheduled注解
@Component
@EnableAsync
//@EnableAsync 和 @Async 使定时任务并行执行
public class AsyncScheduledTasks {
    private static final Logger log = LoggerFactory.getLogger(AsyncScheduledTasks.class);
    private static final SimpleDateFormat dateFormat = new SimpleDateFormat("HH:mm:ss");
    private List<Integer> index = Arrays.asList(6, 6, 2, 3);
    int i = 0;

    @Scheduled(fixedRate = 5000)
    @Async
    public void reportCurrentTimeWithFixedRate() {
        log.info("Current Thread : {}", Thread.currentThread().getName());

        if (i == 0) {
            log.info("Start time is {}", dateFormat.format(new Date()));
        }
        if (i < 4) {
            try {
                TimeUnit.SECONDS.sleep(index.get(i));
                log.info("Fixed Rate Task : The time is now {}", dateFormat.format(new Date()));
            } catch (InterruptedException e) {
                e.printStackTrace();
            }
            i++;
        }
    }

}
2
3
4
5
6
7
8
9
10
11
12
13
14
15
16
17
18
19
20
21
22
23
24
25
26
27
28
29
# 小结
我是 sharkchili ,CSDN Java 领域博客专家,mini-redis的作者,我想写一些有意思的东西,希望对你有帮助,如果你想实时收到我写的硬核的文章也欢迎你关注我的公众号: 写代码的SharkChili 。
同时也非常欢迎你star我的开源项目mini-redis:https://github.com/shark-ctrl/mini-redis (opens new window)
因为近期收到很多读者的私信,所以也专门创建了一个交流群,感兴趣的读者可以通过上方的公众号获取笔者的联系方式完成好友添加,点击备注 “加群” 即可和笔者和笔者的朋友们进行深入交流。
# 参考文献
剖析面试最常见问题之 Spring Boot:https://xiaozhuanlan.com/topic/4923687015 (opens new window)
@RequestParam注解使用:https://blog.csdn.net/sswqzx/article/details/84195043 (opens new window)
如何在 Spring/Spring Boot 中做参数校验?你需要了解的都在这里!:https://juejin.cn/post/6844903991621451789 (opens new window)
对象转换工具 MapStruct 介绍:https://juejin.cn/post/6994233847076356133 (opens new window)
SpringBoot项目是如何启动的?:https://zhuanlan.zhihu.com/p/342530328 (opens new window)
spring boot的常用注解有哪些?:https://zhuanlan.zhihu.com/p/84852136 (opens new window)
SpringBoot 的 44 种应用启动器,你都知道吗?:https://developer.aliyun.com/article/780798 (opens new window)
SpringBoot配置文件加载顺序 :https://blog.csdn.net/zxd1435513775/article/details/103773404 (opens new window)
