 Java并发容器总结
[toc]
# 写在文章开头
这篇文章我们着重探讨一下java中容器的并发管理容器的底层实现和使用技巧,希望对你有帮助。
我是 SharkChili ,Java 开发者,Java Guide 开源项目维护者。欢迎关注我的公众号:写代码的SharkChili,也欢迎您了解我的开源项目 mini-redis:https://github.com/shark-ctrl/mini-redis (opens new window)。
为方便与读者交流,现已创建读者群。关注上方公众号获取我的联系方式,添加时备注加群即可加入。
# 详解并发场景下的Map容器
# 详解JDK7版本HashMap
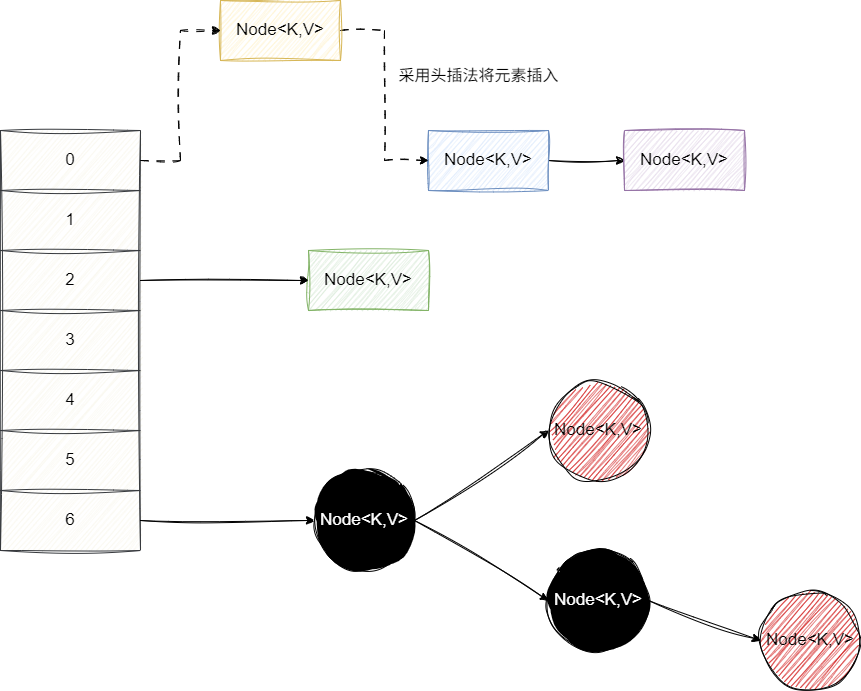
# jdk7版本下的HashMap数据结构
jdk7版本的hashMap底层采用数组加链表的形式存储元素,假如需要存储的键值对经过计算发现存放的位置已经存在键值对了,那么就是用头插法将新节点插入到这个位置。
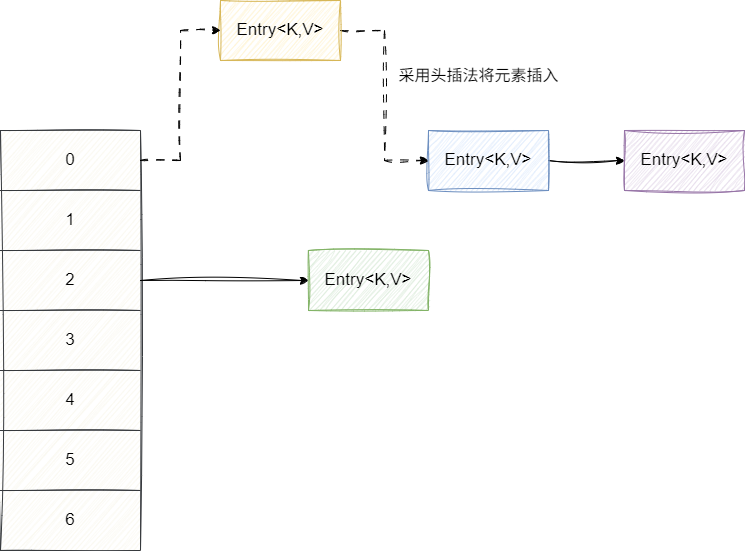
对应的我们也给出JDK7版本下的put方法,该版本进行元素插入时会通过hash散列计算得元素对应的索引位置,也就是我们常说的bucket,然后遍历查看是否存在重复的key,若存在则直接将value覆盖。反之,则会在循环结束后调用addEntry采用头插法将元素插入:
public V put(K key, V value) {
        //......
        //计算key的散列值
        int hash = hash(key);
        int i = indexFor(hash, table.length);
        //定位到对应桶的位置,查看是否存在重复的key,如果有则直接覆盖
        for (Entry<K,V> e = table[i]; e != null; e = e.next) {
            Object k;
            if (e.hash == hash && ((k = e.key) == key || key.equals(k))) {
                V oldValue = e.value;
                e.value = value;
                e.recordAccess(this);
                return oldValue;
            }
        }

		//走到这里说明要在一个空的位置添加节点,将modCount自增,并调用addEntry采用头插法完成节点插入
        modCount++;
        addEntry(hash, key, value, i);
        return null;
    }
2
3
4
5
6
7
8
9
10
11
12
13
14
15
16
17
18
19
20
21
对应我们也给出addEntry的逻辑实现,它会判断数组是否需要扩容,然后调用createEntry执行头插法的三步骤:
- 定位到对应bucket的头节点
- 将新插入节点封装为Entry,后继节点指向bucket的头节点,构成以我们节点为头节点的链表
- 当前bucket指向我们新插入的头节点
对应源码如下所示,读者可结合笔者说明和注释了解一下过程:
void addEntry(int hash, K key, V value, int bucketIndex) {
		//查看数组是否达到阈值,若达到则进行扩容操作
        if ((size >= threshold) && (null != table[bucketIndex])) {
            resize(2 * table.length);
            hash = (null != key) ? hash(key) : 0;
            bucketIndex = indexFor(hash, table.length);
        }

		//使用头插法将节点插入
        createEntry(hash, key, value, bucketIndex);
    }

void createEntry(int hash, K key, V value, int bucketIndex) {
		//定位bucket的第一个节点
        Entry<K,V> e = table[bucketIndex];
        //采用头插法将bucket对应的节点作为新插入节点的后继节点,再让table[bucketIndex] 指向我们插入的新节点
        table[bucketIndex] = new Entry<>(hash, key, value, e);
        size++;
    }
2
3
4
5
6
7
8
9
10
11
12
13
14
15
16
17
18
19
20
# jdk7版本下的HashMap的扩容
还记得我们上文说明HashMap的put操作时提到的扩容方法resize嘛?它的具体实现如下,可以看到它会根据newCapacity创建一个新的容器newTable ,然后将原数组的元素通过transfer方法转移到新的容器newTable中。
void resize(int newCapacity) {
        Entry[] oldTable = table;
        int oldCapacity = oldTable.length;

        if (oldCapacity == MAXIMUM_CAPACITY) {
            threshold = Integer.MAX_VALUE;
            return;
        }

		//创建新的容器
        Entry[] newTable = new Entry[newCapacity];
        //将旧的容器的元素转移到新数组中
        transfer(newTable, initHashSeedAsNeeded(newCapacity));
        table = newTable;
        threshold = (int)Math.min(newCapacity * loadFactor, MAXIMUM_CAPACITY + 1);
    }
2
3
4
5
6
7
8
9
10
11
12
13
14
15
16
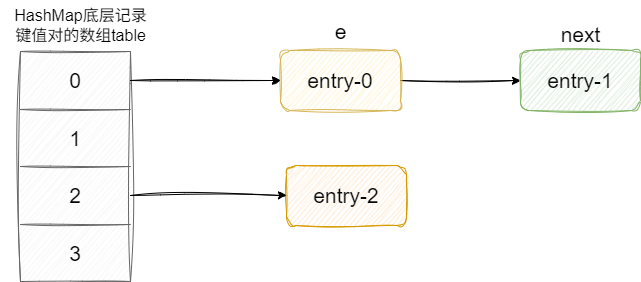
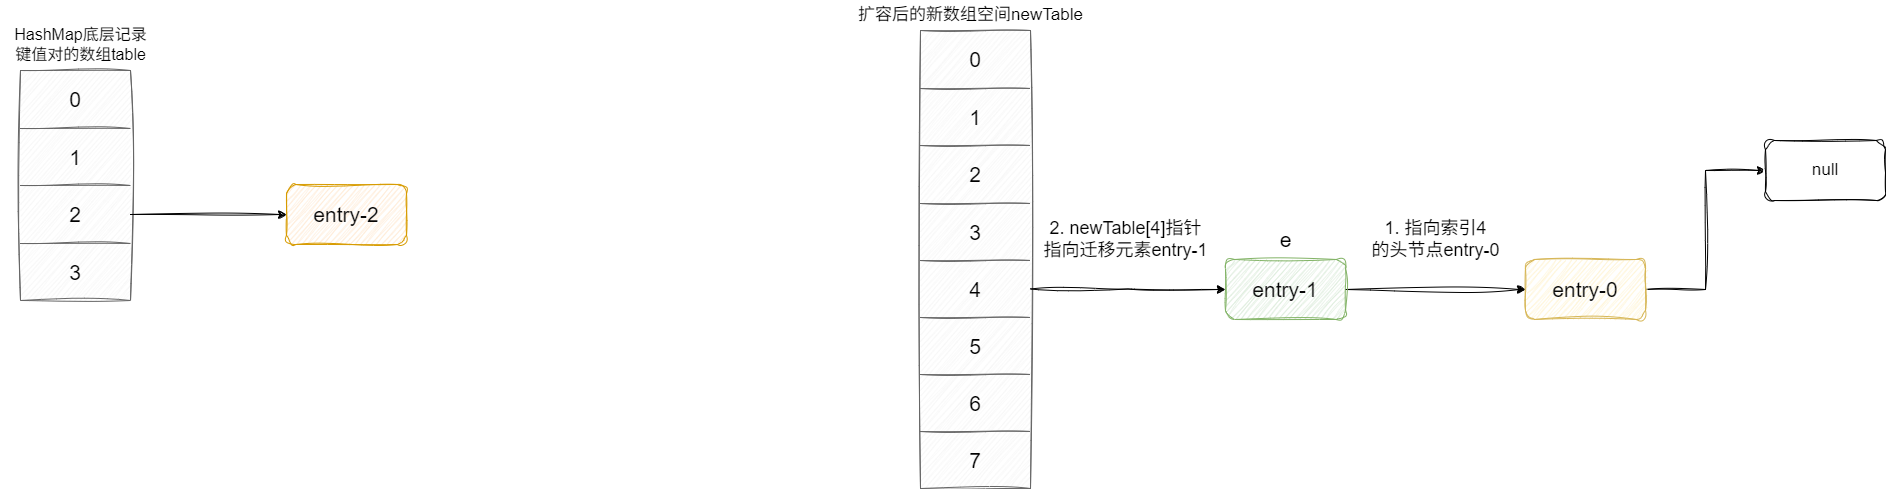
关于transfer的逻辑,这里涉及到链表元素的转移操作,这里我们也直接以图文的方式进行说明,执行扩容前会记录带转移元素的e及其后继节点next:
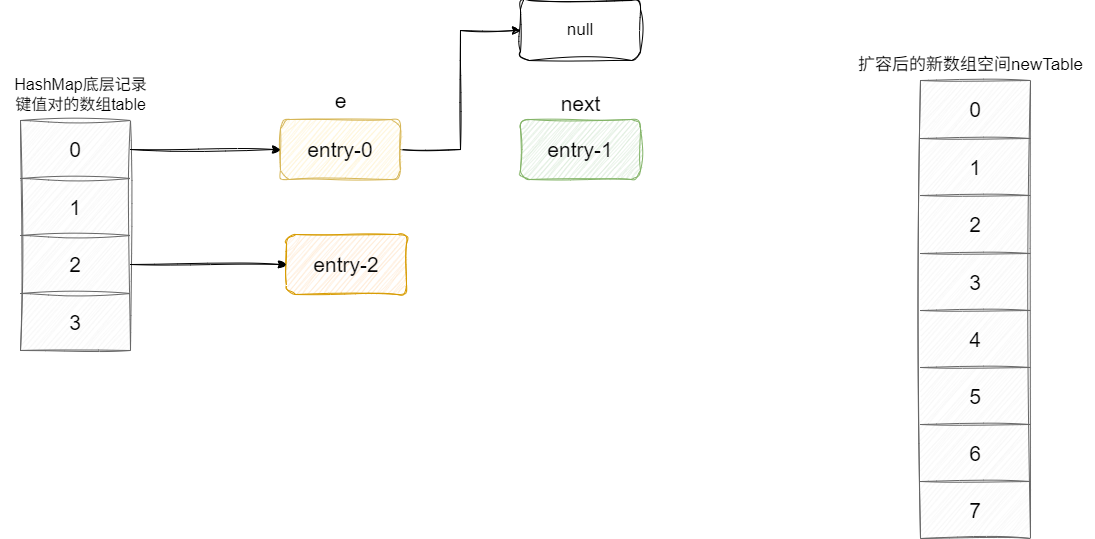
然后计算该节点e扩容后要存放到新空间的索引位置i,我们假设为4,此时节点e就会指向新空间索引4的头节点元素,因为我们是entry-0是第一个执行迁移的元素,此时新bucket索引4空间为空,所以我们的entry-0指向空:
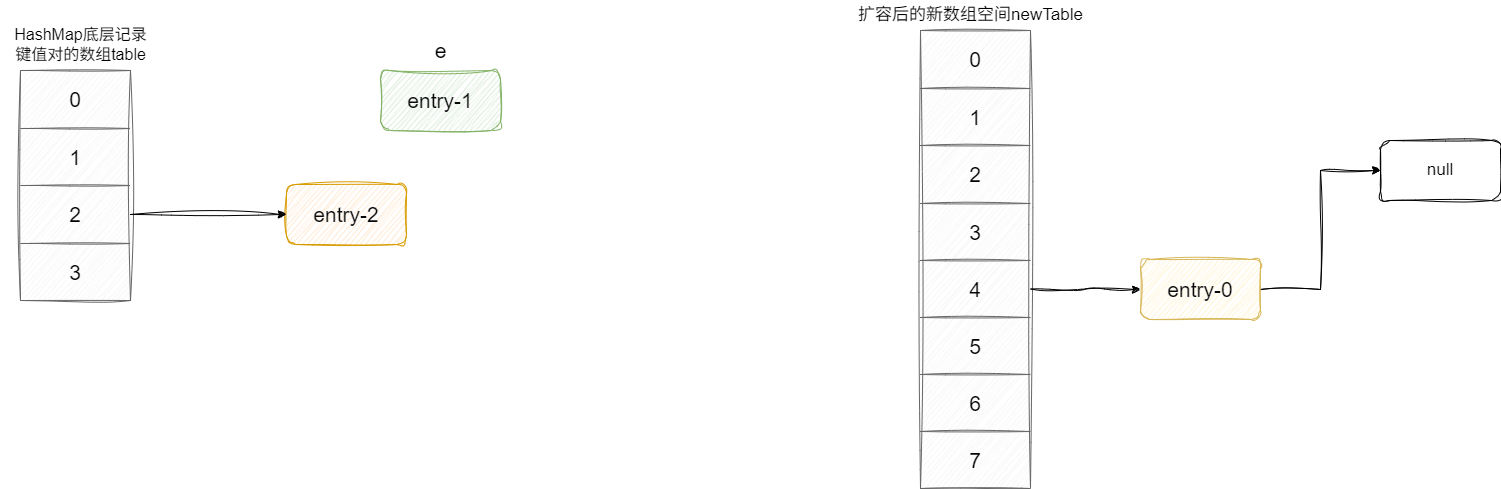
待迁移节点entry-0指向 newTable的头节点后,对应newTable直接指向这个迁移节点,由此完成一个元素entry-0的迁移,同时e指针指向entry-0的后继节点entry-1:
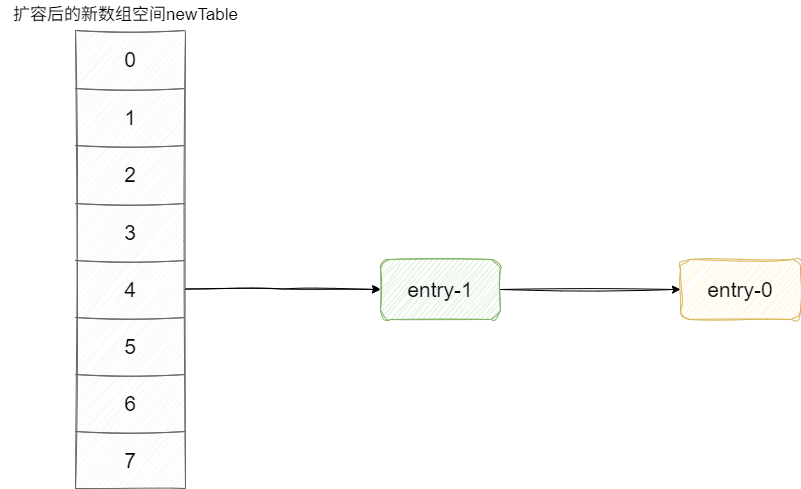
同理,假设entry-1通过计算后也是要迁移到索引4上,entry-1依然按照:指向newTable索引4位置的头节点,也就是entry-0作为后继节点、newTable[4]指向entry-1等步骤不断循环完成逻辑元素迁移:
有了上述图解的基础,我们就可以很好的理解transfer这个元素迁移的源码逻辑了:
void transfer(Entry[] newTable, boolean rehash) {
        int newCapacity = newTable.length;
        for (Entry<K,V> e : table) {
            while(null != e) {
            	//获取迁移节点的后继节点
                Entry<K,V> next = e.next;
              	//......
              	//计算迁移节点到新空间的索引位置
                int i = indexFor(e.hash, newCapacity);
                //节点e的next指向指向插入位置的头节点,构成一个以自己为头节点的链表
                e.next = newTable[i];
                //newTable[i]位置指向我们的节点e,完成一个元素迁移
                newTable[i] = e;
                //e指向第一步记录的next指针,执行下一轮的元素迁移
                e = next;
            }
        }
    }
2
3
4
5
6
7
8
9
10
11
12
13
14
15
16
17
18
# jdk7版本下的HashMap并发扩容问题
当我们了解了JDK7版本的hashMap扩容过程之后,我们就从多线程角度看看什么时候会出现问题,我们不妨想象有两个线程同时在执行多线程操作。
我们假设线程0和线程1并发执行扩容,单位时间内二者所维护的e和next如下图所示:

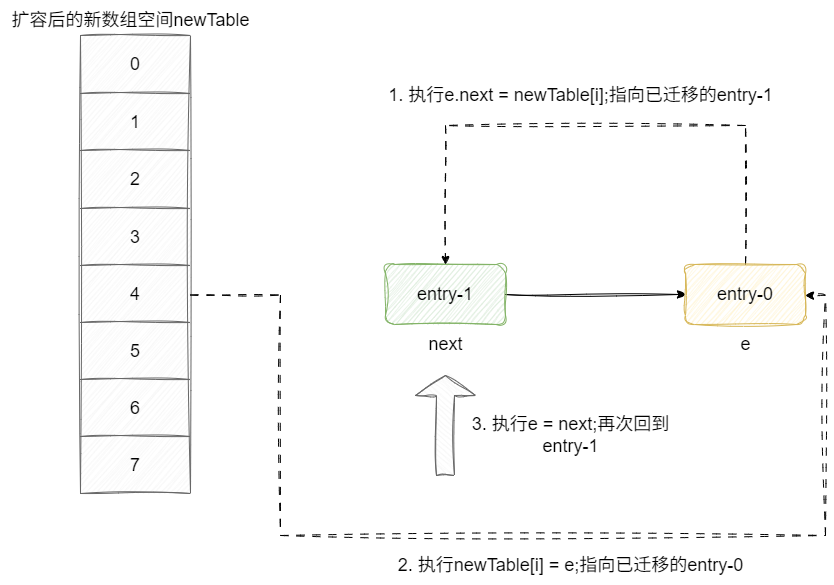
假设线程0先执行,按照扩容的代码逻辑完成头插法将entry-0和entry-1都迁移到索引4上,如下图所示:
重点来了,此时线程1再次获得CPU时间片指向代码逻辑,此时:
- e还是指向entry-0,而next还是指向entry-1
- 执行
e.next = newTable[i];就会拿到已迁移的entry-1 - 执行
newTable[i] = e;再次指向entry-0,由此关系构成下图所示的环路 - e = next;再次获得entry-1,两个元素不断循环导致CPU100%问题:
通过图解我们得知CPU100%原因之后,我们不妨通过代码来重现这个问题。
首先我们将项目JDK版本设置为JDK7。然后定义一个大小为2的map,阈值为1.5,这也就以为着插入时看到size为3的时候会触发扩容。
 /**
     * 这个map 桶的长度为2,当元素个数达到  2 * 1.5 = 3 的时候才会触发扩容
     */
    private static HashMap<Integer,String> map = new HashMap<Integer,String>(2,1.5f);
2
3
4
所以我们的工作代码如下,先插入3个元素,然后两个线程分别插入第4个元素。需要补充一句,这几个元素的key值是笔者经过调试后确定存放位置都在同一个索引上,所以这段代码会触发扩容的逻辑,读者自定义数据样本时,最好和读者保持一致。
try{
            map.put(5,"5");
            map.put(7,"7");
            map.put(3,"3");
            System.out.println("此时元素已经达到3了,再往里面添加就会产生扩容操作:" + map);
            new Thread("T1") {
                public void run() {
                    map.put(11, "11");
                    System.out.println(Thread.currentThread().getName() + "扩容完毕 " );
                };
            }.start();
            new Thread("T2") {
                public void run() {
                    map.put(15, "15");
                    System.out.println(Thread.currentThread().getName() + "扩容完毕 " + map);
                };
            }.start();

            Thread.sleep(60_000);//时间根据debug时间调整

            //死循环后打印直接OOM,思考一下为什么?
            //因为打印的时候回调用toString回遍历链表,但此时链表已经成环状了
            //那么就会无限拼接字符串
//        System.out.println(map);
            System.out.println(map.get(5));
            System.out.println(map.get(7));
            System.out.println(map.get(3));
            System.out.println(map.get(11));
            System.out.println(map.get(15));
            System.out.println(map.size());
        }catch (Exception e){

        }
2
3
4
5
6
7
8
9
10
11
12
13
14
15
16
17
18
19
20
21
22
23
24
25
26
27
28
29
30
31
32
33
我们在扩容的核心方法插个断点,断点条件设置为
Thread.currentThread().getName().equals("T1")||Thread.currentThread().getName().equals("T2")
并且断点的调试方式改成thread
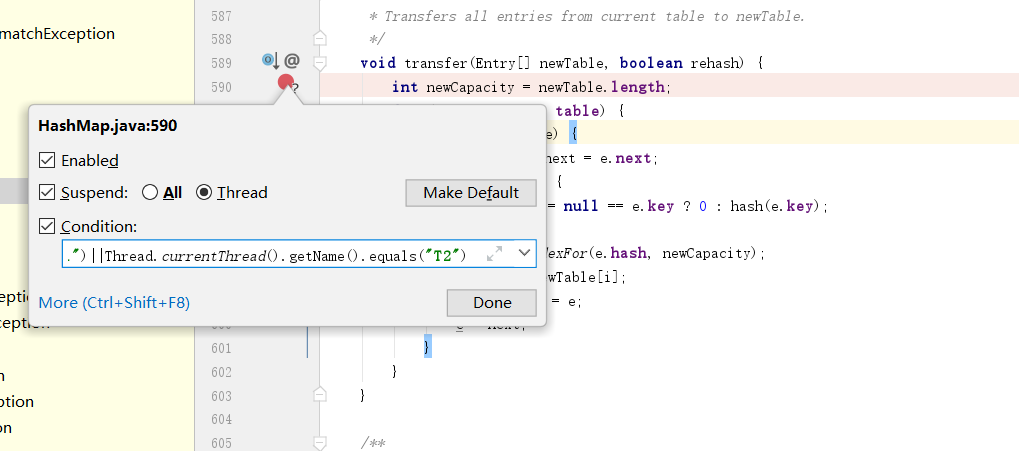
我们首先将线程1断点调试到记录next引用这一步,然后将线程切换为线程2,模拟线程1被挂起。
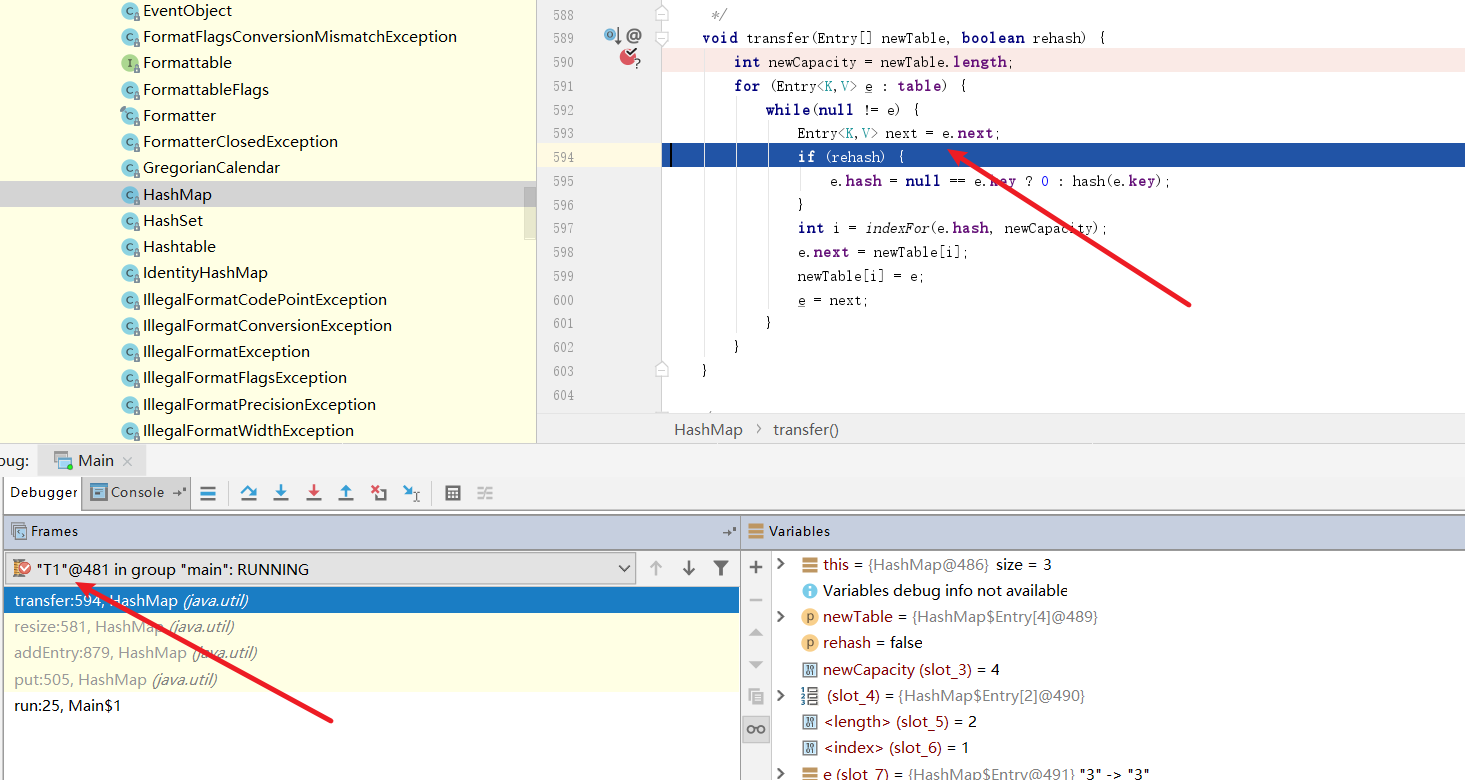
我们直接将线程2走完,模拟线程2完成扩容这一步,然后IDEA会自动切回线程1,我们也将线程1直接走完。
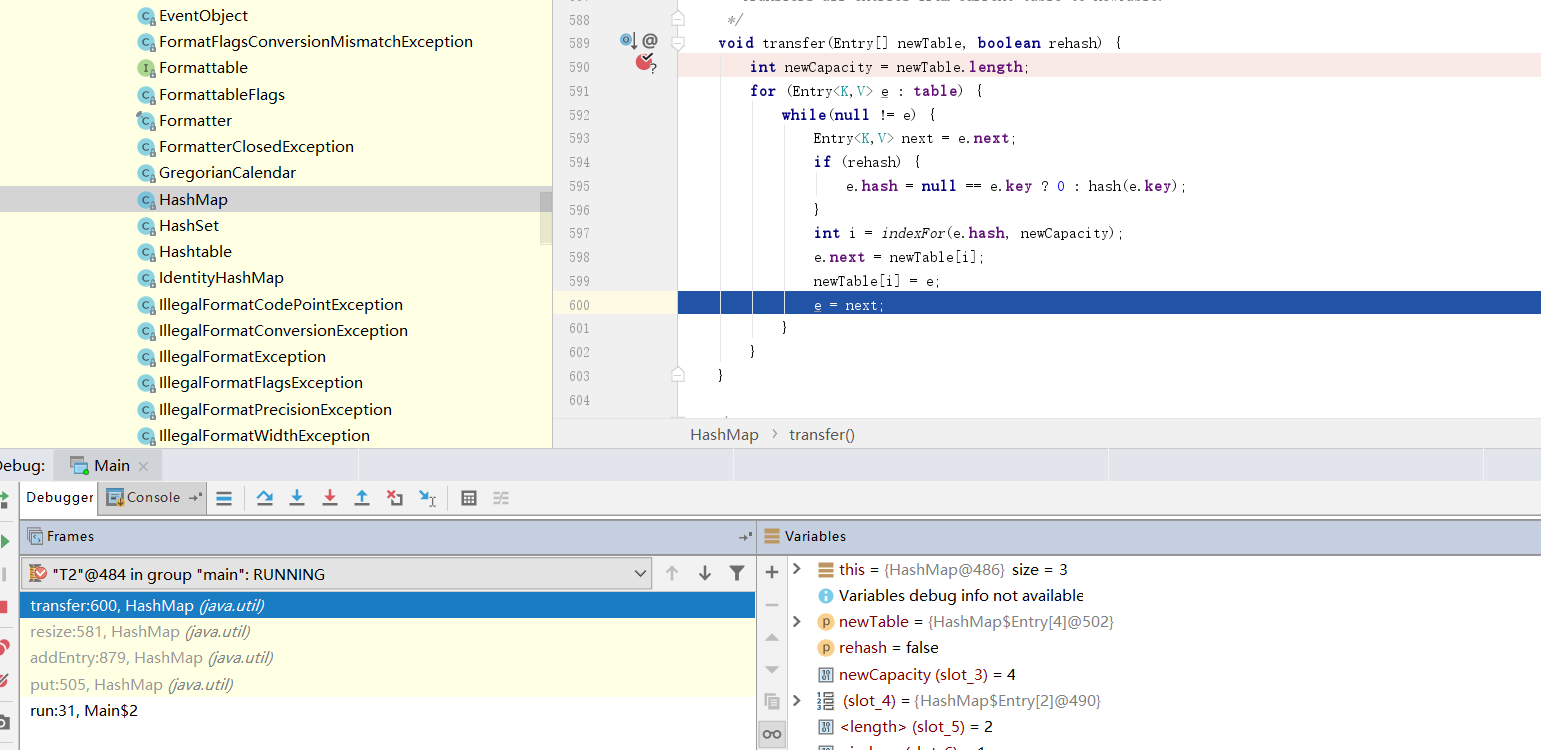
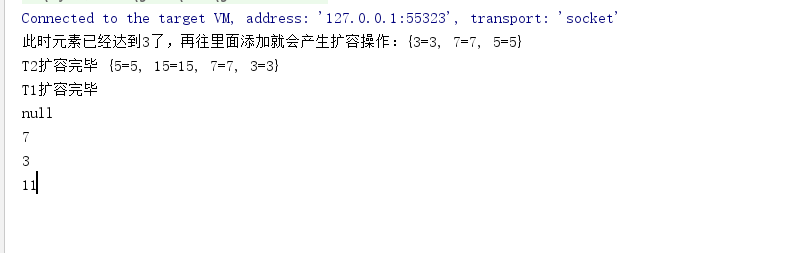
从控制台输出结果来看,控制台迟迟无法结束,说明扩容的操作迟迟无法完成,很明显线程1的扩容操作进入死循环,CPU100%问题由此印证。
# 详解JDK8版本的HashMap
# 基本数据结构
jdk8对HashMap底层数据结构做了调整,从原本的数组+链表转为数组+链表/红黑树的形式,即保证在数组长度大于64且当前节点链表长度达到8的情况下,为避免元素哈希定位退化为O(n)级别的遍历,通过链表树化为红黑树来保证查询效率:
对此我们也给出该版本的HashMap源码,因为作者的风格比较经典,笔者这里就按照核心的4条主线进行说明:
- 经过哈希运算后,对应bucket不存在元素,直接基于key和value生成Node插入。
- 如果定位到的元素key一样,默认情况下直接将元素值覆盖并返回旧元素。
- 如果定位到的key对应bucket非空且为树节点TreeNode则到树节点中找到重复元素覆盖或者将新节点插入。
- 如果key对应的bucket为链表,则遍历找到重复节点覆盖或者找到后继节点插入。
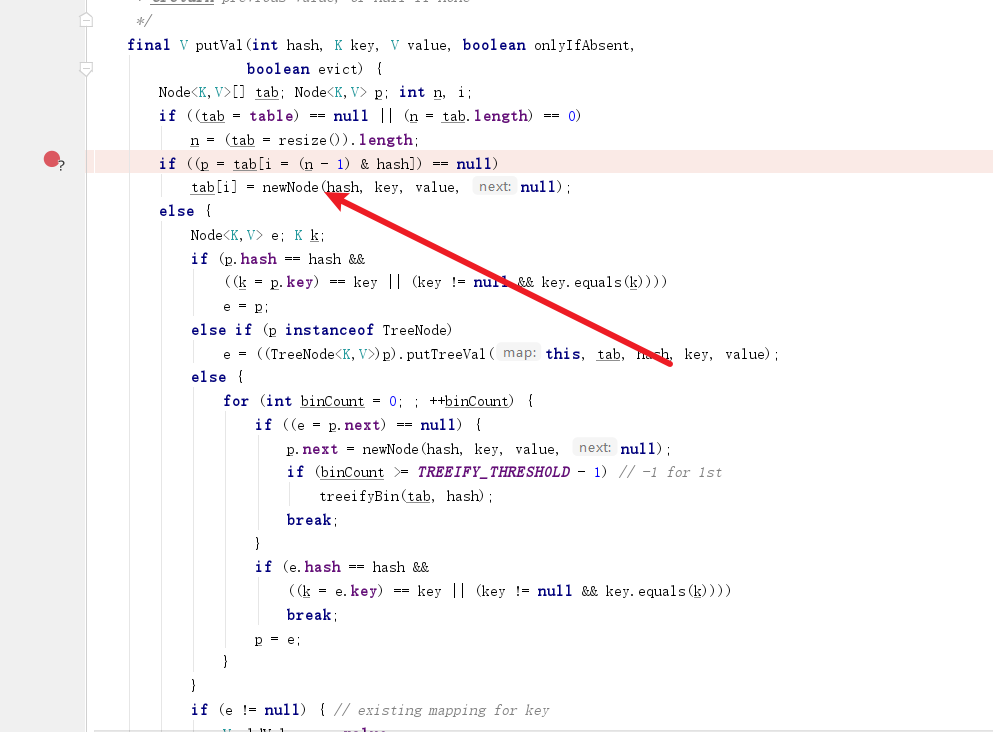
对应我们put方法对应的核心源码如下,读者可以结合注释了解一下:
final V putVal(int hash, K key, V value, boolean onlyIfAbsent,
                   boolean evict) {
        Node<K,V>[] tab; Node<K,V> p; int n, i;

        if ((tab = table) == null || (n = tab.length) == 0)
            n = (tab = resize()).length;
        //用p记录哈希定位后的bucket,若为空则直接创建节点存入该bucket中
        if ((p = tab[i = (n - 1) & hash]) == null)
            tab[i] = newNode(hash, key, value, null);
        else {
        	//若定位到的元素key和当前key一致则将该引用存到e中,后续进行覆盖处理
            Node<K,V> e; K k;
            if (p.hash == hash &&
                ((k = p.key) == key || (key != null && key.equals(k))))
                e = p;
            else if (p instanceof TreeNode)//说明定位到的bucket
                e = ((TreeNode<K,V>)p).putTreeVal(this, tab, hash, key, value);
            else {
            //定位到链表中的最后一个节点
                for (int binCount = 0; ; ++binCount) {
                    if ((e = p.next) == null) {
                        p.next = newNode(hash, key, value, null);
                        if (binCount >= TREEIFY_THRESHOLD - 1) // -1 for 1st
                            treeifyBin(tab, hash);
                        break;
                    }
                    if (e.hash == hash &&
                        ((k = e.key) == key || (key != null && key.equals(k))))
                        break;
                    p = e;
                }
            }
            //定位到key相等的元素,如果onlyIfAbsent 设置为false即允许存在时覆盖,则直接将元素覆盖,返回就有值
            if (e != null) { // existing mapping for key
                V oldValue = e.value;
                if (!onlyIfAbsent || oldValue == null)
                    e.value = value;
                afterNodeAccess(e);
                return oldValue;
            }
        }
      	//......
        return null;
    }
2
3
4
5
6
7
8
9
10
11
12
13
14
15
16
17
18
19
20
21
22
23
24
25
26
27
28
29
30
31
32
33
34
35
36
37
38
39
40
41
42
43
44
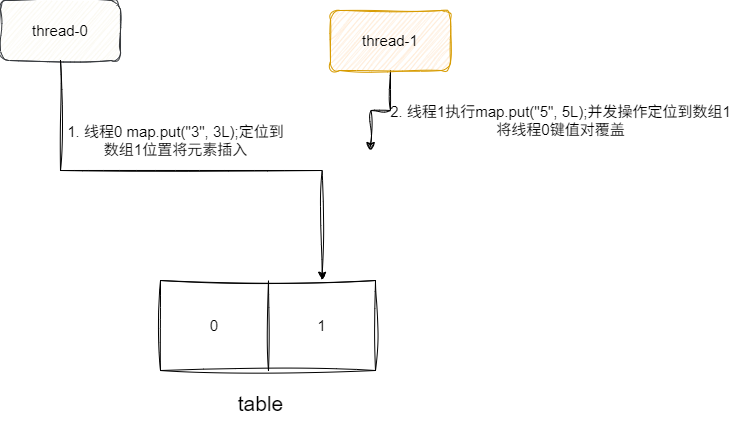
# 多线程操作下的键值对覆盖问题
笔者截取上述片段中的某个代码段,即哈希定位桶为空的节点添加操作:
      //如果数组对应的索引里面没有元素,则直接插入
        if ((p = tab[i = (n - 1) & hash]) == null)
            tab[i] = newNode(hash, key, value, null);
2
3
这段代码,在并发操作下是存在多线程都判断到空,然后后者将前者键值对覆盖的情况,如下图:
所以我们不妨写个代码印证这个问题,我们创建一个长度为2的map,用两个线程往map底层数组的同一个位置中插入键值对。两个线程分别起名为t1、t2,这样方便后续debug调试。
为了验证这个问题,笔者使用countDownLatch阻塞一下流程,只有两个线程都完成工作之后,才能执行后续输出逻辑。
private static HashMap<String, Long> map = new HashMap<>(2, 1.5f);

    public static void main(String[] args) throws InterruptedException {

        CountDownLatch countDownLatch = new CountDownLatch(2);


        new Thread(() -> {
            map.put("3", 3L);
            countDownLatch.countDown();
        }, "t1").start();

        new Thread(() -> {
            map.put("5", 5L);
            countDownLatch.countDown();
        }, "t2").start();

        //等待上述线程执行完,继续执行后续输出逻辑
        countDownLatch.await();


        System.out.println(map.get("3"));
        System.out.println(map.get("5"));


    }
2
3
4
5
6
7
8
9
10
11
12
13
14
15
16
17
18
19
20
21
22
23
24
25
26
然后在插入新节点的地方打个断点,debug模式设置为thread,条件设置为:
"t1".equals(Thread.currentThread().getName())||"t2".equals(Thread.currentThread().getName())
启动程序,我们在t1完成判断,正准备执行创建节点的操作时将线程切换为t2
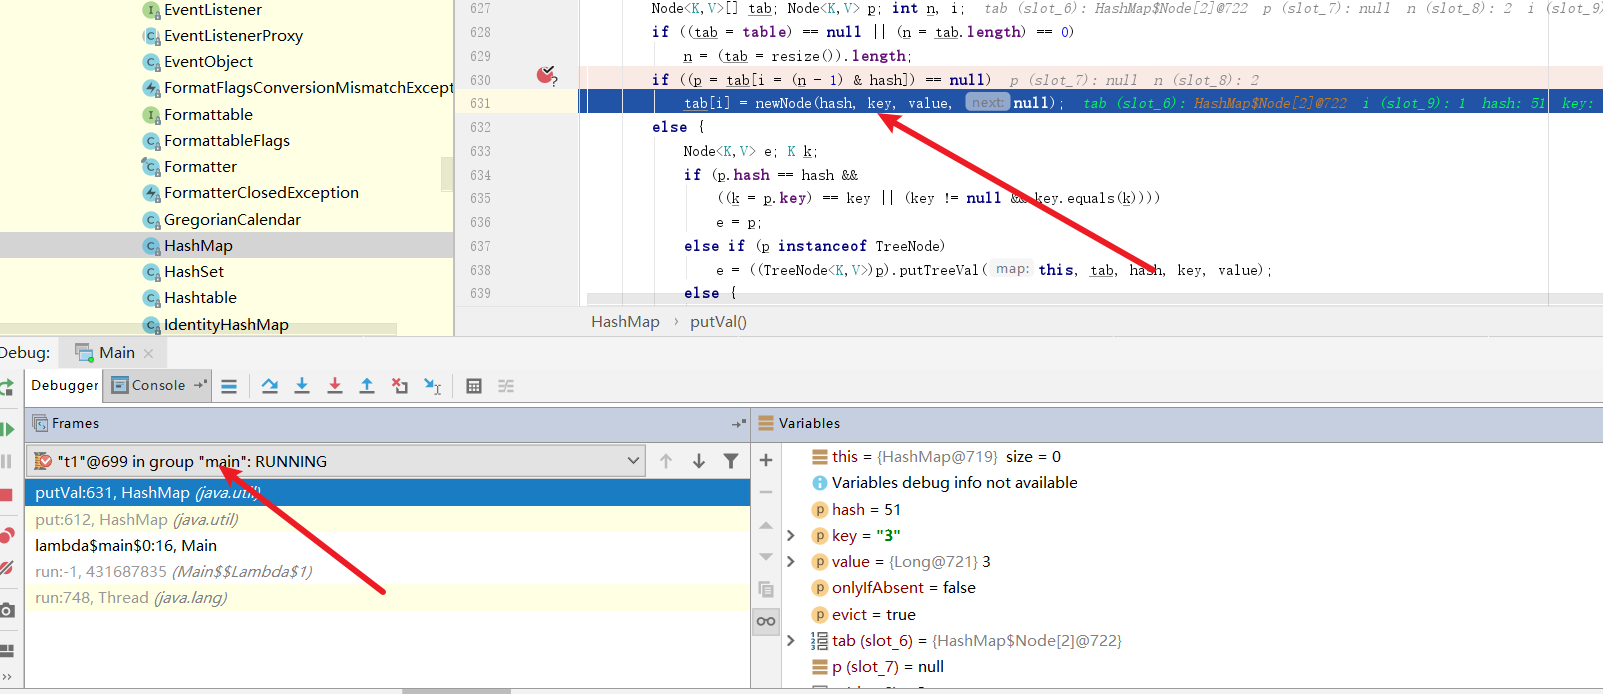
可以看到t2准备将(5,5)这个键值对插入到数组中,我们直接放行这个逻辑
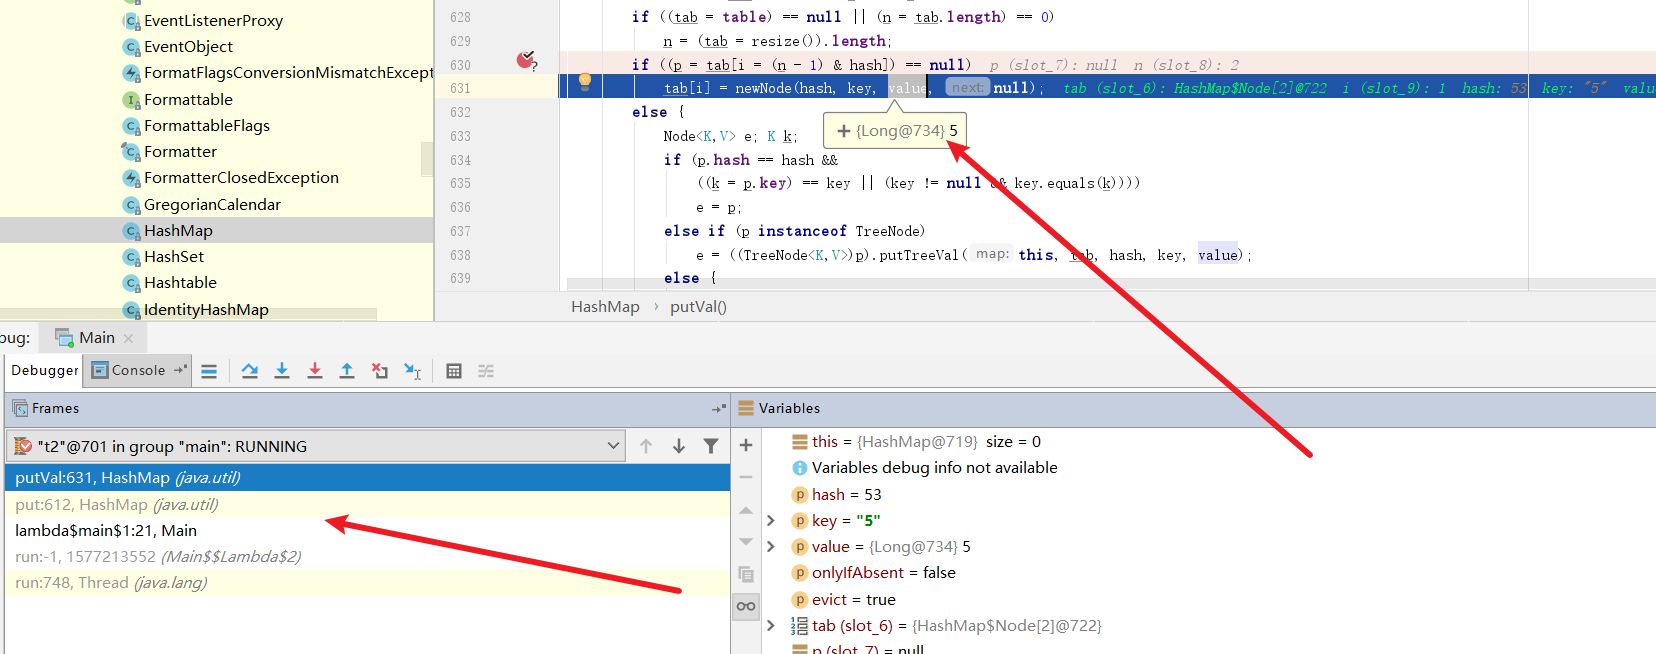
此时线程自动切回t1,我们放行断点,将(3,3)节点插入到数组中。此时,我们已经顺利将线程2的键值对覆盖了。
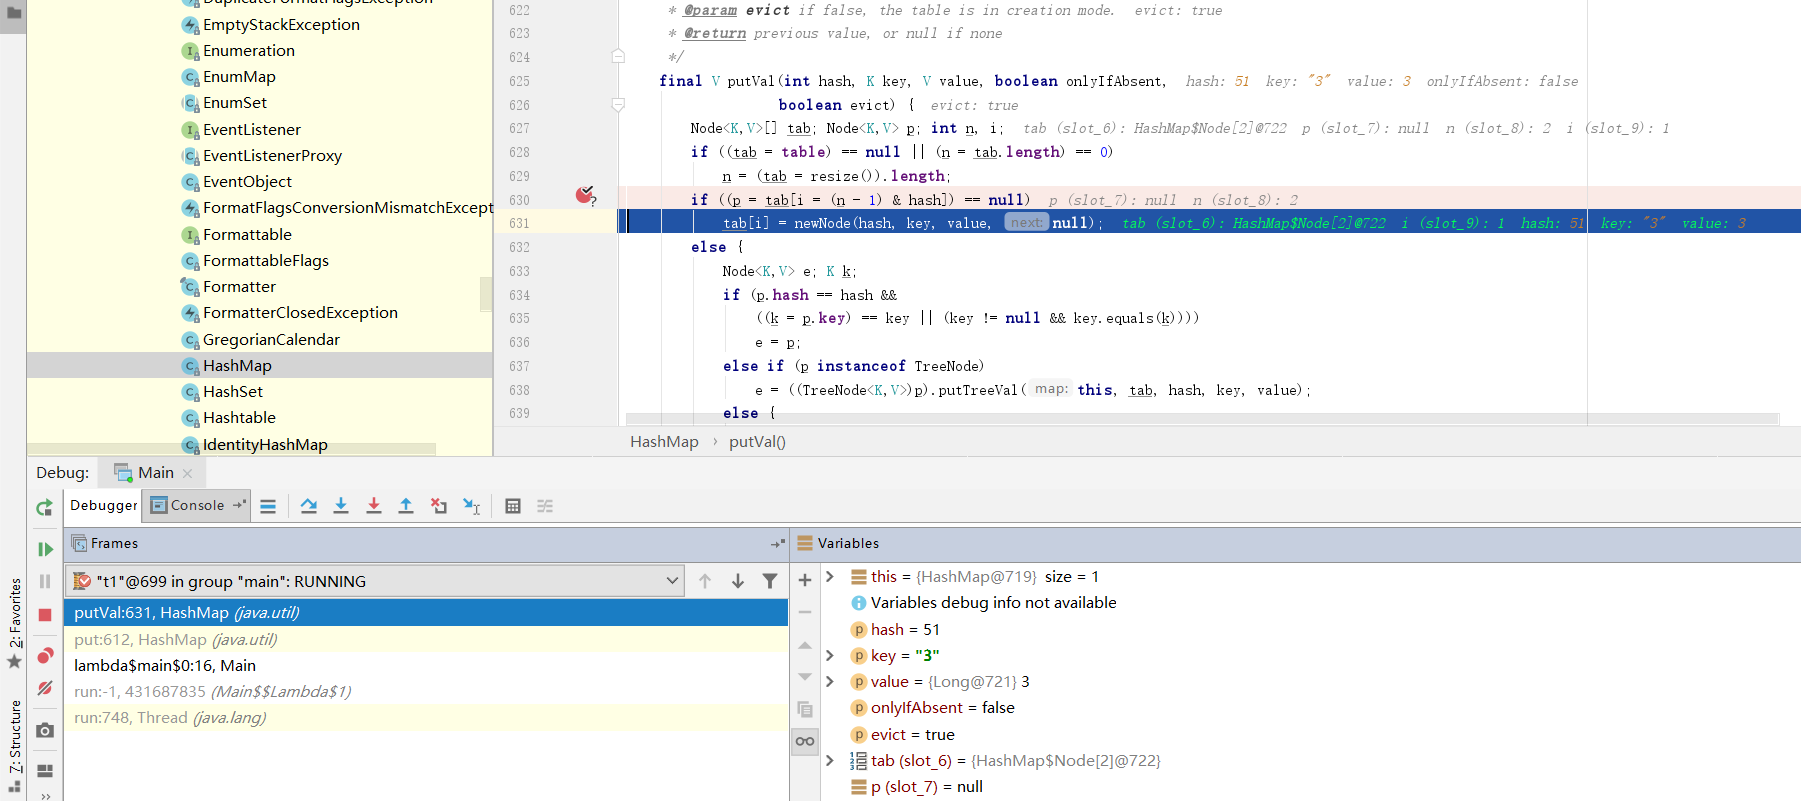
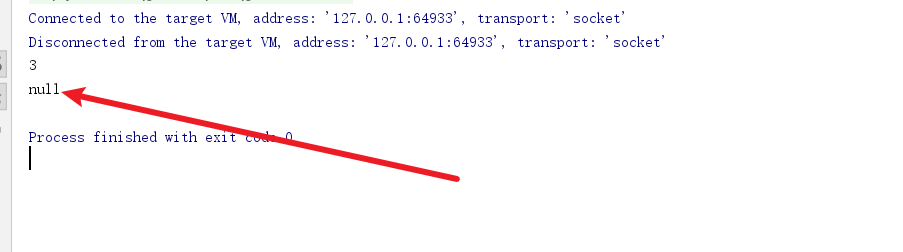
可以看到输出结果key为5的value为null,hashMap在多线程情况下的索引覆盖问题得以印证。
# 如何解决Map的线程安全问题
解决map线程安全问题有两种手段,一种是JDK自带的collections工具,另一种则是并发容器ConcurrentHashMap
为了演示冲突情况下的性能,我们使用不同的map执行100_0000次循环。
@Slf4j
public class MapTest {

    @Test
     public void mapTest() {
        StopWatch stopWatch = new StopWatch();

        stopWatch.start("synchronizedMap put");
        Map<Object, Object> synchronizedMap = Collections.synchronizedMap(new HashMap<>());
        IntStream.rangeClosed(0, 100_0000).parallel().forEach(i -> {
            synchronizedMap.put(i, i);
        });
        stopWatch.stop();


        stopWatch.start("concurrentHashMap put");
        Map<Object, Object> concurrentHashMap = new ConcurrentHashMap<>();
        IntStream.rangeClosed(0, 100_0000).parallel().forEach(i -> {
            concurrentHashMap.put(i, i);
        });
        stopWatch.stop();

        log.info(stopWatch.prettyPrint());

    }
}
2
3
4
5
6
7
8
9
10
11
12
13
14
15
16
17
18
19
20
21
22
23
24
25
26
27
从输出结果来看concurrentHashMap 在冲突频繁的情况下性能更加优异。
2023-03-14 20:29:25,669 INFO  MapTest:37 - StopWatch '': running time (millis) = 1422
-----------------------------------------
ms     %     Task name
-----------------------------------------
00930  065%  synchronizedMap put
00492  035%  concurrentHashMap put
2
3
4
5
6
原因很简单synchronizedMap的put方法,每次操作都会上锁,这意味着无论要插入的键值对在数组哪个位置,执行插入操作前都必须先得到操作map的锁,锁的粒度非常大:
public V put(K key, V value) {
            synchronized (mutex) {return m.put(key, value);}
        }
2
3
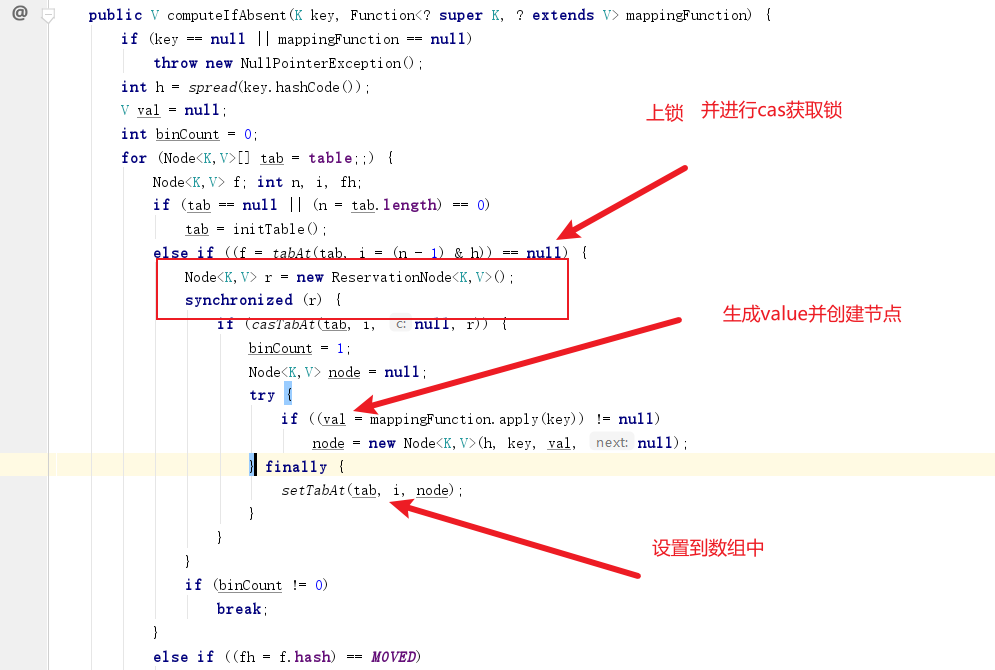
反观concurrentHashMap 它本质的设计是利用了一种锁升级的思想,即先通过CAS完成节点插入,失败后才利用synchronized关键字进行锁定操作,同时锁的仅仅只是数组中某个索引对应的bucket即利用了锁分段的思想,分散了锁的粒度和竞争的压力:
final V putVal(K key, V value, boolean onlyIfAbsent) {
        if (key == null || value == null) throw new NullPointerException();
        int hash = spread(key.hashCode());
        int binCount = 0;
        for (Node<K,V>[] tab = table;;) {
            Node<K,V> f; int n, i, fh;
            if (tab == null || (n = tab.length) == 0)
                tab = initTable();
                //获取当前键值对要存放的位置f
            else if ((f = tabAt(tab, i = (n - 1) & hash)) == null) {
                if (casTabAt(tab, i, null,
                             new Node<K,V>(hash, key, value, null)))
                    break;                   // no lock when adding to empty bin
            }
            else if ((fh = f.hash) == MOVED)
                tab = helpTransfer(tab, f);
            else {
                V oldVal = null;
                //锁定的范围是对应的某个bucket
                synchronized (f) {
                    //......
                }
                if (binCount != 0) {
                    if (binCount >= TREEIFY_THRESHOLD)
                        treeifyBin(tab, i);
                    if (oldVal != null)
                        return oldVal;
                    break;
                }
            }
        }
        addCount(1L, binCount);
        return null;
    }
2
3
4
5
6
7
8
9
10
11
12
13
14
15
16
17
18
19
20
21
22
23
24
25
26
27
28
29
30
31
32
33
34
# 详解ConcurrentHashMap中的操作注意事项
# 非原子化操作
使用ConcurrentHashMap存放键值对,并不一定意味着所有存的操作都是线程安全的。对于非原子化操作仍然是存在线程安全问题
如下所示,我们的代码首先会得到一个含有900的元素的ConcurrentHashMap,然后开10个线程去查看map中还差多少个键值对够1000个,缺多少补多少。
	//线程数
    private static int THREAD_COUNT = 10;
    //数据项的大小
    private static int ITEM_COUNT = 1000;


    //返回一个size大小的ConcurrentHashMap
    private ConcurrentHashMap<String, Object> getData(int size) {
        return LongStream.rangeClosed(1, size)
                .parallel()
                .boxed()
                .collect(Collectors.toConcurrentMap(i -> UUID.randomUUID().toString(),
                        Function.identity(),
                        (o1, o2) -> o1,
                        ConcurrentHashMap::new));
    }


    @GetMapping("wrong")
    public String wrong() throws InterruptedException {
    //900个元素的ConcurrentHashMap
        ConcurrentHashMap<String, Object> map = getData(ITEM_COUNT - 100);
        log.info("init size:{}", map.size());

        ForkJoinPool forkJoinPool = new ForkJoinPool(THREAD_COUNT);
        forkJoinPool.execute(() -> {
            IntStream.rangeClosed(1, 10).parallel().forEach(i -> {
                //判断当前map缺多少个元素就够1000个,缺多少补多少
                int gap = ITEM_COUNT - map.size();
                log.info("{} the gap:{}",Thread.currentThread().getName(), gap);
                map.putAll(getData(gap));
            });
        });


        forkJoinPool.shutdown();
        forkJoinPool.awaitTermination(1, TimeUnit.HOURS);

        log.info("finish size:{}", map.size());
        return "ok";

    }
2
3
4
5
6
7
8
9
10
11
12
13
14
15
16
17
18
19
20
21
22
23
24
25
26
27
28
29
30
31
32
33
34
35
36
37
38
39
40
41
42
从输出结果可以看出,ConcurrentHashMap只能保存put的时候是线程安全,但无法保证put意外的操作线程安全,这段代码计算ConcurrentHashMap还缺多少键值对的操作很可能出现多个线程得到相同的差值,结果补入相同大小的元素,导致ConcurrentHashMap多存放键值对的情况。
2023-03-14 20:52:52,471 INFO  ConcurrentHashMapMisuseController:44 - init size:900
2023-03-14 20:52:52,473 INFO  ConcurrentHashMapMisuseController:51 - ForkJoinPool-1-worker-9 the gap:100
2023-03-14 20:52:52,473 INFO  ConcurrentHashMapMisuseController:51 - ForkJoinPool-1-worker-2 the gap:100
2023-03-14 20:52:52,474 INFO  ConcurrentHashMapMisuseController:51 - ForkJoinPool-1-worker-6 the gap:100
2023-03-14 20:52:52,474 INFO  ConcurrentHashMapMisuseController:51 - ForkJoinPool-1-worker-4 the gap:100
2023-03-14 20:52:52,474 INFO  ConcurrentHashMapMisuseController:51 - ForkJoinPool-1-worker-13 the gap:100
2023-03-14 20:52:52,474 INFO  ConcurrentHashMapMisuseController:51 - ForkJoinPool-1-worker-11 the gap:100
2023-03-14 20:52:52,474 INFO  ConcurrentHashMapMisuseController:51 - ForkJoinPool-1-worker-9 the gap:0
2023-03-14 20:52:52,474 INFO  ConcurrentHashMapMisuseController:51 - ForkJoinPool-1-worker-15 the gap:0
2023-03-14 20:52:52,474 INFO  ConcurrentHashMapMisuseController:51 - ForkJoinPool-1-worker-10 the gap:-100
2023-03-14 20:52:52,474 INFO  ConcurrentHashMapMisuseController:51 - ForkJoinPool-1-worker-9 the gap:0
2023-03-14 20:52:52,476 INFO  ConcurrentHashMapMisuseController:60 - finish size:1500
2
3
4
5
6
7
8
9
10
11
12

解决方式也很简单,将查询缺少个数和put操作原子化,说的通俗一点就是对查和插两个操作上一把锁确保多线程互斥即可。
 @GetMapping("right")
    public String right() throws InterruptedException {
        ConcurrentHashMap<String, Object> map = getData(ITEM_COUNT - 100);
        log.info("init size:{}", map.size());

        ForkJoinPool forkJoinPool = new ForkJoinPool(THREAD_COUNT);
        forkJoinPool.execute(() -> {
            IntStream.rangeClosed(1, 10).parallel().forEach(i -> {
                synchronized (map){
                    int gap = ITEM_COUNT - map.size();
                    log.info("{} the gap:{}",Thread.currentThread().getName(), gap);
                    map.putAll(getData(gap));
                }

            });
        });


        forkJoinPool.shutdown();
        forkJoinPool.awaitTermination(1, TimeUnit.HOURS);

        log.info("finish size:{}", map.size());
        return "ok";

    }
2
3
4
5
6
7
8
9
10
11
12
13
14
15
16
17
18
19
20
21
22
23
24
25
可以看到输出结果正常了:
2023-03-14 20:59:56,730 INFO  ConcurrentHashMapMisuseController:69 - init size:900
2023-03-14 20:59:56,732 INFO  ConcurrentHashMapMisuseController:76 - ForkJoinPool-2-worker-9 the gap:100
2023-03-14 20:59:56,733 INFO  ConcurrentHashMapMisuseController:76 - ForkJoinPool-2-worker-4 the gap:0
2023-03-14 20:59:56,734 INFO  ConcurrentHashMapMisuseController:76 - ForkJoinPool-2-worker-8 the gap:0
2023-03-14 20:59:56,734 INFO  ConcurrentHashMapMisuseController:76 - ForkJoinPool-2-worker-9 the gap:0
2023-03-14 20:59:56,734 INFO  ConcurrentHashMapMisuseController:76 - ForkJoinPool-2-worker-1 the gap:0
2023-03-14 20:59:56,734 INFO  ConcurrentHashMapMisuseController:76 - ForkJoinPool-2-worker-15 the gap:0
2023-03-14 20:59:56,734 INFO  ConcurrentHashMapMisuseController:76 - ForkJoinPool-2-worker-2 the gap:0
2023-03-14 20:59:56,734 INFO  ConcurrentHashMapMisuseController:76 - ForkJoinPool-2-worker-6 the gap:0
2023-03-14 20:59:56,735 INFO  ConcurrentHashMapMisuseController:76 - ForkJoinPool-2-worker-11 the gap:0
2023-03-14 20:59:56,735 INFO  ConcurrentHashMapMisuseController:76 - ForkJoinPool-2-worker-13 the gap:0
2023-03-14 20:59:56,737 INFO  ConcurrentHashMapMisuseController:87 - finish size:1000
2
3
4
5
6
7
8
9
10
11
12
# 合理使用API发挥ConcurrentHashMap最大性能
我们会循环1000w次,在这1000w次随机生成10以内的数字,以10以内数字为key,出现次数为value存放到ConcurrentHashMap中。
你可能会写出这样一段代码
//map中的项数
    private static int ITEM_COUNT = 10;
    //线程数
    private static int THREAD_COUNT = 10;
    //循环次数
    private static int LOOP_COUNT = 1000_0000;


private Map<String, Long> normaluse() throws InterruptedException {
        Map<String, Long> map = new ConcurrentHashMap<>(ITEM_COUNT);
        ForkJoinPool forkJoinPool = new ForkJoinPool(THREAD_COUNT);


        LongStream.rangeClosed(1, LOOP_COUNT).parallel().forEach(i -> {
            String key = "item" + ThreadLocalRandom.current().nextInt(ITEM_COUNT);
            synchronized (map) {
                if (map.containsKey(key)) {
                    map.put(key, map.get(key) + 1);
                } else {
                    map.put(key, 1L);
                }
            }
        });

        forkJoinPool.shutdown();
        forkJoinPool.awaitTermination(1, TimeUnit.HOURS);
        return map;
    }
2
3
4
5
6
7
8
9
10
11
12
13
14
15
16
17
18
19
20
21
22
23
24
25
26
27
28
29
实际上判断key是否存在,若不存在则初始化这个key的操作,在ConcurrentHashMap中已经提供好了这样的API。
我们通过computeIfAbsent进行判断key是否存在,若不存在则初始化的原子操作,注意此时的value是一个Long类型的累加器,这个LongAdder是一个线程安全的累加器,通过LongAdder的increment方法确保多线程情况下,这一点我们可以在LongAdder的注释中得知。
LongAdders can be used with a {@link
 * java.util.concurrent.ConcurrentHashMap} to maintain a scalable
 * frequency map (a form of histogram or multiset). For example, to
 * add a count to a {@code ConcurrentHashMap<String,LongAdder> freqs},
 * initializing if not already present, you can use {@code
 * freqs.computeIfAbsent(k -> new LongAdder()).increment();}
2
3
4
5
6
大概意思是说LongAdder可以用于统计频率等场景,所以我们的代码就直接简化为下面这段代码,基于computeIfAbsent和LongAdder的良好设计,这段代码的语义非常丰富,大体是执行这样一段操作:
- computeIfAbsent执行k插入,如果k不存在则插入k,value为LongAdder,若存在执行步骤2。
- 不覆盖原有k,直接返回容器中k对应的LongAdder的引用
- 基于LongAdder的increment完成计数累加
由此也就实现了我们并发词频统计的需求了:
 ConcurrentHashMap<String,LongAdder> freqs
freqs.computeIfAbsent(k -> new LongAdder()).increment();
2
所以我们改进后的代码如下:
 private Map<String, Long> gooduse() throws InterruptedException {
        Map<String, LongAdder> map = new ConcurrentHashMap<>(ITEM_COUNT);
        ForkJoinPool forkJoinPool = new ForkJoinPool(THREAD_COUNT);
        LongStream.rangeClosed(1, LOOP_COUNT).parallel().forEach(i -> {
            String key = "item" + ThreadLocalRandom.current().nextInt(ITEM_COUNT);
            map.computeIfAbsent(key, k -> new LongAdder()).increment();

        });

        forkJoinPool.shutdown();
        forkJoinPool.awaitTermination(1, TimeUnit.HOURS);

        return map.entrySet().stream()
                .collect(Collectors.toMap(e -> e.getKey()
                        , e -> e.getValue().longValue()));
    }
2
3
4
5
6
7
8
9
10
11
12
13
14
15
16
完成后我们不妨对这段代码进行性能压测
@GetMapping("good")
    public String good() throws InterruptedException {
        StopWatch stopWatch = new StopWatch();
        stopWatch.start("normaluse");
        Map<String, Long> normaluse = normaluse();
        stopWatch.stop();
        Assert.isTrue(normaluse.size() == ITEM_COUNT, "normaluse size error");
        Assert.isTrue(normaluse.entrySet()
                .stream()
                .mapToLong(i -> i.getValue().longValue())
                .reduce(0, Long::sum)
                == LOOP_COUNT, "normaluse count error");


        stopWatch.start("gooduse");
        Map<String, Long> gooduse = gooduse();
        stopWatch.stop();
        Assert.isTrue(gooduse.size() == ITEM_COUNT, "gooduse size error");
        Assert.isTrue(gooduse.entrySet()
                .stream()
                .mapToLong(i -> i.getValue().longValue())
                .reduce(0, Long::sum)
                == LOOP_COUNT, "gooduse count error");

        log.info(stopWatch.prettyPrint());

        return "ok";
    }
2
3
4
5
6
7
8
9
10
11
12
13
14
15
16
17
18
19
20
21
22
23
24
25
26
27
28
29
很明显后者的性能要优于前者,那么原因是什么呢?
-----------------------------------------
ms     %     Task name
-----------------------------------------
03458  080%  normaluse
00871  020%  gooduse
2
3
4
5
从ConcurrentHashMap的computeIfAbsent中不难看出,其底层实现"若key不存在则初始化"是通过ReservationNode+CAS实现的,相比于上一段代码那种非原子化的操作性能自然高出不少。
# 详解ArrayList线程安全问题
# 问题重现以原因
我们使用并行流在多线程情况下往list中插入100w个元素。
 @Test
    public void listTest() {
        StopWatch stopWatch = new StopWatch();

        List<Object> list=new ArrayList<>();
        IntStream.rangeClosed(1, 100_0000).parallel().forEach(i -> {
            list.add(i);
        });

        Assert.assertEquals(100_0000,list.size());


    }
2
3
4
5
6
7
8
9
10
11
12
13
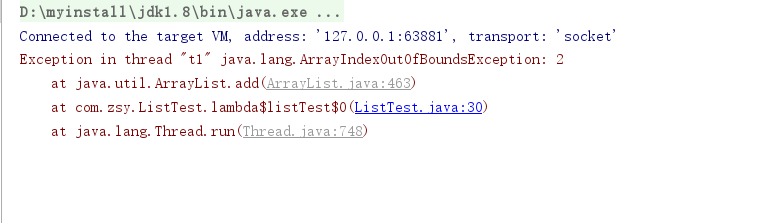
从输出结果来看,list确实发生了线程安全问题。
java.lang.AssertionError:
Expected :1000000
Actual   :377628
2
3
4
我们不妨看看arrayList的add方法,它的逻辑为:
- 判断当前数组空间是否可以容纳新元素,若不够则创建一个新数组,并将旧数组的元素全部转移到新数组中
- 将元素e追加到数组末尾
public boolean add(E e) {
		//确定当前数组空间是否足够,若不足则扩容
        ensureCapacityInternal(size + 1);  // Increments modCount!!
        //将元素添加到末尾
        elementData[size++] = e;
        return true;
    }
2
3
4
5
6
7
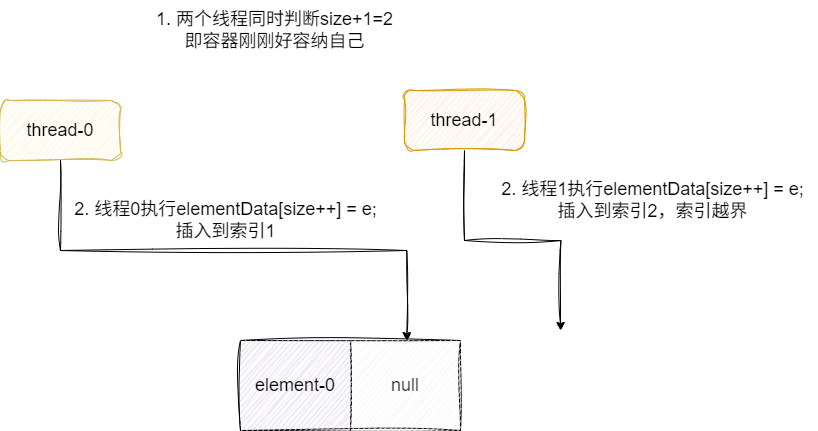
所以如果我们两个线程同时得到线程空间足够,然后两个线程分别执行插入逻辑,如下图所示,因为各自明确加上自己的元素数组空间2是足够的,所以执行elementData[size++] = e;时,线程2定位到的索引位置为2出现索引越界:
我们同样可以写一段简单的代码就能轻易重现这个问题
@Test
    public void listTest() throws InterruptedException {

        ArrayList<Object> list = new ArrayList<>(2);

        CountDownLatch countDownLatch = new CountDownLatch(2);
        list.add(0);

        new Thread(() -> {
            list.add(1);
            countDownLatch.countDown();
        }, "t1").start();

        new Thread(() -> {
            list.add(2);
            countDownLatch.countDown();
        }, "t2").start();

        countDownLatch.await();

        System.out.println(list.toString());

    }
2
3
4
5
6
7
8
9
10
11
12
13
14
15
16
17
18
19
20
21
22
23
我们的add方法上打一个断点,并设置条件为t1和t2两个线程
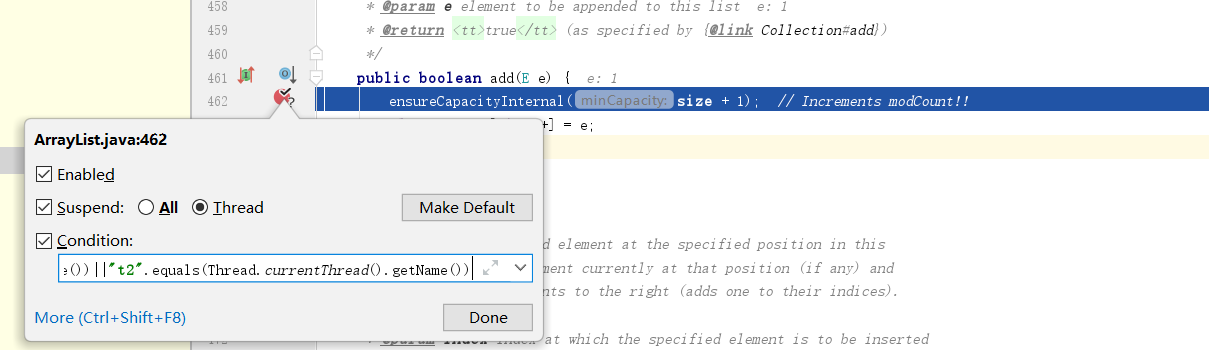
在t1线程正准备插入元素时,切换线程到t2
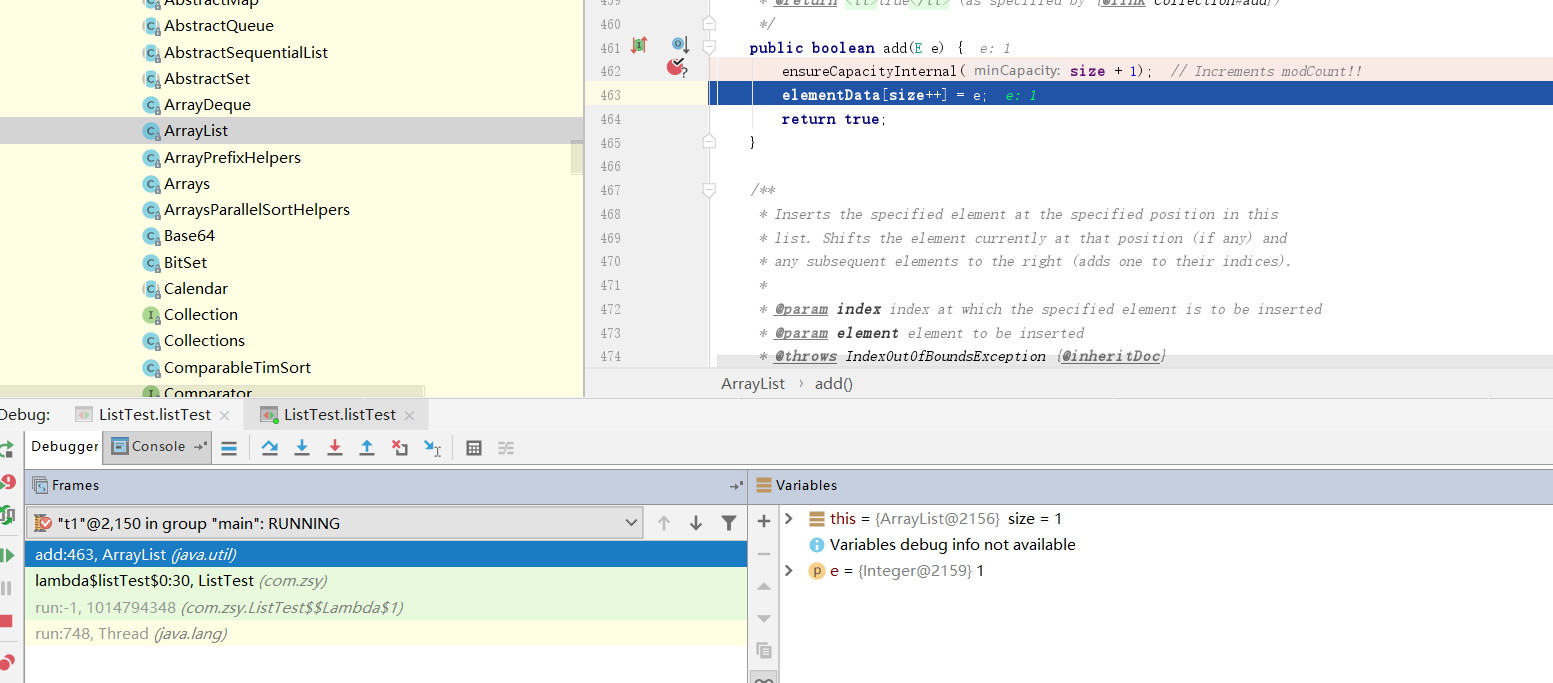
然后直接将t2线程放行,回到t1线程放行后续操作。问题得以重现
# 解决ArrayList线程安全问题的两个思路
在此回到这段代码,解决这段代码线程安全问题的方式有两种
 @Test
    public void listTest() {
        StopWatch stopWatch = new StopWatch();

        List<Object> list=new ArrayList<>();
        IntStream.rangeClosed(1, 100_0000).parallel().forEach(i -> {
            list.add(i);
        });

        Assert.assertEquals(100_0000,list.size());


    }
2
3
4
5
6
7
8
9
10
11
12
13
第一种是使用synchronizedList这个api将容器包装为线程安全容器:
 @Test
    public void listTest() {

        List<Object> list=Collections.synchronizedList(new ArrayList<>());
        IntStream.rangeClosed(1, 100_0000).parallel().forEach(i -> {
            list.add(i);
        });

        Assert.assertEquals(100_0000,list.size());


    }
2
3
4
5
6
7
8
9
10
11
12
第二种则是使用CopyOnWriteArrayList这个基于COW思想即写时复制的并发容器:
 @Test
    public void listTest() {

        List<Object> list=new CopyOnWriteArrayList<>();
        IntStream.rangeClosed(1, 100_0000).parallel().forEach(i -> {
            list.add(i);
        });

        Assert.assertEquals(100_0000,list.size());


    }
2
3
4
5
6
7
8
9
10
11
12
# synchronizedList和CopyOnWriteArrayList区别
虽然两者都可以保证并发操作的线程安全,但我们还是需要注意两者使用场景上的区别:
synchronizedList保证多线程操作安全的原理很简单,每次执行插入或者读取操作前上锁。
 public E get(int index) {
            synchronized (mutex) {return list.get(index);}
        }

public void add(int index, E element) {
            synchronized (mutex) {list.add(index, element);}
        }
2
3
4
5
6
7
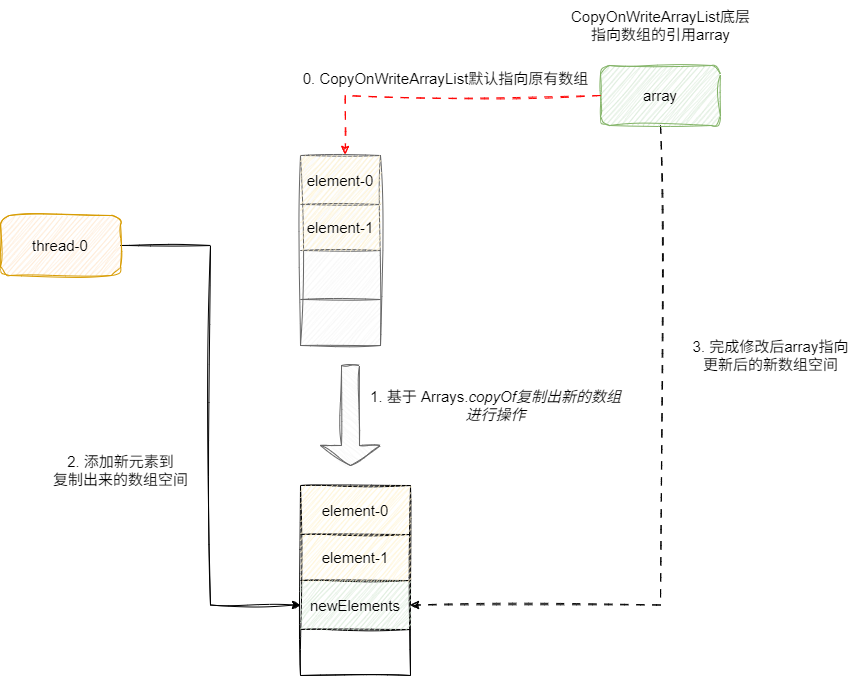
CopyOnWriteArrayList意味写时复制,从源码中不难看出它保证线程安全的方式开销非常大:
- 获得写锁。
- 复制一个新数组newElements 。
- 在newElements 添加元素。
- 将数组修改为newElements。
对应的我们也给出相应的add源码的实现逻辑:
public boolean add(E e) {
        final ReentrantLock lock = this.lock;
        //上锁
        lock.lock();
        try {
        	//复制数组
            Object[] elements = getArray();
            int len = elements.length;
            Object[] newElements = Arrays.copyOf(elements, len + 1);
            //添加元素
            newElements[len] = e;
            //原子覆盖
            setArray(newElements);
            return true;
        } finally {
            lock.unlock();
        }
    }
2
3
4
5
6
7
8
9
10
11
12
13
14
15
16
17
18
而对于读CopyOnWriteArrayList则非常简单,直接返回原数组的值,所以CopyOnWriteArrayList更适合与读多写少的场景:
 private E get(Object[] a, int index) {
        return (E) a[index];
    }
2
3
对此我们对两者读写性能进行了一次压测,首先是写性能压测
@GetMapping("testWrite")
    public Map testWrite() {
        int loopCount = 10_0000;
        CopyOnWriteArrayList<Integer> copyOnWriteArrayList = new CopyOnWriteArrayList<>();
        List<Integer> synchronizedList = Collections.synchronizedList(new ArrayList<>());

        //使用copyOnWriteArrayList添加10w个数据
        StopWatch stopWatch = new StopWatch();
        stopWatch.start("copyOnWriteArrayList add");
        IntStream.rangeClosed(1, loopCount)
                .parallel()
                .forEach(__ -> copyOnWriteArrayList.add(ThreadLocalRandom.current().nextInt(loopCount)));
        stopWatch.stop();

        //使用synchronizedList添加10w个数据
        stopWatch.start("synchronizedList add");
        IntStream.rangeClosed(1, loopCount)
                .parallel()
                .forEach(__ -> synchronizedList.add(ThreadLocalRandom.current().nextInt(loopCount)));
        stopWatch.stop();


        log.info(stopWatch.prettyPrint());


        Map<String, Integer> result = new HashMap<>();
        result.put("copyOnWriteArrayList", copyOnWriteArrayList.size());
        result.put("synchronizedList", synchronizedList.size());
        return result;


    }
2
3
4
5
6
7
8
9
10
11
12
13
14
15
16
17
18
19
20
21
22
23
24
25
26
27
28
29
30
31
32
可以看出,高并发写的情况下synchronizedList 性能更佳。
2023-03-15 00:16:14,532 INFO  CopyOnWriteListMisuseController:39 - StopWatch '': running time (millis) = 5556
-----------------------------------------
ms     %     Task name
-----------------------------------------
05527  099%  copyOnWriteArrayList add
00029  001%  synchronizedList add
2
3
4
5
6
读取性能压测代码
@GetMapping("testRead")
    public Map testRead() {
        int loopCount = 100_0000;
        CopyOnWriteArrayList<Integer> copyOnWriteArrayList = new CopyOnWriteArrayList<>();
        List<Integer> synchronizedList = Collections.synchronizedList(new ArrayList<>());

        //为两个list设置100_0000个元素
        addAll(copyOnWriteArrayList);
        addAll(synchronizedList);

        //随机读取copyOnWriteArrayList中的元素
        StopWatch stopWatch = new StopWatch();
        stopWatch.start("copyOnWriteArrayList read");
        IntStream.rangeClosed(0, loopCount)
                .parallel()
                .forEach(__ -> copyOnWriteArrayList.get(ThreadLocalRandom.current().nextInt(loopCount)));
        stopWatch.stop();

        //随机读取synchronizedList中的元素
        stopWatch.start("synchronizedList read");
        IntStream.rangeClosed(0, loopCount)
                .parallel()
                .forEach(__ -> synchronizedList.get(ThreadLocalRandom.current().nextInt(loopCount)));
        stopWatch.stop();


        log.info(stopWatch.prettyPrint());


        Map<String, Integer> result = new HashMap<>();
        result.put("copyOnWriteArrayList", copyOnWriteArrayList.size());
        result.put("synchronizedList", synchronizedList.size());
        return result;


    }


    private void addAll(List<Integer> list) {
        list.addAll(IntStream.rangeClosed(1, 100_0000)
                .parallel()
                .boxed()
                .collect(Collectors.toList()));
    }
2
3
4
5
6
7
8
9
10
11
12
13
14
15
16
17
18
19
20
21
22
23
24
25
26
27
28
29
30
31
32
33
34
35
36
37
38
39
40
41
42
43
44
而在高并发读的情况下synchronizedList 性能更加
2023-03-15 00:16:54,335 INFO  CopyOnWriteListMisuseController:74 - StopWatch '': running time (millis) = 310
-----------------------------------------
ms     %     Task name
-----------------------------------------
00037  012%  copyOnWriteArrayList read
00273  088%  synchronizedList read
2
3
4
5
6
# 阻塞队列ArrayBlockingQueue和延迟队列DelayQueue
笔者近期已经将阻塞队列和延迟队列的文章提交给了开源项目JavaGuide,关于阻塞的队列读者可以参考这篇文章:
# 小结
以上笔者对高并发容器的个人理解,总的来说读者必须掌握以下几点:
- 通过阅读源码了解容器工作机制,代入多线程绘图推算出可能存在的线程安全问题,并学会使用IDEA加以实践落地推算结果。
- 了解并发容器工作原理和所有API,确定在指定的场景可以正确使用并发容器保证线程安全和性能。
我是 SharkChili ,Java 开发者,Java Guide 开源项目维护者。欢迎关注我的公众号:写代码的SharkChili,也欢迎您了解我的开源项目 mini-redis:https://github.com/shark-ctrl/mini-redis (opens new window)。
为方便与读者交流,现已创建读者群。关注上方公众号获取我的联系方式,添加时备注加群即可加入。
# 参考
为什么说ArrayList是线程不安全的?:https://blog.csdn.net/u012859681/article/details/78206494 (opens new window)
并发容器类:https://blog.csdn.net/DLC990319/article/details/106499408 (opens new window)
ConcurrentHashMap源码&底层数据结构分析:https://javaguide.cn/java/collection/concurrent-hash-map-source-code.html#_1-concurrenthashmap-1-7 (opens new window)
Java 业务开发常见错误 100 例:https://time.geekbang.org/column/intro/294?utm_term=zeus134KG&utm_source=blog&utm_medium=zhuye (opens new window)
ConcurrentHashMap源码&底层数据结构分析:https://javaguide.cn/java/collection/concurrent-hash-map-source-code.html#_4-get (opens new window)
大厂常问的HashMap线程安全问题,看这一篇就够了!:https://blog.csdn.net/weixin_44141495/article/details/108250160 (opens new window)
浅谈Java8的HashMap为什么线程不安全:https://blog.csdn.net/LovePluto/article/details/106460378 (opens new window)
5张图讲明白JDK1.7下的HashMap死循环(原理+实战):https://zhuanlan.zhihu.com/p/358819700 (opens new window)
一文带你彻底读懂红黑树:https://zhuanlan.zhihu.com/p/91960960 (opens new window)
