 Java BIO NIO AIO详解
# 前置知识
# 阻塞IO和非阻塞IO
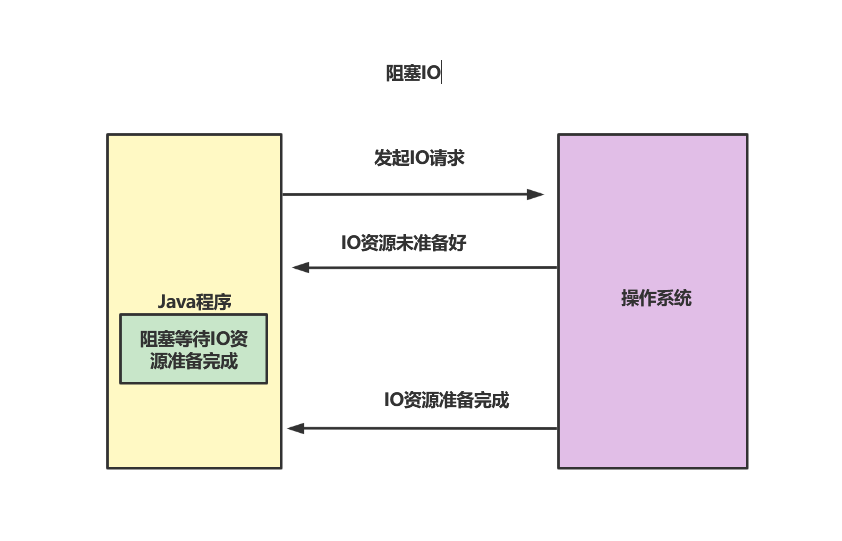
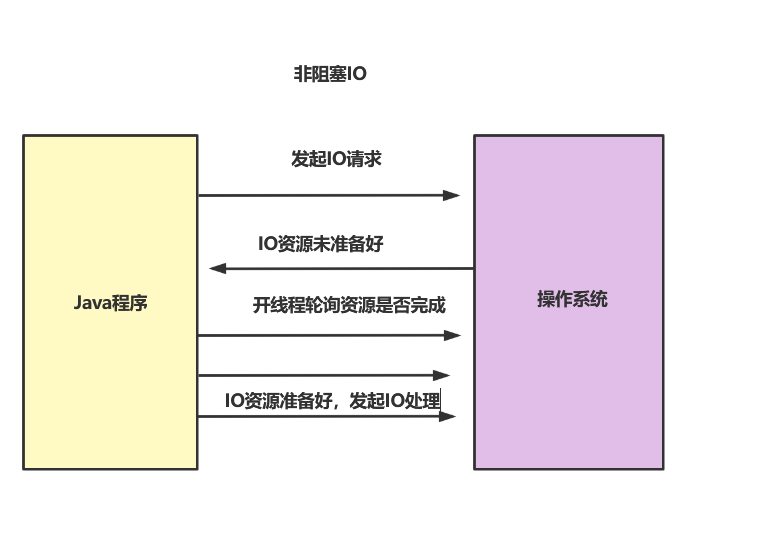
阻塞IO的概念属于程序级别的阻塞,若程序将操作系统发起IO,若操作系统告知IO资源并没有准备好,前者会阻塞等待IO资源准备完成。后者不会阻塞,而是通过线程不断轮询询问IO资源是否准备完成。
阻塞式IO如下图所示
非阻塞IO如下图所示:
# 同步IO和非同步IO
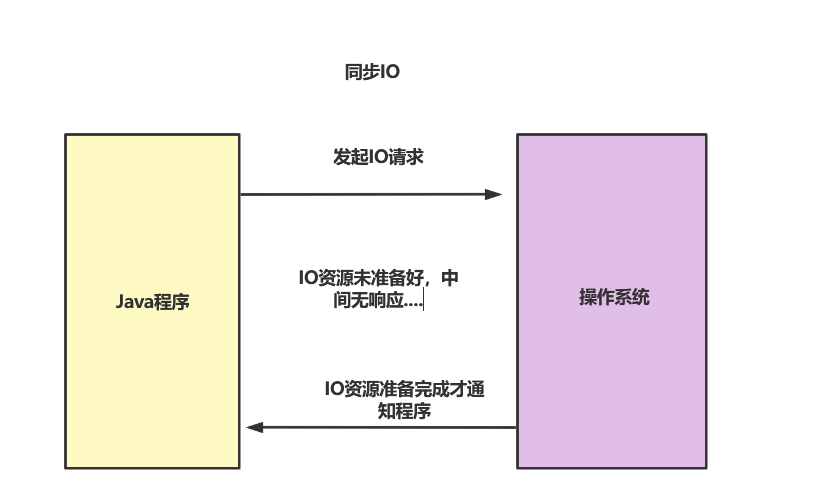
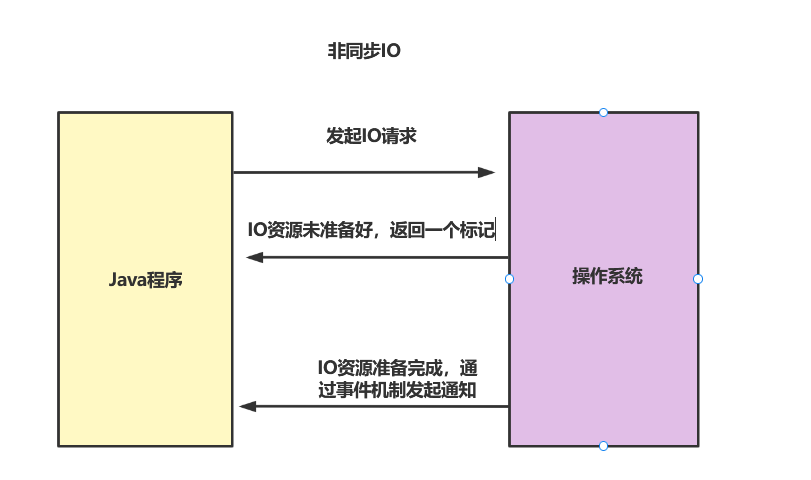
同步IO的概念是操作系统级别的IO了,若Java程序发起IO请求,若操作系统IO资源未准备好,同步IO不做出任何响应。而非同步IO则会返回一个标记,当IO资源准备完成后,再通过事件机制通知程序。
如下图所示,同步IO会因为IO资源未准备好而进入阻塞状态。
非同步IO则会通过事件机制,避免和操作系统级别的阻塞。
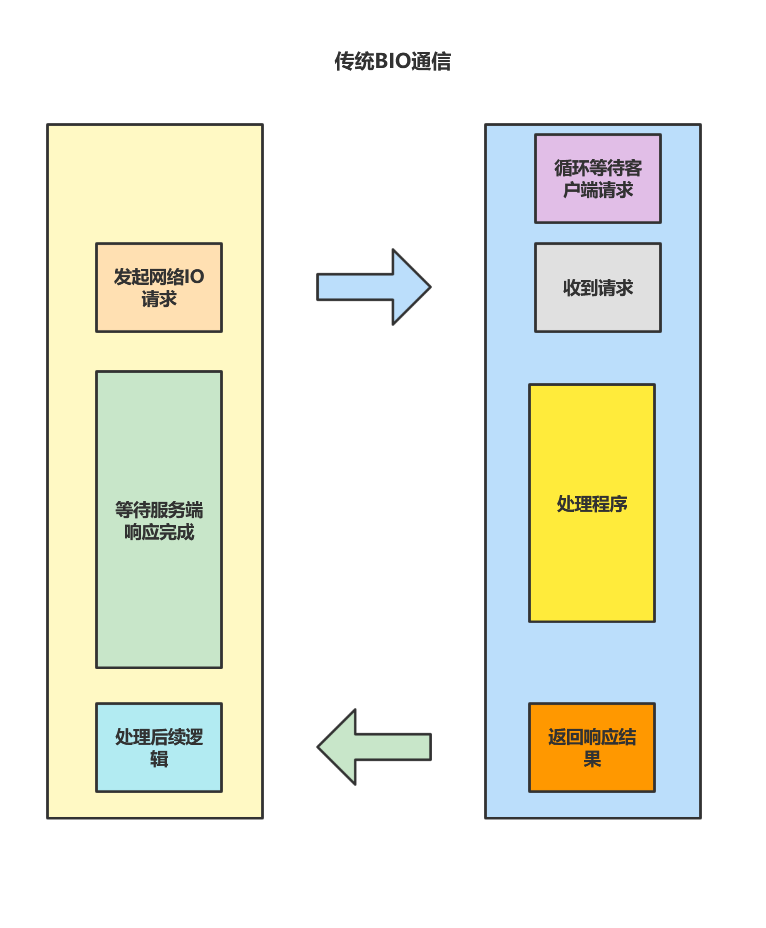
# 传统BIO通信简介
# 传统BIO的问题
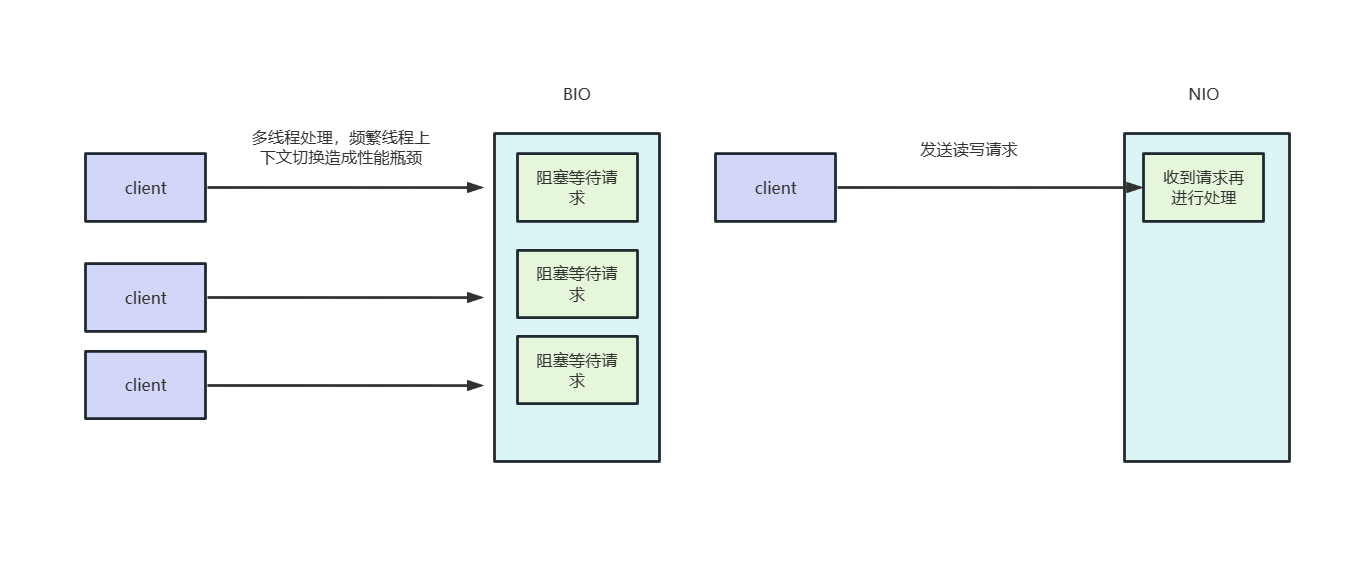
BIO通信过程如下图所示,可以看到客户端成功与服务端建立连接后会因为等待服务端处理并响应结果而需要进行阻塞。而服务端在没有客户端发起请求时也会进入循环阻塞。并且服务端必须只有处理完这个请求后,才会去处理其他用户的请求。所以在高并发场景下,无论用户体验,还是服务器处理效率和压力都是灾难性的打击。
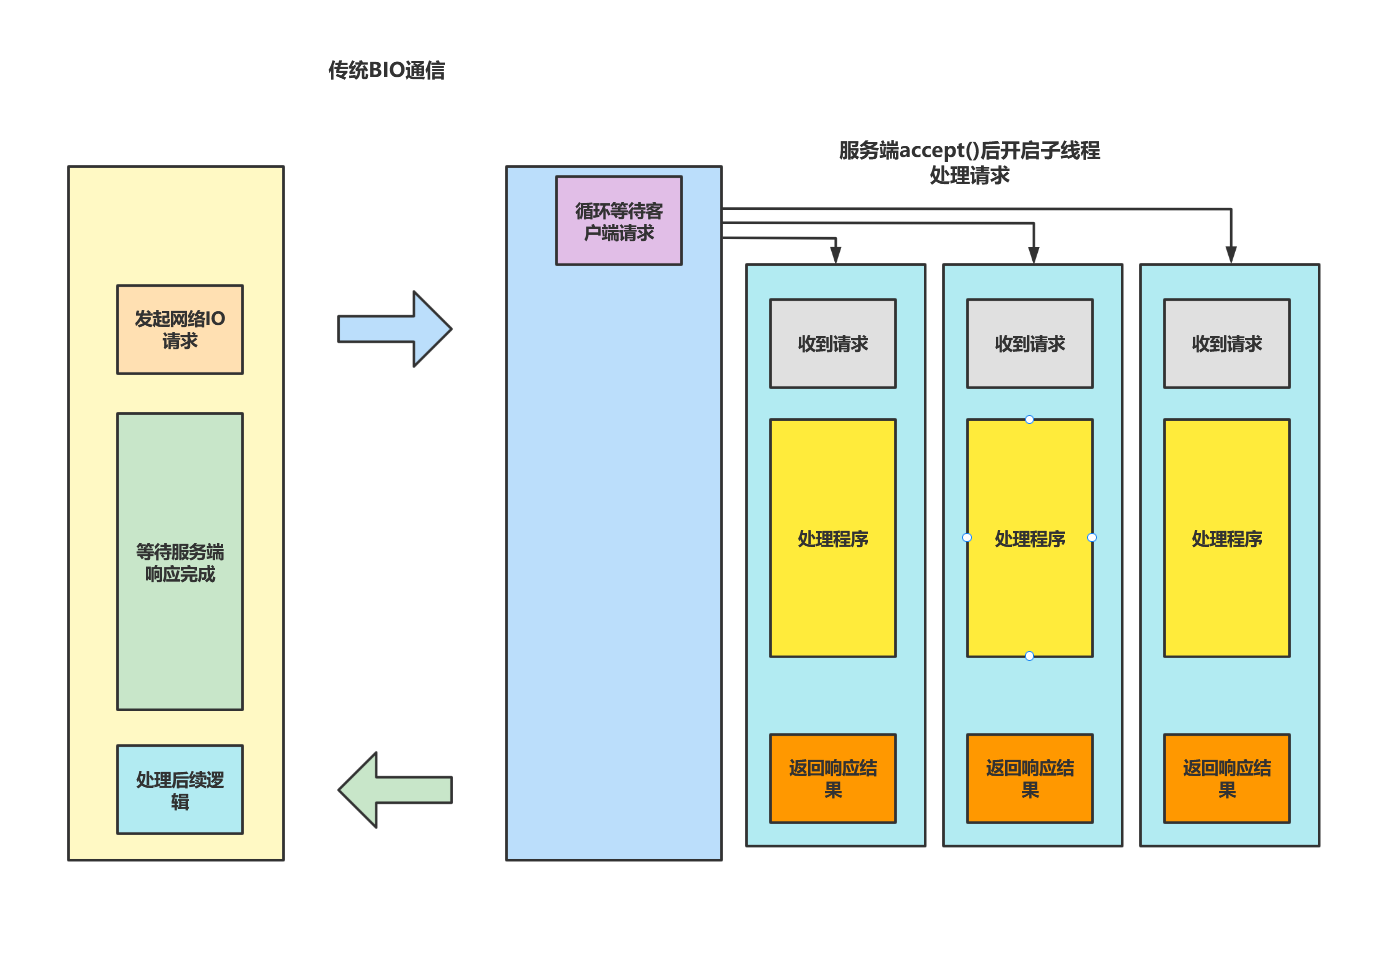
# 采用多线程处理客户端请求是否可以解决问题?
可能你会想到使用下面张图的方式解决大量客户端请求,虽然一定程序上解决了串行请求响应慢的问题,但杯水车薪,大量客户端请求时,用户阻塞时间仍然会程序好一段时间,原因如下:
- accept()方法属于操作系统级别的同步IO,及时我们处理用户请求可以用多线程解决,但是每个用户进来都要挨个进行操作系统级别的同步IO。
- 高并发场景下,为了每个请求建立线程去解决问题想法固然美好,但是操作系统对创建的线程是有限制的,我们可以通过下面这段命令查看服务器支持创建的最大线程数,可以看到最大可以创建1w多线程,及时我们只需要创建1w多个线程,线程之间频繁切换的开销也将会十分耗时,这就导致真正处理业务逻辑的CPU占比可能还不如线程切换的占比
[root@localhost~]# cat /proc/sys/kernel/threads-max
# 输出结果
15402
2
3
4
- 多线程我们可以也可以用线程池解决,但是JVM创建线程时会在堆栈开辟空间创建线程,每个线程默认128k,或许你可以使用ThreadPoolExecutor来解决规范管理线程,但是高并发场景下,你的队列可能会出现大量任务堆积,同样消耗大量资源。并且线程池的线程是不会被回收的,假如你的处理逻辑都需要长连接,这也很可能导致资源失控。
# BIO通信方式深入分析
如下代码所示,服务端等待客户端请求以及多线程处理请求任务类ServerThread ,逻辑很简单,通过socket获取客户端的响应内容,输出客户端发送的消息以及响应收到的消息即可。代码如下:
import org.slf4j.Logger;
import org.slf4j.LoggerFactory;

import java.io.IOException;
import java.io.InputStream;
import java.io.OutputStream;
import java.net.Socket;

public class ServerThread implements Runnable {


    private static Logger logger = LoggerFactory.getLogger(ServerThread.class);

    private Socket socket;


    public ServerThread(Socket socket) {
        this.socket = socket;
    }


    @Override
    public void run() {

        InputStream inputStream = null;
        OutputStream outputStream = null;

        try {
            inputStream = socket.getInputStream();
            outputStream = socket.getOutputStream();


            byte[] buf = new byte[1024];

            int readLen = 1024;
            StringBuilder sb = new StringBuilder();

            if ((readLen = inputStream.read(buf, 0, readLen)) != -1) {
                sb.append(new String(buf, 0, readLen));
            }

            String msg = sb.toString();

            logger.info("服务端收到来自端口号:[{}]的消息,消息内容:[{}]", this.socket.getPort(), msg);

            outputStream.write("服务端收到消息".getBytes());
            outputStream.flush();

            logger.info("服务端消息发送完成");


        } catch (IOException e) {
            e.printStackTrace();
        } finally {

            if (inputStream != null) {
                try {
                    inputStream.close();
                } catch (IOException e) {
                    logger.error("服务端输入流关闭失败,失败原因[{}]", e.getCause(), e);
                }
            }

            if (outputStream != null) {
                try {
                    outputStream.close();
                } catch (IOException e) {
                    logger.error("服务端输出流关闭失败,失败原因[{}]", e.getCause(), e);
                }
            }

            if (socket != null) {
                try {
                    socket.close();
                } catch (IOException e) {
                    logger.error("服务端socket关闭失败,失败原因[{}]", e.getCause(), e);
                }
            }
        }
    }
}
2
3
4
5
6
7
8
9
10
11
12
13
14
15
16
17
18
19
20
21
22
23
24
25
26
27
28
29
30
31
32
33
34
35
36
37
38
39
40
41
42
43
44
45
46
47
48
49
50
51
52
53
54
55
56
57
58
59
60
61
62
63
64
65
66
67
68
69
70
71
72
73
74
75
76
77
78
79
80
81
82
83
客户端代码如下,我们为了每个客户端发起IO请求类都增加一个参数countDownLatch,这样后续测试时就能够用倒计时门闩统一管理了
import java.io.IOException;
import java.io.InputStream;
import java.io.OutputStream;
import java.net.Socket;
import java.util.concurrent.CountDownLatch;

/**
 * 客户端线程任务
 */
public class ClientThread implements Runnable {

    private int index;

    private CountDownLatch count;

    private static Logger logger = LoggerFactory.getLogger(ClientThread.class);


    public ClientThread(int index, CountDownLatch count) {
        this.index = index;
        this.count = count;
    }

    @Override
    public void run() {
        Socket socket = null;
        InputStream inputStream = null;
        OutputStream outputStream = null;

        try {
            socket = new Socket("localhost", 83);

            inputStream = socket.getInputStream();
            outputStream = socket.getOutputStream();

            this.count.await();

            String message = "客户端" + this.index + "发送向服务端发送请求";
            outputStream.write(message.getBytes());
            outputStream.flush();

            logger.info("客户端向服务端发送请求完成,客户端代号:[{}],发送消息:[{}]", index, message);

            int len = 0;
            int readBufSize = 1024;
            byte[] readByte = new byte[readBufSize];
            StringBuilder sb = new StringBuilder();

            //在for循环里面 编译器无法对字符串拼接进行优化,所以我们就手动使用sb
            while ((len = inputStream.read(readByte, 0, readBufSize)) != -1) {
                sb.append(new String(readByte, 0, readBufSize));
            }

            String resp = sb.toString();
            logger.info("客户端[{}] 收到服务端响应,服务端响应内容[{}]", index,resp );


        } catch (Exception e) {
            logger.error("客户端线程请求失败,客户端代号:[{}],失败原因[{}]", index, e.getMessage(), e);
        } finally {
            if (inputStream != null) {
                try {
                    inputStream.close();
                } catch (IOException e) {
                    logger.error("输入流关闭失败,客户端代号[{}],错误原因[{}]", index, e.getMessage(), e);
                }
            }


            if (outputStream != null) {
                try {
                    outputStream.close();
                } catch (IOException e) {
                    logger.error("输出流关闭失败,客户端代号[{}],错误原因[{}]", index, e.getMessage(), e);
                }
            }
        }
    }
}
2
3
4
5
6
7
8
9
10
11
12
13
14
15
16
17
18
19
20
21
22
23
24
25
26
27
28
29
30
31
32
33
34
35
36
37
38
39
40
41
42
43
44
45
46
47
48
49
50
51
52
53
54
55
56
57
58
59
60
61
62
63
64
65
66
67
68
69
70
71
72
73
74
75
76
77
78
79
80
主运行代码如下所示,可以看到通过socket的accept阻塞监听83端口,等收到客户端消息之后就交给ServerThread线程处理消息。
public class ServerHandler {

    private static Logger logger = LoggerFactory.getLogger(ServerHandler.class);

    public static void main(String[] args) {
        ServerSocket serverSocket = null;
        ExecutorService threadPool = Executors.newFixedThreadPool(20);
        try {
            serverSocket = new ServerSocket(83);
            while (true) {
//           操作系统级别的同步IO阻塞
                logger.info("服务端操作系统级别的同步IO阻塞中......");
                Socket socket = serverSocket.accept();

                threadPool.submit(new ServerThread(socket));
//                new Thread(new ServerThread(socket)).start();

            }
        } catch (Exception e) {
            logger.error("服务端处理任务失败,失败原因[{}]", e.getMessage(), e);
        } finally {
            if (serverSocket != null) {
                try {
                    serverSocket.close();
                } catch (IOException e) {
                    logger.error("服务端serverSocket关闭失败,失败原因[{}]", e.getMessage(), e);
                }
            }
        }
    }
}
2
3
4
5
6
7
8
9
10
11
12
13
14
15
16
17
18
19
20
21
22
23
24
25
26
27
28
29
30
31
完成的服务端启动代码之后,我们不妨也编写一下客户端的启动代码,如下图所示,笔者为了起到压测的效果直接用countDownLatch 统一调度发送客户端请求。
public class ClentHandle {
    public static void main(String[] args) {
        int clentNum = 20;
        CountDownLatch countDownLatch = new CountDownLatch(clentNum);

        //20个并发请求同时发送到服务端
        ExecutorService threadPool = Executors.newFixedThreadPool(clentNum);
        for (int i = 0; i < clentNum; i++) {
            threadPool.submit(new ClientThread(i, countDownLatch));
            countDownLatch.countDown();
        }

        threadPool.shutdown();
        while (!threadPool.isTerminated()) {

        }
    }
}
2
3
4
5
6
7
8
9
10
11
12
13
14
15
16
17
18
19
好了,完成之后我们不妨将两个main函数启动,然后我们不妨通过debug的方式来分析分析BIO的缺陷,首先断点定在serverSocket.accept();
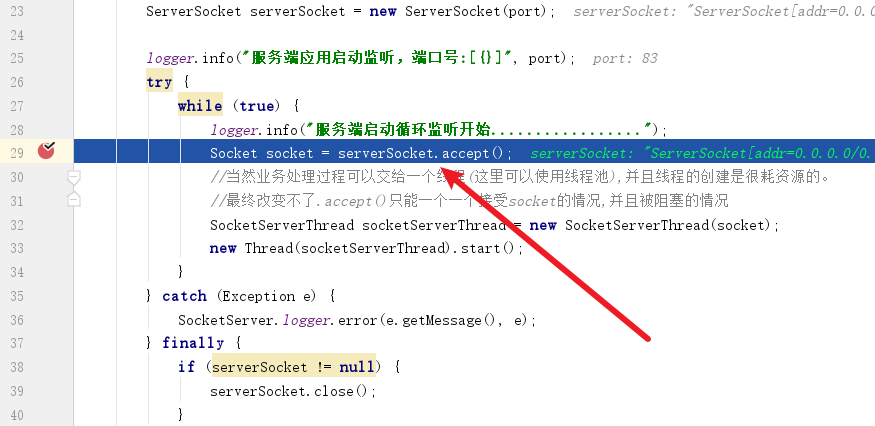
然后代码走到了implAccept(s);

点击F7步入,可以看到代码走到了getImpl().accept(si);
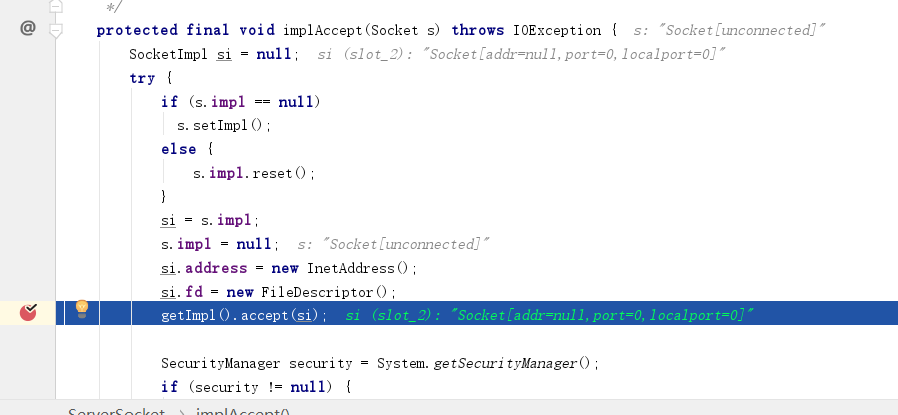
可以看到accept加了synchronized关键字这种重量级锁下,我们再看看 impl.accept(delegate);
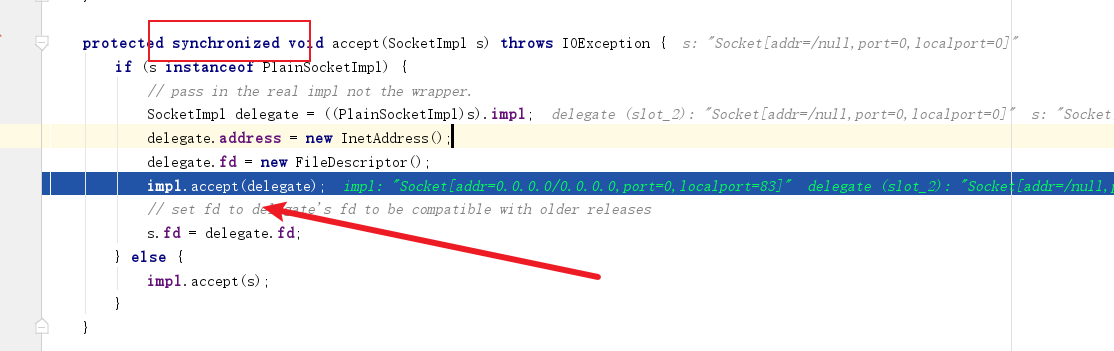
最终代码走到这,再往下就是native方法了,不难看出这段若离如果Java没有设置超时等待时长,则调用accept0进行操作系统级别的同步IO阻塞,直至请求到来。
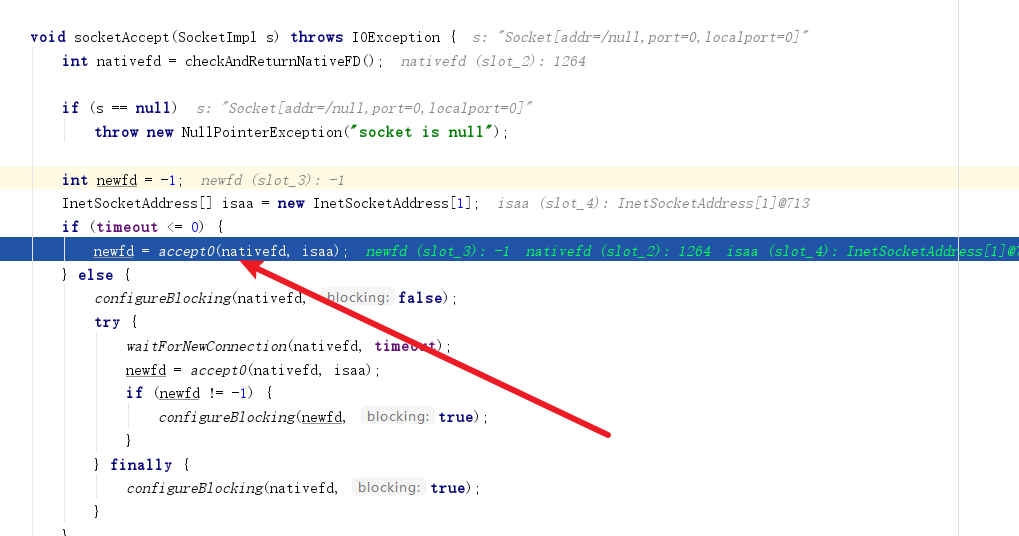
这也是为什么我们服务端在没有请求的时候一直卡在accept之前的原因。
# NIO
# 流与块的区别
常规的IO流操作基本单位为流,即1字节1字节的读写数据,效率不高,但是操作简单优雅。而面向块的数据操作相比流来说会快很多,但是操作上没有面向流操作那么简单优雅。
# 为什么需要NIO,和BIO比有什么优势
相比于BIO,NIO是非阻塞式的IO,只有通到收到读写事件时才会进行读写操作,这样一来我们就不必为了每个连接去创建线程,从而避免没必要的线程上下文切换的开销也能提高系统吞吐量。
# NIO三大核心概念
# 缓冲区
buffer是NIO中一个比较重要的概念,相比于传统IO通过stream流进行读写,NIO则是通过buffer将数据写入缓冲区进行高效处理的。

而我们常用的类型是bytebuffer,可以看到这个类本质上就是通过一个byte数组来处理数据的。
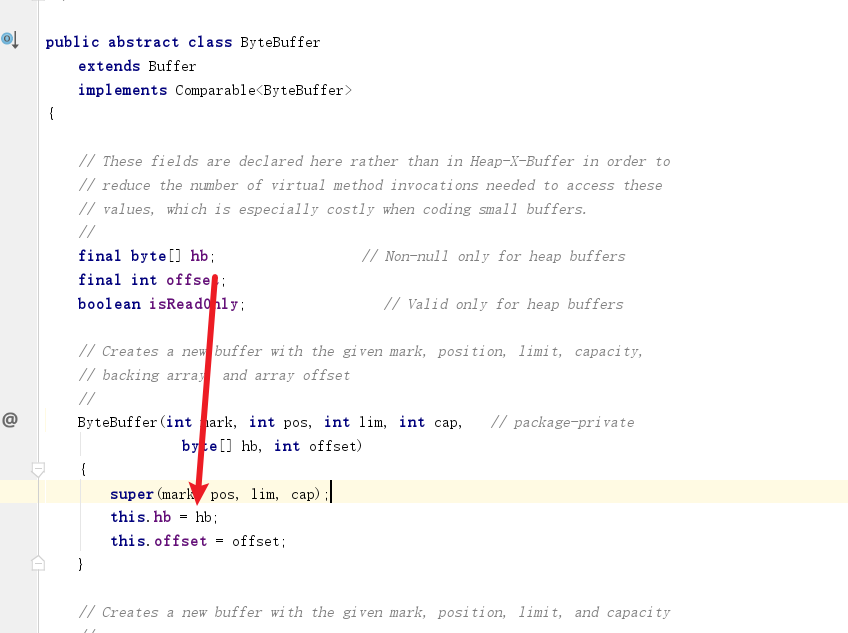
从类图中了解了缓冲区的几个类之后,我们不妨看看缓冲区状态变量,通过这几个变量记录数据读写的进度:
capacity: 缓冲区最大容量,例如:ByteBuffer buf = ByteBuffer.allocate(5);即这个缓冲区容量为5字节
position: 当前已经读写的字节数,假如position为5则说明读取了5个单位的数据
limit: capacity-position即代表,缓冲区剩余空间。
2
3
这样详述可能会有些抽象,笔者后文会基于一段实践示例结合源码展示缓冲区的变化,这里读者先了解一下概念即可。
我们不妨写一段基础示例,可以看到下面这段代码大概做了以下几件事:
- 获取文件通到。
- 创建缓存区。
- 将数据读到缓存区。
- 缓存区设置为写模式,将数据写入文件中。
接下来我们会通过一步步的演示,实现通过NIO文件操作实现将in.txt的文件写道out.txt
首先获取in.txt的通道
//            获取输入流文件通道
            FileInputStream inputStream = new FileInputStream(src);
            FileChannel inputStreamChannel = inputStream.getChannel();
2
3
再获取out.txt的通道
//            输出流文件通道
            FileOutputStream outputStream = new FileOutputStream(dst);
            FileChannel outputStreamChannel = outputStream.getChannel();
2
3
设置缓冲区
//            缓冲区设置未5字节
            ByteBuffer buf = ByteBuffer.allocate(5);
2
读取数据到缓冲区,如下所示,将in.txt数据读取到buf中,因为我们缓冲区设置为5字节,获取只会读取5个字节数据,正常情况下len=5。
//获取输入流管道读取到的字节数
            int len = inputStreamChannel.read(buf);

            if (len == -1) {
                logger.info("源文件[{}] 无数据", src);
            }

            logger.info("inputStreamChannel 读取了【{}】个字符", len);
2
3
4
5
6
7
8
我们查看通道read的源码,可以看到将缓冲作为参数传到IOUtil中,我们不妨步入看看详情
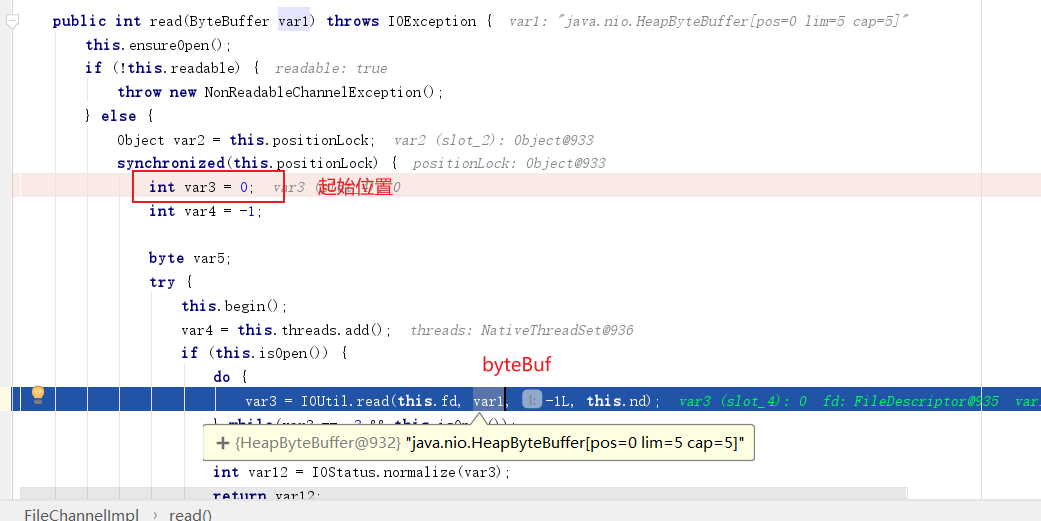
步入后代码如下,缓冲区被拷贝一份给变量var5,后续操作都是基于这个缓冲区进行的。即读取缓冲区长度的数据后。更新postion,和limit,返回读取的长度值var7
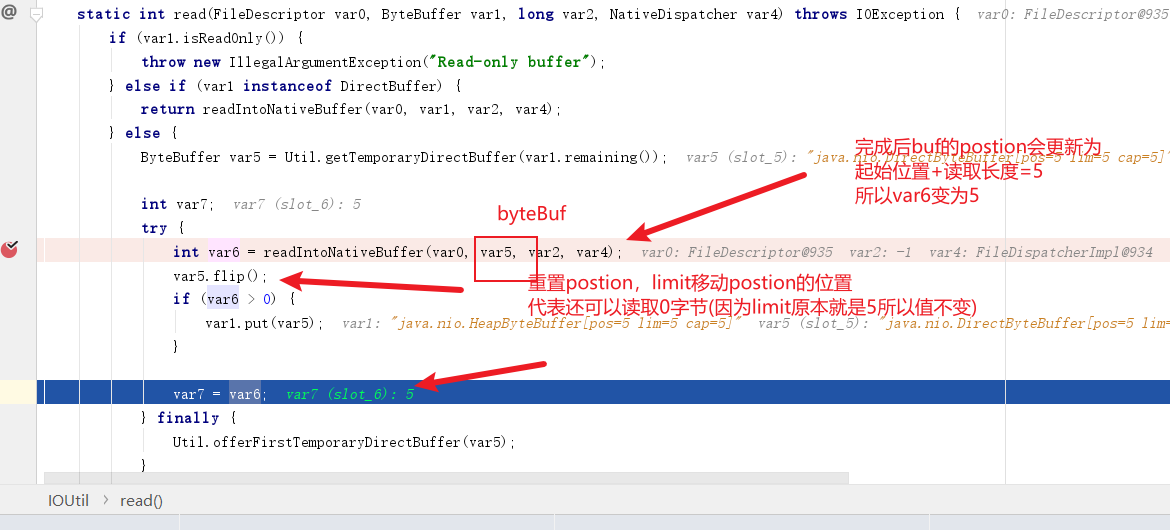
inputStreamChannel.read(buf);对缓冲区的操作
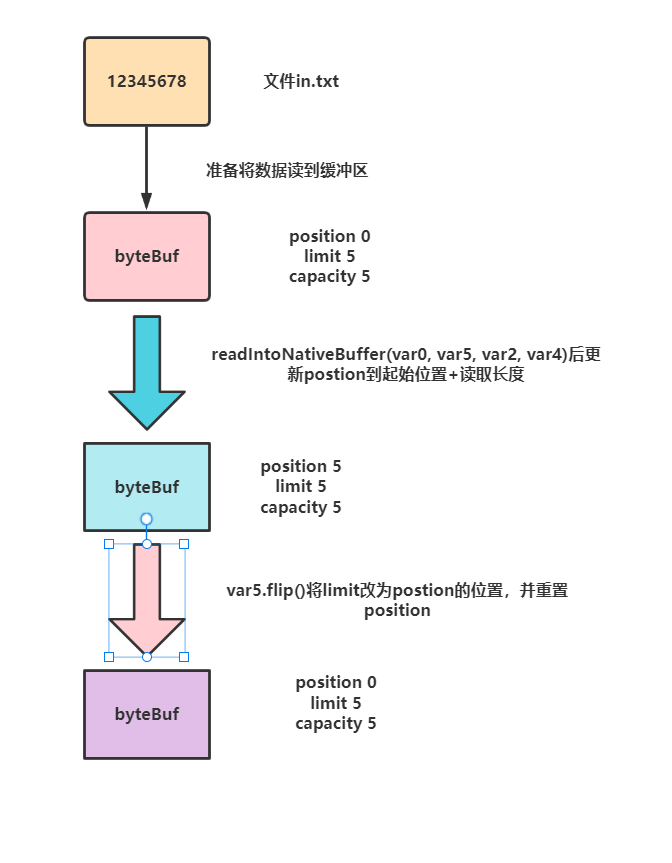
更新缓冲区,这个步骤就是将position改为0,并将buf的limit改为position的值,意味切换为写模式,从position读取到limit。
 /**
             * 源码
             * public final Buffer flip() {
             *         limit = position;
             *         position = 0;
             *         mark = -1;
             *         return this;
             *     }
             *
             *     即limit设置到读取到的字节长度的位置
             *     position归0
             *
             */
            buf.flip();
2
3
4
5
6
7
8
9
10
11
12
13
14
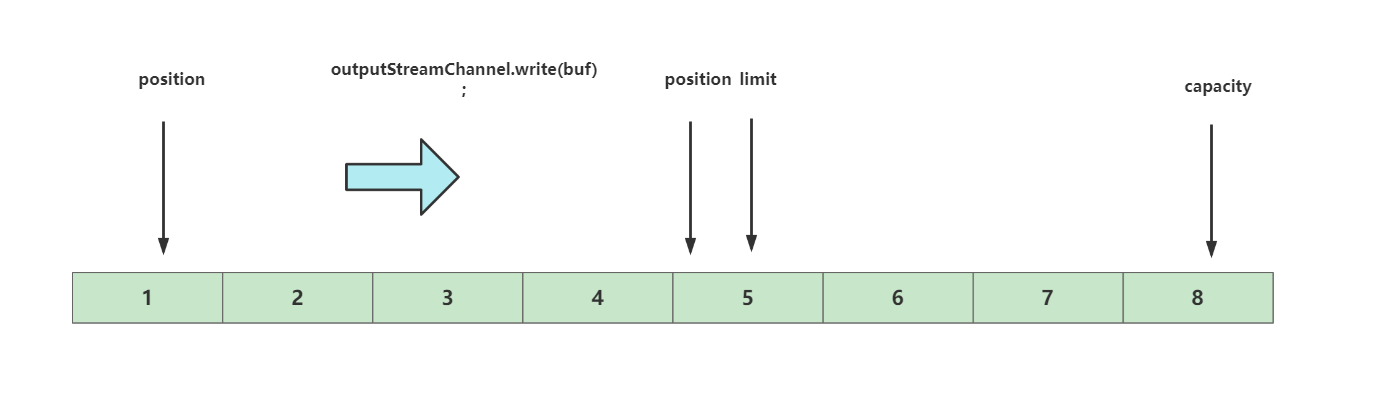
数据写入到outputStreamChannel,代码如下所示,这时候我们的代码就基于position到limit写到通道,并且更新postion,将position移动到读取完成后的位置
outputStreamChannel.write(buf);
完整代码如下
@Test
    public void fastCopyTest() {
        fastCopy("in.txt", "out.txt");
    }

    private void fastCopy(String src, String dst) {
        try {
        // 获取输入流文件通道
            FileInputStream inputStream = new FileInputStream(src);
            FileChannel inputStreamChannel = inputStream.getChannel();

            // 获取输出流文件通道
            FileOutputStream outputStream = new FileOutputStream(dst);
            FileChannel outputStreamChannel = outputStream.getChannel();


            // 缓冲区设置设置为5字节
            ByteBuffer buf = ByteBuffer.allocate(5);


            //获取输入流管道读取到的字节数
            int len = inputStreamChannel.read(buf);

            if (len == -1) {
                logger.info("源文件[{}] 无数据", src);
            }

            logger.info("inputStreamChannel 读取了【{}】个字符", len);

            //将buffer改为写模式,将数据写入输出通到中
            buf.flip();

            outputStreamChannel.write(buf);


            //缓冲区清空继续都组数据
            buf.clear();


            logger.info("第2次读取*************");

            len = inputStreamChannel.read(buf);

            if (len == -1) {
                logger.info("源文件[{}] 无数据", src);
            }

            logger.info("inputStreamChannel 读取了【{}】个字符", len);

            buf.flip();

            outputStreamChannel.write(buf);

            buf.clear();


        } catch (Exception e) {
            logger.error("nio快速拷贝失败,失败原因【{}】", e.getMessage(), e);
        }
    }
2
3
4
5
6
7
8
9
10
11
12
13
14
15
16
17
18
19
20
21
22
23
24
25
26
27
28
29
30
31
32
33
34
35
36
37
38
39
40
41
42
43
44
45
46
47
48
49
50
51
52
53
54
55
56
57
58
59
60
上文我们了解了一下NIO中buffer基础使用,可以看到我们使用缓冲区的时候用的是下面这种形式。
ByteBuffer.allocate(5);
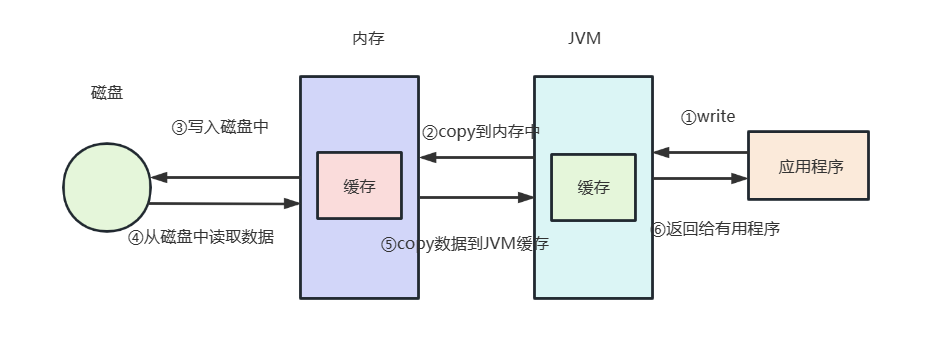
其实,nio为我们提供两种buffer,一种就是上文中用到的HeapByteBuffer,如下图所示,无论读还是写请求,数据都需要经过JVM和内存缓冲区复制这一步。
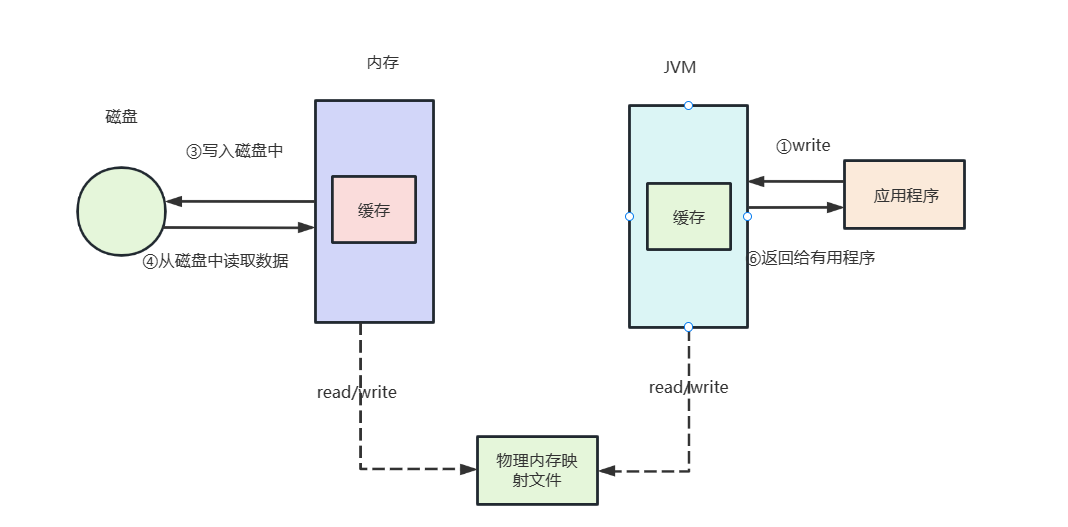
所以设计们提出了一种性能更强劲的读写方式DirectByteBuffer,即直接内存读写,这种形式进行数据读写时,无需经过将数据从JVM缓冲区读到内存缓冲区这一步,所以更加高效一些。
对此我们不妨给出下面这段代码,感兴趣的读者可以调试一下看直接缓冲区和非直接缓冲区的性能差异,
long starTime = System.currentTimeMillis();
        //获取文件输入流
        File file = new File("D:\\aa.mp4");
        FileInputStream inputStream = new FileInputStream(file);
        //从文件输入流获取通道
        FileChannel inputStreamChannel = inputStream.getChannel();
        //获取文件输出流
        FileOutputStream outputStream = new FileOutputStream(new File("D:\\test.mp4"));
        //从文件输出流获取通道
        FileChannel outputStreamChannel = outputStream.getChannel();
        //创建一个直接缓冲区
        ByteBuffer byteBuffer = ByteBuffer.allocateDirect(5 * 1024 * 1024);
        //创建一个非直接缓冲区
        //ByteBuffer byteBuffer = ByteBuffer.allocate(5 * 1024 * 1024);
        //写入到缓冲区
        while (inputStreamChannel.read(byteBuffer) != -1) {
            //切换读模式
            byteBuffer.flip();
            outputStreamChannel.write(byteBuffer);
            byteBuffer.clear();
        }
        //关闭通道
        outputStream.close();
        inputStream.close();
        outputStreamChannel.close();
        inputStreamChannel.close();
        long endTime = System.currentTimeMillis();
        System.out.println("消耗时间:" + (endTime - starTime) + "毫秒");
2
3
4
5
6
7
8
9
10
11
12
13
14
15
16
17
18
19
20
21
22
23
24
25
26
27
28
# 管道
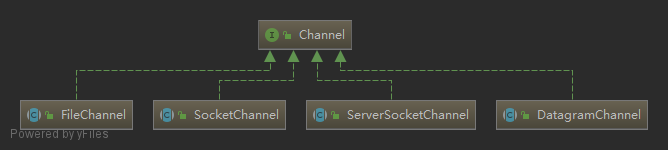
接下来我们继续了解NIO中又一个重要的概念——channel,channel的类图如下图所示,首先我们需要了解channel仅仅负责数据运输,所以channel必须配合buffer才能完成数据读写,这里我们简单介绍一下四个channel的区别:
- FileChannel:负责物理磁盘的文件读写。
- SocketChannel:负责网络数据的读写。
- ServerSocketChannel:负责TCP网络数据的读写。
- DatagramChannel:负责物理磁盘的文件读写。
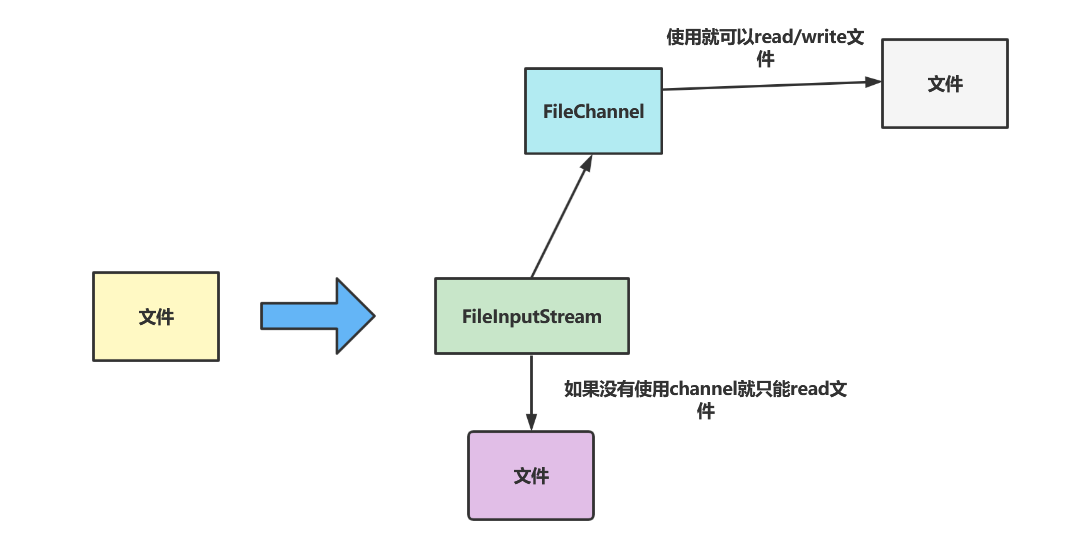
NIO通过channel模拟流操作的读写,与流不同的是,channel支持可以对stream进行读写操作。不像-常规IO流操作那样,inputStream只能做read操作。
我们不妨看一个fileChanel的示例,代码如下所示,可以看到使用channel之后IO读写方便了许多,只需完成以下几步即可完成文件的读写:
- 获取输入流的channel
- 获取输出流的channel
- 创建一个缓冲区buffer
- 从输入流的channel中读取数据到buffer
- 将buffer数据写到输出流的channel对应的文件中
- 关闭资源
public static void main(String[] args) throws Exception {
        //获取文件输入流
        File file = new File("in.txt");


        //从文件输入流获取通道
        FileInputStream inputStream = new FileInputStream(file);
        FileChannel inputStreamChannel = inputStream.getChannel();


        //获取文件输出流
        FileOutputStream outputStream = new FileOutputStream(new File("out.txt"));
        //从文件输出流获取通道
        FileChannel outputStreamChannel = outputStream.getChannel();


        //创建一个byteBuffer,小文件所以就直接一次读取,不分多次循环了
        ByteBuffer byteBuffer = ByteBuffer.allocate((int)file.length());

        //把输入流通道的数据读取到缓冲区
        inputStreamChannel.read(byteBuffer);


        //切换成写模式
        byteBuffer.flip();


        //把数据从缓冲区写入到输出流通道
        outputStreamChannel.write(byteBuffer);

        //关闭通道
        outputStream.close();
        inputStream.close();
        outputStreamChannel.close();
        inputStreamChannel.close();
    }
2
3
4
5
6
7
8
9
10
11
12
13
14
15
16
17
18
19
20
21
22
23
24
25
26
27
28
29
30
31
32
33
34
35
36
同理socketChannel示例使用步骤也是差不多的,代码如下所示,也是参考下面几步:
- 创建channel
- 和监听地址绑定
- 监听channel
- 获取客户端传输的结果
- 输出
- 完成后关闭channel
代码如下所示:
public static void main(String[] args) throws Exception {
        //获取ServerSocketChannel
        ServerSocketChannel serverSocketChannel = ServerSocketChannel.open();
        InetSocketAddress address = new InetSocketAddress("127.0.0.1", 6666);

        //绑定地址,端口号
        serverSocketChannel.bind(address);

        //创建一个缓冲区
        ByteBuffer byteBuffer = ByteBuffer.allocate(1024);

        while (true) {
            //获取SocketChannel
            SocketChannel socketChannel = serverSocketChannel.accept();

            while (socketChannel.read(byteBuffer) != -1){
                //打印结果
                System.out.println(new String(byteBuffer.array()));
                //清空缓冲区
                byteBuffer.clear();
            }
        }
    }
2
3
4
5
6
7
8
9
10
11
12
13
14
15
16
17
18
19
20
21
22
23
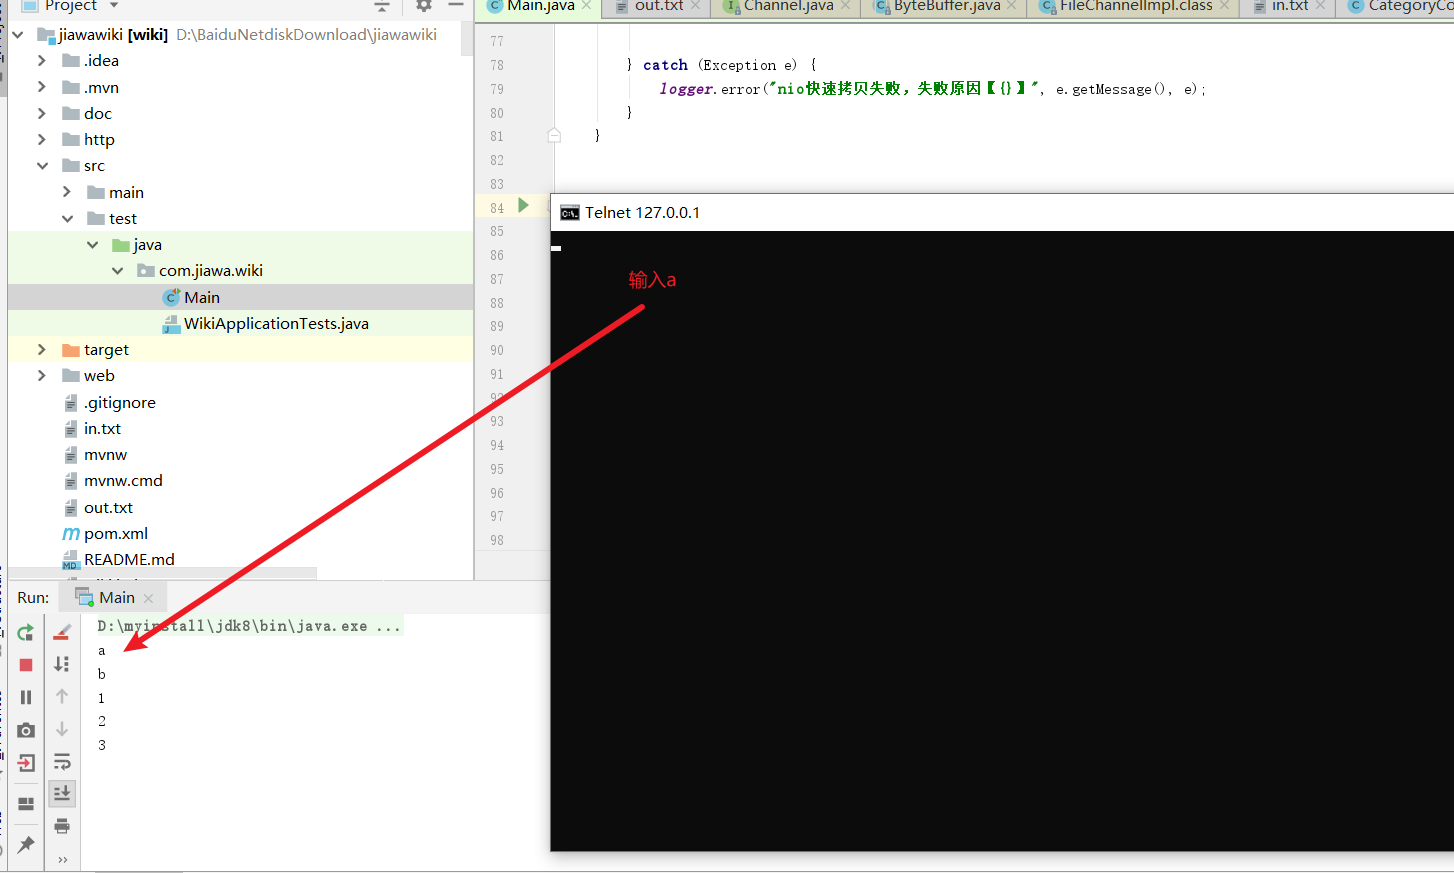
我们可以通过telnet进入命令界面,最终我们在黑色界面输入什么内容,IDEA控制台就会输出什么内容。
telnet 127.0.0.1 6666
我们调试的结果就如下图所示
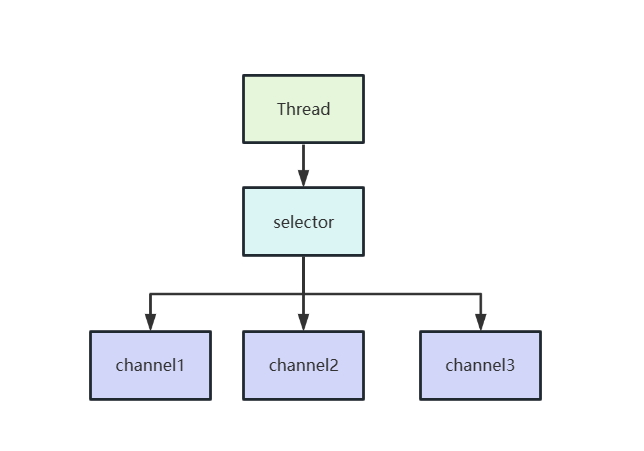
# 选择器
有时候我们会叫他IO多路复用器,如下图,它的存在使得我们可以通过一个线程,监听多个管道(channel)以此达到最小开销最大化IO复用的目的。
选择器中还有一个SelectionKey的概念,通过SelectionKey我们即可知道当前channel收到的处理事件是什么:
- 一个channel成功连接到另一个服务器称为”连接就绪“,
SelectionKey.OP_CONNECT - 一个server socket channel准备号接收新进入的连接称为”接收就绪“。
SelectionKey.OP_ACCEPT - 一个有数据可读的通道可以说是”读就绪“。
SelectionKey.OP_READ - 一个等待写数据的通道可以说是”写就绪“。
SelectionKey.OP_WRITE
# 综合示例
了解了这么多的概念之后,我们不妨来一个综合的网络NIO的示例进行一下总结,首先我们先写一个nio的服务端代码,逻辑很简单,创建一个选择器监听连接请求,监听到了注册一个读请求,然后读取数据。
public class NioServer {
    private static Logger logger = LoggerFactory.getLogger(NioServer.class);

    public static void main(String[] args) {
        try {
            //打开选择器
            Selector selector = Selector.open();
            //打开socket管道,管道中注册连接就绪的事件,后续就会监听处理接收就绪事件
            ServerSocketChannel channel = ServerSocketChannel.open();
            channel.configureBlocking(false);
            channel.register(selector, SelectionKey.OP_ACCEPT);

            //获取管道中对应的socket将其和我们的ip 端口绑定
            ServerSocket socket = channel.socket();
            InetSocketAddress address = new InetSocketAddress("127.0.0.1", 8888);
            socket.bind(address);


            while (true) {
                //监听选择器注册的事件
                selector.select();

                //获取选择器得到的键集
                Set<SelectionKey> keys = selector.selectedKeys();
                Iterator<SelectionKey> iterator = keys.iterator();

                //遍历轮处理这些键集
                while (iterator.hasNext()) {
                    SelectionKey key = iterator.next();

                    //测试该key是否准备处理新的socket连接,即处理我们的注册的OP_ACCEPT
                    if (key.isAcceptable()) {

                        //将OP_ACCEPT得到的管道注册一个OP_READ,处理客户端输入的数据
                        ServerSocketChannel serverSocketChannel = (ServerSocketChannel) key.channel();
                        SocketChannel socketChannel = serverSocketChannel.accept();

                        socketChannel.configureBlocking(false);
                        socketChannel.register(selector, SelectionKey.OP_READ);
                    } else if (key.isReadable()) {//处理读事件
                        SocketChannel readChannel = (SocketChannel) key.channel();
                        //从管道中读取并输出
                        logger.info(readDataFromSocketChannel(readChannel));
                        //休眠一会看到输出结果
                        TimeUnit.MINUTES.sleep(1);
                        socket.close();
                    }
                    iterator.remove();
                }
            }
        } catch (IOException | InterruptedException e) {
            logger.info("套接字nio服务端运行失败,失败原因:[{}]", e.getMessage(), e);
        }
    }


    private static String readDataFromSocketChannel(SocketChannel socketChannel) throws IOException {
        ByteBuffer byteBuffer = ByteBuffer.allocate(1024);
        StringBuilder sb = new StringBuilder();


        while (true) {
            byteBuffer.clear();

            //读取数据到缓冲区
            int r = socketChannel.read(byteBuffer);

            if (r == -1) {
                break;
            }

            //切换为写模式
            byteBuffer.flip();
            //获取缓冲区长度
            int limit = byteBuffer.limit();
            char[] dst = new char[limit];
            //将缓冲区数据写到char数组
            for (int i = 0; i < limit; i++) {
                dst[i] = (char) byteBuffer.get(i);
            }

            sb.append(dst);
        }
        //返回读取结果
        return sb.toString();
    }
}
2
3
4
5
6
7
8
9
10
11
12
13
14
15
16
17
18
19
20
21
22
23
24
25
26
27
28
29
30
31
32
33
34
35
36
37
38
39
40
41
42
43
44
45
46
47
48
49
50
51
52
53
54
55
56
57
58
59
60
61
62
63
64
65
66
67
68
69
70
71
72
73
74
75
76
77
78
79
80
81
82
83
84
85
86
87
客户端代码也很简单,发送一个hell world给服务端即可。
public class NIOClient {

    public static void main(String[] args) throws IOException {
        Socket socket = new Socket("127.0.0.1", 8888);
        OutputStream out = socket.getOutputStream();
        String s = "hello world";
        out.write(s.getBytes());
        out.close();
    }
}
2
3
4
5
6
7
8
9
10
11
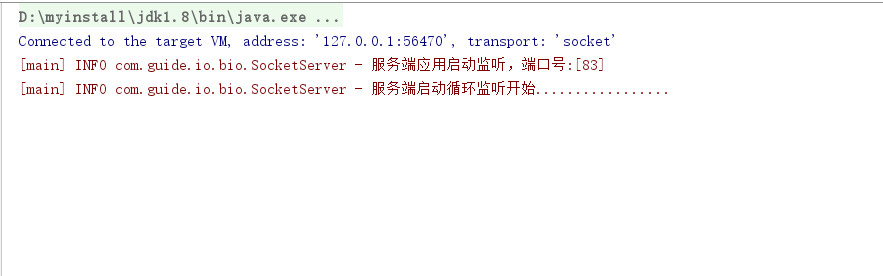
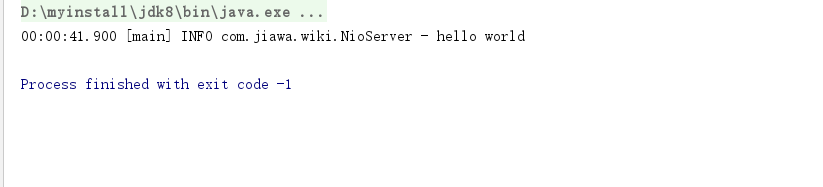
完成后我们先开启服务端,然后开启客户端,即可输出下面这段结果
# 关于NIO 多路复用详解
可以参考笔者写的这篇文章
Java进阶NIO之IO多路复用详解 (opens new window)
# AIO
# 异步IO
上述几种模型都是阻塞式同步IO、非阻塞式同步IO、多路复用IO,都属于操作系统同步IO级别,即必须主动询问操作系统IO资源是否准备完毕,若没完毕就会被阻塞。 而AIO采用订阅-通知模式,即向操作系统注册监听,然后就可以处理自己的事情。当操作系统发生IO事件,通过主动通知应用程序,触发应用程序某个回调函数即可完成IO操作。

# Java AIO框架简析
和同步IO一样,AIO也需要操作系统支持,windows系统内核是基于一种IOCP技术:IOCP(I/O Completion Port,I/O完成端口);
而Linux则是通过epoll模拟实现异步IO的。
# 代码示例
启动入口,可以看到我们的程序向异步通道注册监听
/**
 * aio服务端基础示例
 */
public class SocketServer {
    private static final Object lock = new Object();


    private static Logger logger = LoggerFactory.getLogger(SocketServer.class);

    public static void main(String[] args) {

        try {
            // 获取异步IO通道
            ExecutorService threadPool = Executors.newFixedThreadPool(20);
            AsynchronousChannelGroup group = AsynchronousChannelGroup.withThreadPool(threadPool);
            AsynchronousServerSocketChannel socketChannel = AsynchronousServerSocketChannel.open(group);

            //注册监听,当有事件发生时通知ServerSocketChannelHandle处理
            socketChannel.bind(new InetSocketAddress("127.0.0.1", 83));
            socketChannel.accept(null, new ServerSocketChannelHandle(socketChannel));
            synchronized (lock) {
                lock.wait();
            }
        } catch (Exception e) {
            logger.error("aio服务端启动失败,失败原因:[{}]", e.getMessage(), e);
        }
    }
}
2
3
4
5
6
7
8
9
10
11
12
13
14
15
16
17
18
19
20
21
22
23
24
25
26
27
28
处理类,该类做的事很简单,收到请求交给下一个回调处理器
public class ServerSocketChannelHandle implements CompletionHandler<AsynchronousSocketChannel, Void> {

    private static Logger logger = LoggerFactory.getLogger(ServerSocketChannelHandle.class);

    private AsynchronousServerSocketChannel socketChannel;


    public ServerSocketChannelHandle(AsynchronousServerSocketChannel socketChannel) {
        this.socketChannel = socketChannel;
    }


    @Override
    public void completed(AsynchronousSocketChannel socketChannel, Void attachment) {
        //每次都要重新注册监听(一次注册,一次响应),但是由于“文件状态标示符”是独享的,所以不需要担心有“漏掉的”事件
        this.socketChannel.accept(attachment, this);

        ByteBuffer buffer=ByteBuffer.allocate(50);
        //将读取到长度和缓存 buffer对象给下一个回调SocketChannelReadHandle
        socketChannel.read(buffer,new StringBuffer(),new SocketChannelReadHandle(socketChannel,buffer));
    }

    @Override
    public void failed(Throwable exc, Void attachment) {

    }
}
2
3
4
5
6
7
8
9
10
11
12
13
14
15
16
17
18
19
20
21
22
23
24
25
26
27
28
读取数据
import java.io.IOException;
import java.io.UnsupportedEncodingException;
import java.nio.ByteBuffer;
import java.nio.channels.AsynchronousSocketChannel;
import java.nio.channels.CompletionHandler;

public class SocketChannelReadHandle implements CompletionHandler<Integer, StringBuffer> {


    private static Logger logger = LoggerFactory.getLogger(SocketChannelReadHandle.class);


    private AsynchronousSocketChannel socketChannel;

    private ByteBuffer byteBuffer;


    public SocketChannelReadHandle(AsynchronousSocketChannel socketChannel, ByteBuffer buffer) {
        this.socketChannel = socketChannel;
        this.byteBuffer = buffer;
    }

    @Override
    public void completed(Integer result, StringBuffer historyMsg) {
        if (result == -1) {
            try {
                this.socketChannel.close();
            } catch (IOException e) {
                logger.error("通道关闭失败,失败原因:[{}]", e.getMessage(), e);
            }

            return;
        }

        logger.info("开始进行数据读取..............");
        this.byteBuffer.flip();
        /*
         * 实际上,由于我们从Integer result知道了本次channel从操作系统获取数据总长度
         * 所以实际上,我们不需要切换成“读模式”的,但是为了保证编码的规范性,还是建议进行切换。
         *
         * 另外,无论是JAVA AIO框架还是JAVA NIO框架,都会出现“buffer的总容量”小于“当前从操作系统获取到的总数据量”,
         * 但区别是,JAVA AIO框架中,我们不需要专门考虑处理这样的情况,因为JAVA AIO框架已经帮我们做了处理(做成了多次通知)
         * */
        byte[] bytes = new byte[byteBuffer.limit()];
        this.byteBuffer.get(bytes, byteBuffer.position(), result);

        try {
            historyMsg.append(new String(bytes, 0, result, "UTF-8"));
        } catch (UnsupportedEncodingException e) {
            logger.error("数据读取失败,失败原因:[{}]", e.getMessage(), e);
        }


        logger.info("读取到的数据为:[{}]", historyMsg.toString());

        if (historyMsg.indexOf("over") != -1) {
            return;
        }

        historyMsg = new StringBuffer();

        this.socketChannel.read(this.byteBuffer, historyMsg, this);


    }

    @Override
    public void failed(Throwable exc, StringBuffer attachment) {

    }
}
2
3
4
5
6
7
8
9
10
11
12
13
14
15
16
17
18
19
20
21
22
23
24
25
26
27
28
29
30
31
32
33
34
35
36
37
38
39
40
41
42
43
44
45
46
47
48
49
50
51
52
53
54
55
56
57
58
59
60
61
62
63
64
65
66
67
68
69
70
71
客户端实现
public class Client {
    public static void main(String[] args) throws Exception {
        Socket socket = new Socket("127.0.0.1", 83);
        OutputStream out = socket.getOutputStream();
        String s = "hello world over";
        out.write(s.getBytes());
        out.close();
    }
}
2
3
4
5
6
7
8
9
10
# 参考文献
Java IO - BIO 详解 (opens new window)
Java NIO - 基础详解 (opens new window)
MappedByteBuffer介绍及详细解读(java操作大文件多种方法) (opens new window)
Java AIO - 异步IO详解 (opens new window)
